
Outdoor Floodlight Camera Wiring Installation: Box Check
Key Takeaways
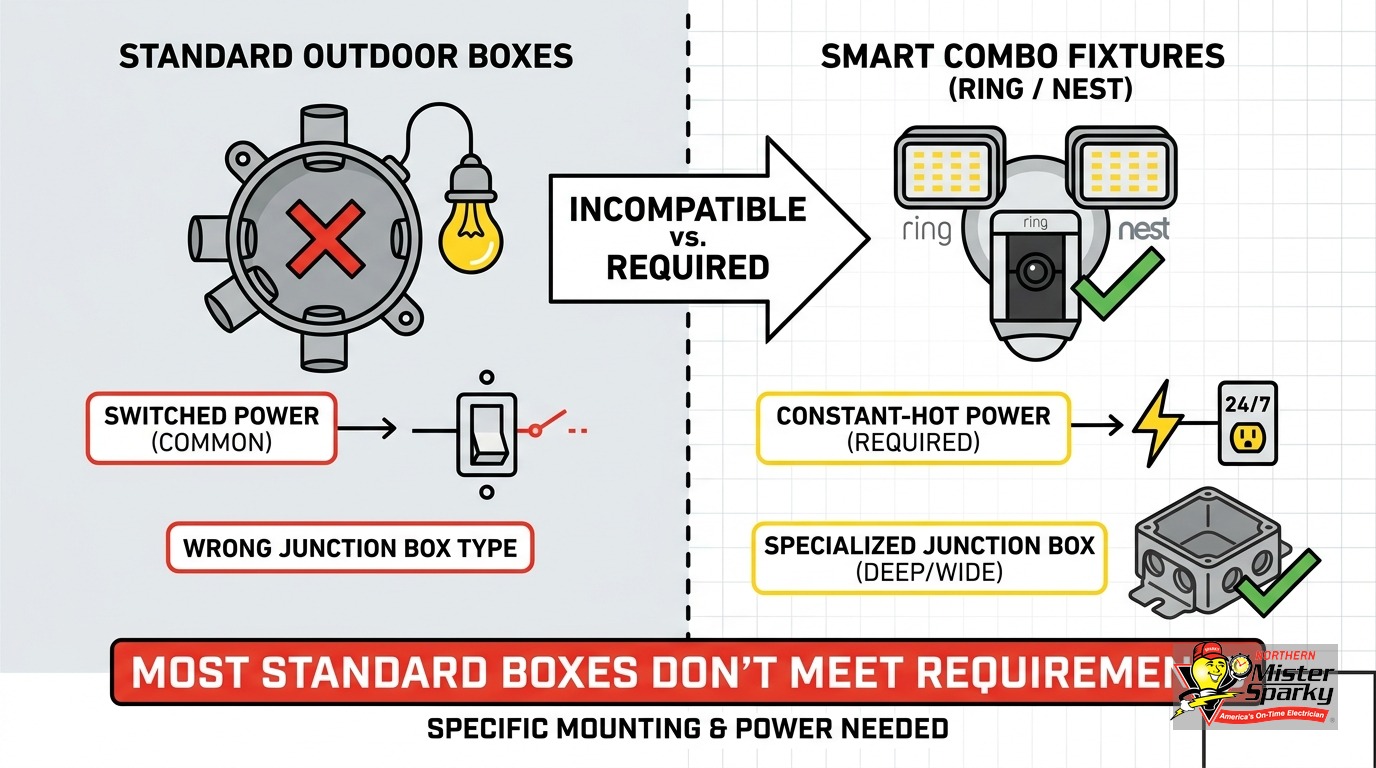
- Smart floodlight cameras require a 4-inch round, UL-listed weatherproof junction box. Most standard outdoor boxes are smaller or the wrong shape.
- The Nest Cam with Floodlight cannot be installed without a neutral wire at the fixture. Homes built before roughly 1985 commonly have switch-leg circuits at outdoor fixture locations, which do not include a true neutral.
- Smart cameras need continuous power. A switch-controlled circuit takes the camera offline every time someone flips the wall switch.
- Minnesota adopted the 2026 NEC effective August 17, 2026. Any new circuit work must comply with the current code.
- Minneapolis and St. Paul homeowners cannot use the state DLI permit portal. Both cities operate their own permit offices.
- If your box or circuit fails any of these checks, a licensed electrician is the correct next step, not a longer installation video.
Does Your Existing Outdoor Box Meet the Requirements for a Smart Floodlight Camera?
Probably not. Smart floodlight cameras require a 4-inch round, UL-listed weatherproof box. Most outdoor fixtures in older Twin Cities homes are mounted to smaller round or octagon boxes. If your box is not 4-inch round and weatherproof-rated, it needs to be replaced before the camera goes up - no exceptions.
Ring’s Floodlight Cam Wired Plus and Pro requires a 4-inch round, UL-listed weatherproof electrical box. The device base is 5 inches wide. A standard 1.5-inch “handy box” or a common 3.5-inch octagon will not seat the mounting bracket correctly, regardless of which screw bag set you choose. That half-inch gap between a 3.5-inch and a 4-inch box is not workable. Forcing the bracket creates an opening between the camera housing and the box face, which defeats the weatherproofing and leaves conductors exposed to moisture and Minnesota’s freeze-thaw cycles.
What a qualifying box looks like:
- 4-inch round (not square, not octagon)
- UL-listed
- Rated for damp or wet locations
- Anchored securely to framing, not just the exterior siding
If your existing box does not meet those criteria, it needs to come out. That is not a suggestion.
A note on the screw bag sets
Ring includes multiple screw bag sets - labeled A, B, and C - specifically because recessed boxes are common in existing construction. The different sets handle varying box depths. But the form factor - 4-inch round - is non-negotiable regardless of depth. No screw configuration compensates for a box that is the wrong size or shape.
Replacing a box sounds straightforward. In practice, it can require cutting into soffit material, removing siding, or working inside a finished wall cavity, depending on how the original fixture was mounted. This is a job that compounds quickly once you pull the old box and see what is behind it.
What Is Switch-Leg Wiring, and Why Does It Block Most Smart Floodlight Camera Installs?
Switch-leg wiring is a wiring method where power goes to the fixture location first, and only a hot conductor runs down to the wall switch and back. There is no neutral wire at the fixture box. Smart cameras that require a neutral - including the Nest Cam with Floodlight - cannot be installed without new wire run to that location.
Here is how a switch-leg circuit works. Power enters at the fixture location. Two conductors run from that box down to the wall switch: one carries the line-voltage hot down, the other carries the switched-hot return back up. The white wire in that two-wire cable serves as the switched-hot return. It is not a neutral. Older installation practice required marking it with black tape to flag it as a live conductor, but in homes from the 1940s through the 1970s that marking may be missing, faded, or never applied in the first place.
The Nest Cam with Floodlight requires a neutral wire at the fixture. Google’s installation documentation is direct: “If there is no neutral wire, the Nest Cam Floodlight cannot be installed.” There is no adapter, no workaround, no capacitor trick. The camera’s electronics need a complete circuit to stay powered even when the floodlights are off. That requires both a hot and a true neutral, not a hot and a switched-hot return.
How to tell if you have a switch-leg circuit
Pull the existing fixture and look at what comes out of the box:
- One cable, two conductors plus a bare ground: almost certainly a switch-leg. You have a line-voltage hot and a switched-hot return. No neutral.
- One cable, three conductors plus a bare ground: you may have a neutral. Confirm with a non-contact voltage tester before touching anything.
- Two cables entering the box: power may be passing through to a second junction point, which sometimes means a neutral is present at the box. Still confirm with a tester.
Do not guess. A non-contact voltage tester costs less than a co-pay. If the white wire in the box is marked with black tape or has no white sheathing visible at all, treat it as a switched-hot until you verify otherwise.
Switch-leg wiring was standard practice in homes built before roughly 1985. In Minneapolis, St. Paul, Edina, Richfield, Hopkins, Columbia Heights, and most inner-ring suburbs, homes from the 1940-1985 era make up a large share of the housing stock. If your home falls in that range and the outdoor light has always been controlled by an indoor wall switch, assume switch-leg wiring at the fixture until a licensed electrician confirms otherwise. Do not assume otherwise because the white wire looks white.
What Is a Constant-Hot Circuit, and Why Do Smart Cameras Need One?
A constant-hot circuit stays live regardless of what any wall switch does. Smart cameras need this because they are always-on devices: motion monitoring, video streaming, and network connection do not stop when the lights go dark. A switched circuit cuts power every time someone flips the wall switch, which takes the camera offline and disrupts recordings.
This is a second problem that is separate from the neutral wire issue. Even if you confirm a neutral is present at the fixture, the circuit itself may still be switch-controlled. The hot goes dead when the switch goes off. The camera goes with it - and repeated power cycles over days and weeks can cause problems with firmware and cloud sync history.
The fix is running a constant-hot feed to the fixture location. That means pulling wire from a nearby junction box that is always live, or running wire back to the panel. Either path is new wiring work. New wiring work almost always requires a permit in Minnesota.
If you want to keep a wall switch for manual control of the floodlights, that is still possible. The camera takes the constant-hot feed and manages the light output through its app or its built-in motion sensor. The existing wall switch either gets capped off or gets replaced with a compatible smart switch that communicates with the camera. Your electrician will determine which approach works with your existing box configuration and your specific camera model.
This distinction - constant hot versus switch-controlled - does not appear in any of the top manufacturer install guides. Those guides assume the circuit is already set up correctly. In older Twin Cities homes, it usually is not, and figuring that out mid-install is not the moment you want to discover it.
Why Minnesota’s Climate Makes Weatherproofing Requirements Non-Negotiable
A non-weatherproof box installed in September may look fine through October. Minnesota winters find the weakness by February.
Under NEC 314.15, outdoor and damp-location junction boxes must be weatherproof: gasketed covers, sealed cable entries, and corrosion-resistant materials throughout. Water that seeps into a non-weatherproof box in November freezes, expands, and can crack conductors or loosen connections at terminal screws. By March, you may have more than a camera problem. You may have an arc fault behind your exterior siding, invisible until something fails or burns.
NEC 300.7 requires that raceways in freeze-thaw zones include expansion capability to prevent conductor damage from seasonal movement. Minnesota qualifies. If an electrician runs conduit from the panel to your floodlight camera location, the conduit and fittings need to accommodate temperature swings that can exceed 100 degrees Fahrenheit between January lows and August highs. This is not a formality - it is the reason improperly installed conduit cracks and allows moisture infiltration over time.
There is a second code requirement that frequently surprises homeowners. NEC 314.29 requires that junction boxes remain accessible without removing permanent building components. A box buried inside a sealed soffit, covered by siding, or recessed inside a wall cavity fails this requirement. If you cannot reach the box cover with your hands and a screwdriver, it is not code-compliant. This matters at inspection, during future service calls, and at resale when a buyer’s electrician pulls the report.
Do You Need a Permit for Outdoor Floodlight Camera Wiring Installation in the Twin Cities?
A true like-for-like fixture replacement may be exempt in some suburban jurisdictions. But replacing the box, adding constant-hot power where a switch-controlled leg existed, or running any new wire is permit-required work in virtually every Twin Cities jurisdiction. Minneapolis and St. Paul do not use the state DLI permit system - each city has its own permit office.
Minnesota adopted the 2026 NEC effective August 17, 2026. Any permit pulled on or after that date must comply with the current code. Licensing exams transitioned to the 2026 NEC on September 8, 2026. Work permitted before that date under the 2023 NEC is not required to be upgraded, but any new permit triggers the current standard.
Minneapolis and St. Paul are different from the suburbs
Those cities do not use the state DLI permit portal. A Minneapolis or St. Paul homeowner who searches for “Minnesota electrical permit” will land on the DLI website, which does not cover work in either city. Both cities run their own permit departments. Contact your city’s permit office directly before assuming the state system applies to your project.
Homeowner permits in the suburbs
Homeowner electrical permits are available through the state DLI at 651-284-5026, but only for owner-occupied single-family homes in jurisdictions that use the DLI system. Condos, townhomes, apartments, and rental properties require a licensed electrical contractor regardless of the scope of work. Rental property owners cannot pull a homeowner permit, period.
Even if you qualify for a homeowner permit, the permit process includes an inspection. Inspections protect you. They also matter for your homeowner’s insurance: an unpermitted wiring modification that precedes a fire or equipment failure can complicate a claim significantly.
Our post on electrical permits in Minnesota walks through the permit types and how to determine which one applies to your specific project.
When Is This a DIY Job, and When Should You Call an Electrician?
If your existing box is a 4-inch round weatherproof box, the circuit already has constant-hot power, and you confirm a neutral is present at the fixture, a confident homeowner can handle the swap. If any of that is not true, call a licensed electrician. The wiring complexity here is higher than most homeowners expect before they open the box.
DIY is reasonable when:
- The existing box is 4-inch round, weatherproof-rated, and anchored to framing
- You have confirmed (with a voltage tester, not a guess) that a neutral is present at the box
- The circuit is already constant-hot, not switch-controlled
- No new wire is required
Call an electrician when:
- The box is the wrong size, wrong shape, or not weatherproof
- You have switch-leg wiring with no neutral at the fixture
- The circuit is switch-controlled and the camera requires constant-hot power
- You find aluminum wiring, cloth-insulated wire, or unexpected splices inside the box
- You are in Minneapolis or St. Paul and uncertain about the permit requirement
- Anything in the box does not match what you expected when you opened it
Twin Cities homes built between 1940 and 1980 are most likely to need a licensed electrician for this job. That range covers most of south Minneapolis, Northeast Minneapolis, St. Paul’s established neighborhoods, Edina, Richfield, Robbinsdale, and Hopkins. If your home is in that age range, plan for a professional assessment before you commit to an install date or spend money on the camera.
Our post on outdoor GFCI outlet installation covers the GFCI protection rules that apply to outdoor circuits, including those that feed floodlight cameras. For planning other camera wiring projects around the house, our home security camera wiring installation guide walks through the circuit and routing decisions that apply across camera types and locations.
What the Outdoor Floodlight Camera Wiring Installation Actually Involves
When you hire a licensed electrician for this job, here is the typical scope of work:
- Remove the existing fixture and assess the box. The electrician checks box size, box mounting, wiring type, whether a neutral is present at the fixture, and whether the circuit is constant-hot or switch-controlled. This assessment determines everything that follows.
- Replace the box if needed. A 4-inch round, weatherproof box goes in, anchored to solid framing - not to siding or sheathing alone.
- Evaluate the circuit and run new wire if required. If the circuit is switch-leg with no neutral, a constant-hot feed comes from a nearby always-live source or from the panel. The electrician chooses the shortest code-compliant route, which may involve attic access, running conduit along the exterior, or opening a section of interior wall.
- Install the camera. With the box and circuit correct, mounting and wiring the camera itself is the quick part.
- Reconfigure or cap the wall switch. Depending on the camera model and your preference, the wall switch gets capped off or replaced with a compatible smart switch.
- Weatherproof all cable entries. Box gaskets, conduit fittings, and penetration fill all get sealed for Minnesota weather.
- Pull and close the permit where the project scope requires it.
A job where only the box needs replacement typically runs two to three hours. A job that requires running new wire from the panel takes longer, particularly in homes with finished walls and limited attic access. A good electrician gives you a clear scope and a straight price before starting - not after the wall is already open.
Schedule the Assessment Before You Order
Northern Mister Sparky is locally owned and operated in the Twin Cities. We handle outdoor floodlight camera wiring installation across Minneapolis, St. Paul, Bloomington, Brooklyn Park, Woodbury, Blaine, Maple Grove, Plymouth, and the surrounding metro. We show up when we say we will - that is the America’s On-Time Electrician(R) promise - and every job is backed by the UWIN(R) 100% satisfaction guarantee.
If you are not sure whether your existing box and circuit can support the camera you are planning to buy, call us before you order. Knowing what you are working with saves everyone time and avoids a second trip. Call 763-200-5956 or book through our outdoor lighting page. We will give you a straight answer, no malarky.
Frequently Asked Questions
Do I need a permit for outdoor floodlight camera wiring installation in Minnesota? +
Why won't the Nest Cam with Floodlight work with my existing outdoor wiring? +
What size junction box does a Ring Floodlight Cam Wired require? +
Need an electrician now?