
Install a 240V Outlet for a Dryer or Electric Range
Key Takeaways
- A dryer needs a dedicated 30-amp, 240V circuit with a NEMA 14-30R outlet and 10 AWG wire.
- An electric range needs a dedicated 40- to 50-amp, 240V circuit with a NEMA 14-50R outlet and 8 or 6 AWG wire.
- These outlets are not interchangeable. The pin layouts differ. Plugs cannot be swapped.
- Before any wiring, confirm your panel has the capacity. Many older Twin Cities homes run 100-amp service. Adding two large appliances may require a panel upgrade first.
- Minnesota requires a permit for all new circuit work. A licensed electrician must pull it in most cases.
- Xcel Energy offers up to $1,500 for qualifying panel upgrades. Most homeowners do not know this rebate exists.
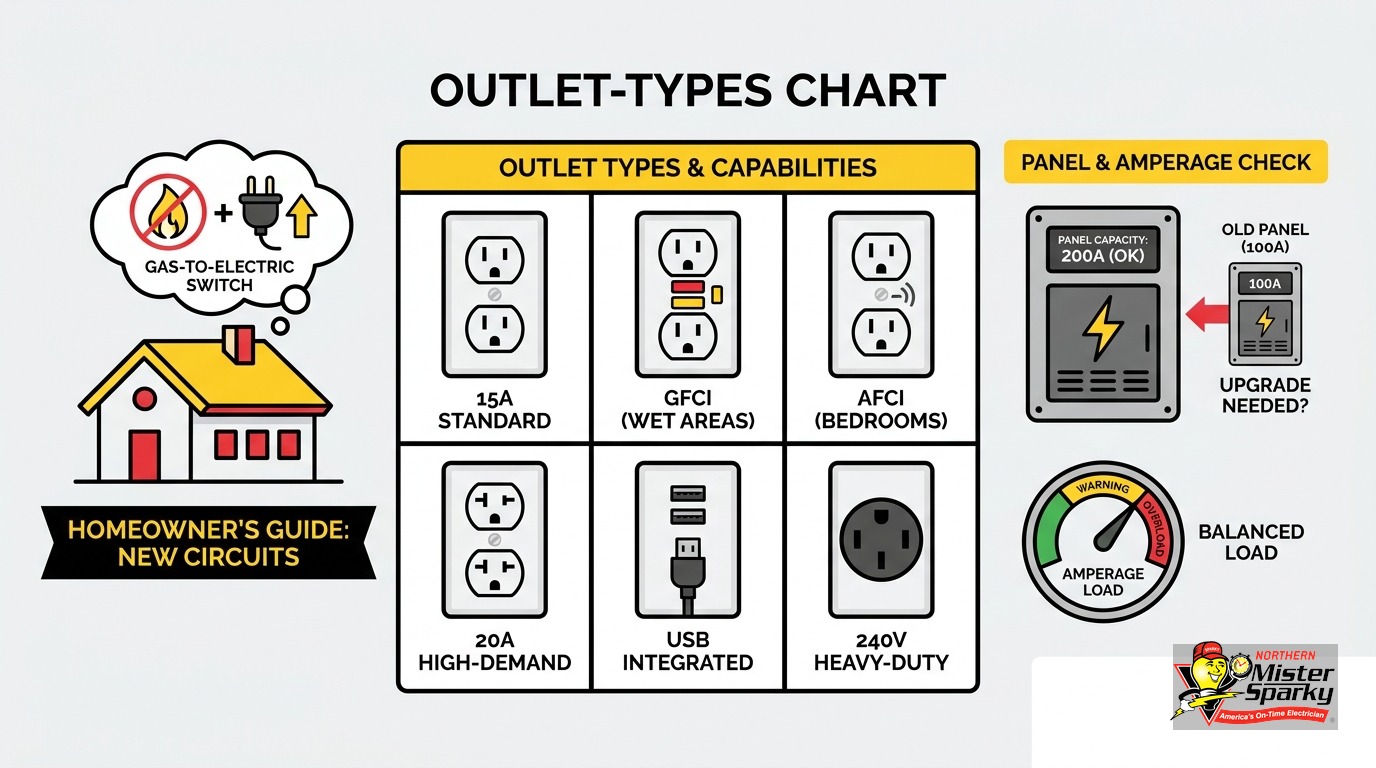
More Twin Cities homeowners are switching from gas appliances to electric ones. New dryers and ranges deliver reliable performance without a gas line. The catch: your home almost certainly does not have the circuit those appliances require. This post walks through how to install a 240v outlet for a dryer or electric range - and why the real first step has nothing to do with the outlet itself.
Why This Job Starts at Your Electrical Panel, Not the Outlet
Most guides start with the outlet: what receptacle type, what wire gauge, what breaker size. That approach works if you are replacing an existing 240V circuit. Swapping a three-prong dryer outlet for a four-prong one, for example. The circuit is already there.
Converting from gas to electric is different. You are not replacing a circuit. You are adding one - or two - that have never existed in your home. The first question is whether your panel can handle the additional load.
Open your panel. Find the main breaker handle. That number - 100, 150, or 200 - is your total service ampacity. Count the open double-pole slots. Those are the only spaces available for large new circuits. If the slots are taken, or if the panel’s remaining capacity cannot absorb 30 to 50 new amps, the upgrade comes before the outlet.
Most online guides skip this because they are written for DIYers who already have an open slot waiting. Gas-to-electric conversions in older Twin Cities homes rarely do.
What Is a 240V Circuit?
A 240-volt circuit uses two hot legs from your panel to deliver twice the voltage of a standard outlet. It runs from the panel to a single dedicated receptacle, with no other loads on the line.
Standard 120V circuits handle 15 or 20 amps. A dryer pulling 30 amps or a range pulling 50 amps would trip a standard circuit before finishing a single cycle. Dedicated circuits for large appliances are a code requirement, not a preference. Sharing a 240V circuit creates heat buildup in the wiring and can cause persistent tripping or worse.
240V circuits use a double-pole breaker - two adjacent slots in your panel linked by a single handle. When either leg overloads, both sides trip together. That paired design is what keeps high-draw appliance circuits safe when the breaker does its job.
The National Electrical Code requires dryers and ranges to each run on their own dedicated circuit with no shared outlets or taps. No exceptions.
Can Your Panel Handle a New 240V Circuit?
A panel can support a new 240V circuit if it has open double-pole slots and enough ampacity remaining after a load calculation. In older Twin Cities homes converting from gas, one or both conditions are often not met.
A load calculation totals the demand from every circuit in your home and determines how much headroom remains. A licensed electrician runs this calculation before applying for a permit. If the result shows the panel is at or near its limit, a panel upgrade is the prerequisite - not an option.
Signs a panel is already strained: breakers tripping under normal load, lights dimming when large appliances start up, or a panel that is more than 25 years old and has never been upgraded. These are signals worth flagging before any new circuit work begins.
A 200-amp panel with several open slots makes adding a single new circuit straightforward. A 100-amp panel in a pre-1990 home needs a load calculation before you order any appliances. The panel sets the ceiling on what circuits can be added.
Dryer vs. Range: Two Different Circuits
“240V” describes the voltage. It does not tell you the breaker size, wire gauge, or outlet type. Those differ between a clothes dryer and an electric range, and the specifications are not interchangeable.
- Breaker: 30-amp double-pole
- Wire: 10 AWG copper
- Outlet: NEMA 14-30R (4-prong, 30A)
- Dedicated circuit: required; nothing else on this line
Electric range or cooktop circuit:
- Breaker: 40- to 50-amp double-pole
- Wire: 8 AWG at 40A, or 6 AWG at 50A
- Outlet: NEMA 14-50R (4-prong, 50A)
- Dedicated circuit: required; nothing else on this line
Running a range on 10 AWG wire is a fire hazard. The wire heats past its rated temperature before the breaker trips. Using undersized wire or a smaller outlet to cut costs creates real danger. These specifications exist because the appliance loads demand them.
If you are adding both a dryer and a range, you are adding two separate circuits. Each gets its own breaker, its own wire run, and its own outlet.
Which NEMA Outlet Do You Need?
NEMA 14-30R is the dryer outlet, rated 30 amps. NEMA 14-50R is the range outlet, rated 50 amps. Their pin configurations are physically different, so the wrong plug will not seat in the wrong outlet.
NEMA outlet standards specify voltage, amperage, and pin layout. Both types use four prongs - two hots, a neutral, and a ground - but the pin shape and spacing differ between the 14-30R and 14-50R. A dryer cord cannot plug into a range outlet, and a range cord cannot plug into a dryer outlet.
Before your electrician orders materials, confirm what plug comes on your appliance. Most modern dryers ship with a NEMA 14-30 cord. Most ranges ship with a NEMA 14-50 cord. Some ranges ship without a cord; you supply one at installation. Check the manual or call the retailer before the service appointment.
One practical note: the NEMA 14-50R outlet also serves Level 2 EV charging. If your garage is nearby and an EV is in the future, it may be worth planning that circuit alongside the range circuit in a single visit rather than two separate jobs.
Does Minnesota Require a Permit for This Work?
Yes. Adding a new 240V circuit in Minnesota requires an electrical permit. The minimum fee is $55, with a typical total around $110 when two inspections are included. There is no permit-optional path for a licensed contractor.
Two inspections are built into the process. The rough-in inspection happens before walls close - the inspector reviews the wire run, breaker installation, and connection points before anything gets covered. The final inspection confirms the completed circuit is safe before the outlet goes into use.
Permits protect you in concrete ways. A home inspector will flag unpermitted electrical work during a sale. Your homeowner’s insurer may deny a claim if the cause of loss traces to unpermitted wiring. And inspection is the only objective confirmation that the work meets current code before your family uses the outlet.
Our guide to electrical permits in Minnesota walks through the full application and inspection process in detail.
Who Can Legally Do This Work in Minnesota?
Minnesota requires licensed, bonded, and insured electrical contractors for nearly all residential electrical work. The homeowner exception allows self-performed work only on a homesteaded, owner-occupied single-family home where the owner personally performs every task.
Condos, apartments, townhomes governed by an HOA, mobile homes, and rental units are all excluded from the homeowner exception. The exception also disappears if you hire any other person to assist - licensed or not. If someone else does any part of the work, a licensed electrician must pull the permit.
In practice, the vast majority of homeowners calling for a quote on this type of job want a licensed electrician to handle it. The electrician files the permit application. The inspector reviews the work at two stages. The homeowner ends up with a code-compliant circuit and documented inspections on record.
That is the no-malarky version of how the process actually works in Minnesota.
Converting from Gas to Electric: Will Your Panel Keep Up?
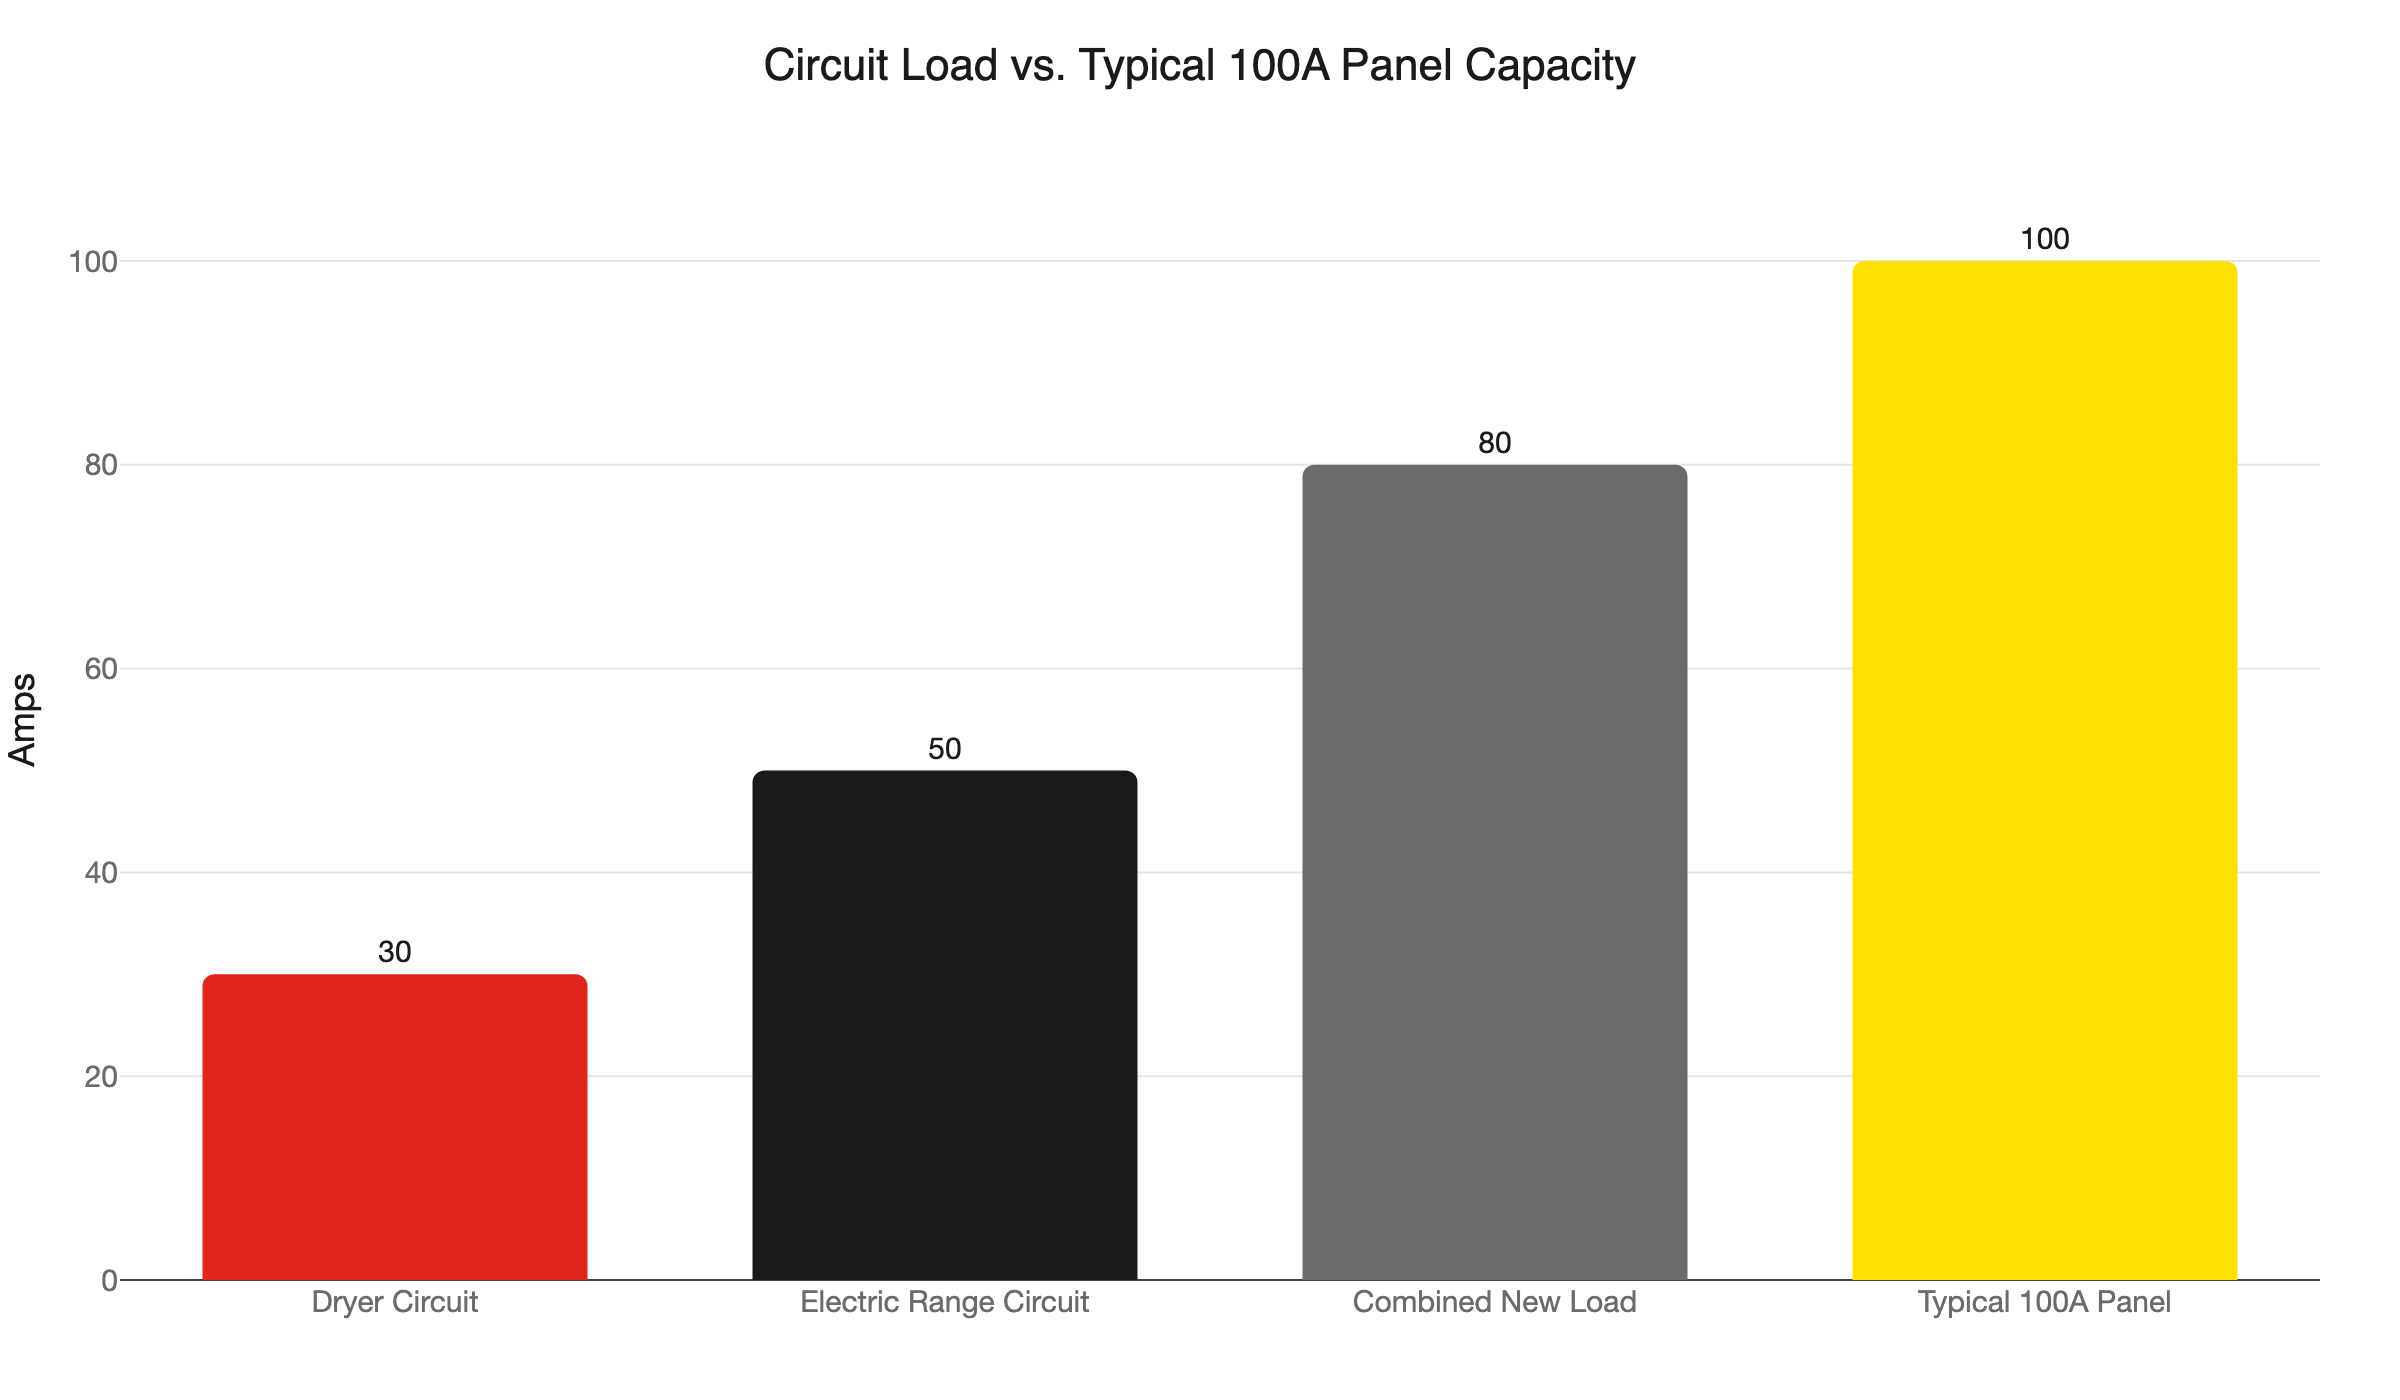
Switching both a gas dryer and a gas range to electric adds up to 80 amps of new demand on your panel. A dryer circuit draws 30 amps and a range circuit draws up to 50 amps. Many pre-1990 Twin Cities homes have 100-amp service, and that math often does not work without a service upgrade.
Here is what that looks like in practice. Your panel is already serving your lights, refrigerator, dishwasher, water heater, HVAC blower motor, and every other circuit in the home. That existing load leaves some headroom in a 100-amp panel - but not 80 amps of it.
Pre-1990 homes in Minneapolis, St. Paul, Bloomington, and the surrounding suburbs were sized for a different appliance era. Gas dryers and ranges needed only a small 120V circuit for ignition and controls. Replacing them with electric equivalents multiplies the electrical demand sharply. A 100-amp panel in that condition often cannot absorb two new large circuits without a service upgrade first.
When capacity is the limiting factor, upgrading to 200-amp service is not an add-on - it is the prerequisite. And that is precisely the scenario the Xcel Energy rebate was designed to address.
Worth considering before you scope the upgrade: do not size for today’s load only. If a Level 2 EV charger, a heat pump water heater, or a whole-home heat pump is in your five-year plan, design the upgrade for that future load now. One service upgrade is far less disruptive than two.
What About the Xcel Energy Panel Upgrade Rebate?
Xcel Energy offers up to $1,500 when Twin Cities residential customers upgrade to a higher-amperage panel. Most articles on 240V outlet installation never mention it. If a gas-to-electric conversion is triggering an upgrade, that rebate is real money sitting on the table.
Here is what qualifies and what does not:
- Who qualifies: Xcel Energy residential customers in single-family homes or small multi-unit buildings of up to four units.
- What qualifies: A genuine capacity upgrade - moving from 100-amp to 200-amp service, for example. Replacing a failed panel at the same amperage does not qualify.
- How to claim it: Complete the work with a licensed electrician, obtain permit approval, then submit your permit approval and invoice to Xcel Energy. Rebates typically process in 6 to 8 weeks.
On the federal side: the Section 25C tax credit for panel upgrades expired December 31, 2025. Work completed in 2025 can still be claimed on the 2025 tax return. For 2026 projects, there is currently no federal credit available.
Confirm your Xcel account eligibility before work begins. Your electrician can help document the work correctly for the rebate application.
A Note on Minnesota’s NEC Code Transition
Minnesota adopted the 2026 National Electrical Code, with an effective date of August 3, 2026. That date is close, and the timing of your permit matters.
Permits filed before August 3, 2026 must comply with the 2023 NEC. Permits filed on or after that date must comply with the 2026 NEC. The two editions have differences in circuit protection requirements, outlet specifications, and installation methods. Your electrician works to whichever code applies to your permit date.
If your project is already in motion, confirm with your electrician when the permit will be filed. Code version can affect the scope of work and what the inspector reviews. This is a live transition happening right now - not a future consideration.
What to Expect When You Call Northern Mister Sparky
We are locally owned and operated in the Twin Cities, and our team handles this type of circuit work regularly. Here is what a typical installation looks like from first call to final inspection:
Step 1 - Phone or online estimate. We ask about the appliance type, its intended location, and your current panel. A quick conversation flags anything obvious before we schedule a truck.
Step 2 - On-site assessment. Our electrician opens the panel, counts available double-pole slots, reviews existing circuits, and measures the run from the panel to where the outlet needs to land.
Step 3 - Load calculation. Before the permit is filed, we total your current demand and confirm headroom for the new circuit. If the panel cannot support it, we have that conversation directly and quote both the circuit and any necessary upgrade together.
Step 4 - Permit application. We file with the Minnesota Department of Labor and Industry. You do not need to navigate the permit process on your own.
Step 5 - Rough-in work. Circuit run, breaker installed, wire secured to code. Walls stay open for the rough-in inspection.
Step 6 - Rough-in inspection. The state inspector reviews the installation before anything is covered.
Step 7 - Final installation. Outlet installed, connections verified, panel labeled.
Step 8 - Final inspection. The inspector signs off. The circuit is live, legal, and documented.
Most jobs span one to two scheduled visits, built around the inspection calendar. Our outlet installation service covers the full scope from load calculation through final sign-off.
Northern Mister Sparky backs every job with the UWIN(R) 100% satisfaction guarantee. As America’s On-Time Electrician(R), we show up when we say we will and we do not leave until the job is right.
Call 763-200-5956 or book online to schedule your estimate. We serve Minneapolis, St. Paul, Bloomington, Brooklyn Park, Woodbury, Blaine, Maple Grove, Plymouth, and the surrounding Twin Cities metro.
Frequently Asked Questions
Can I install a 240V outlet myself in Minnesota? +
What size breaker does a dryer need? +
Is there financial help for a panel upgrade in Minnesota? +
What is the difference between a NEMA 14-30R and a NEMA 14-50R outlet? +
Need an electrician now?