
Ceiling Fan Vaulted Ceiling Installation: Start With the Box
Key Takeaways
- The outlet box in your vaulted ceiling is almost certainly a light-fixture box. It cannot legally support a ceiling fan without replacement.
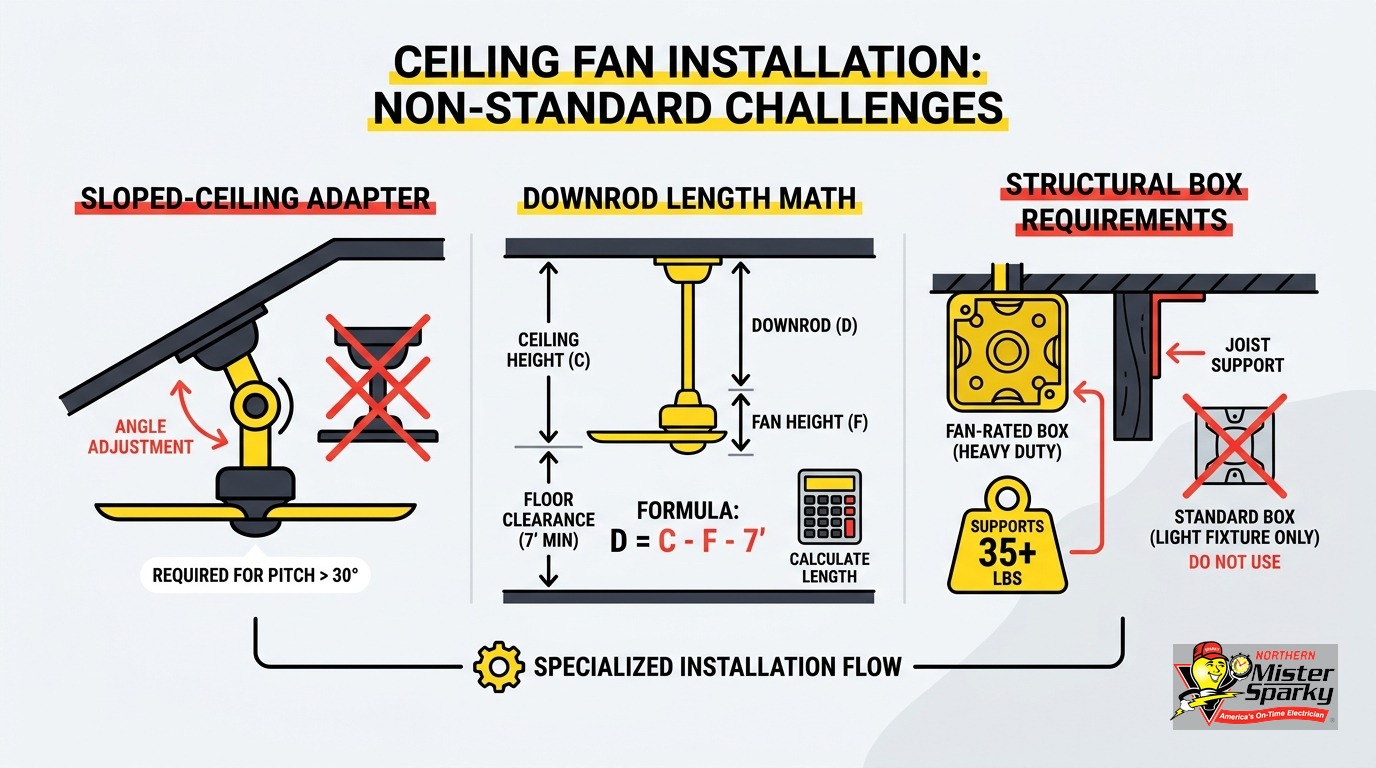
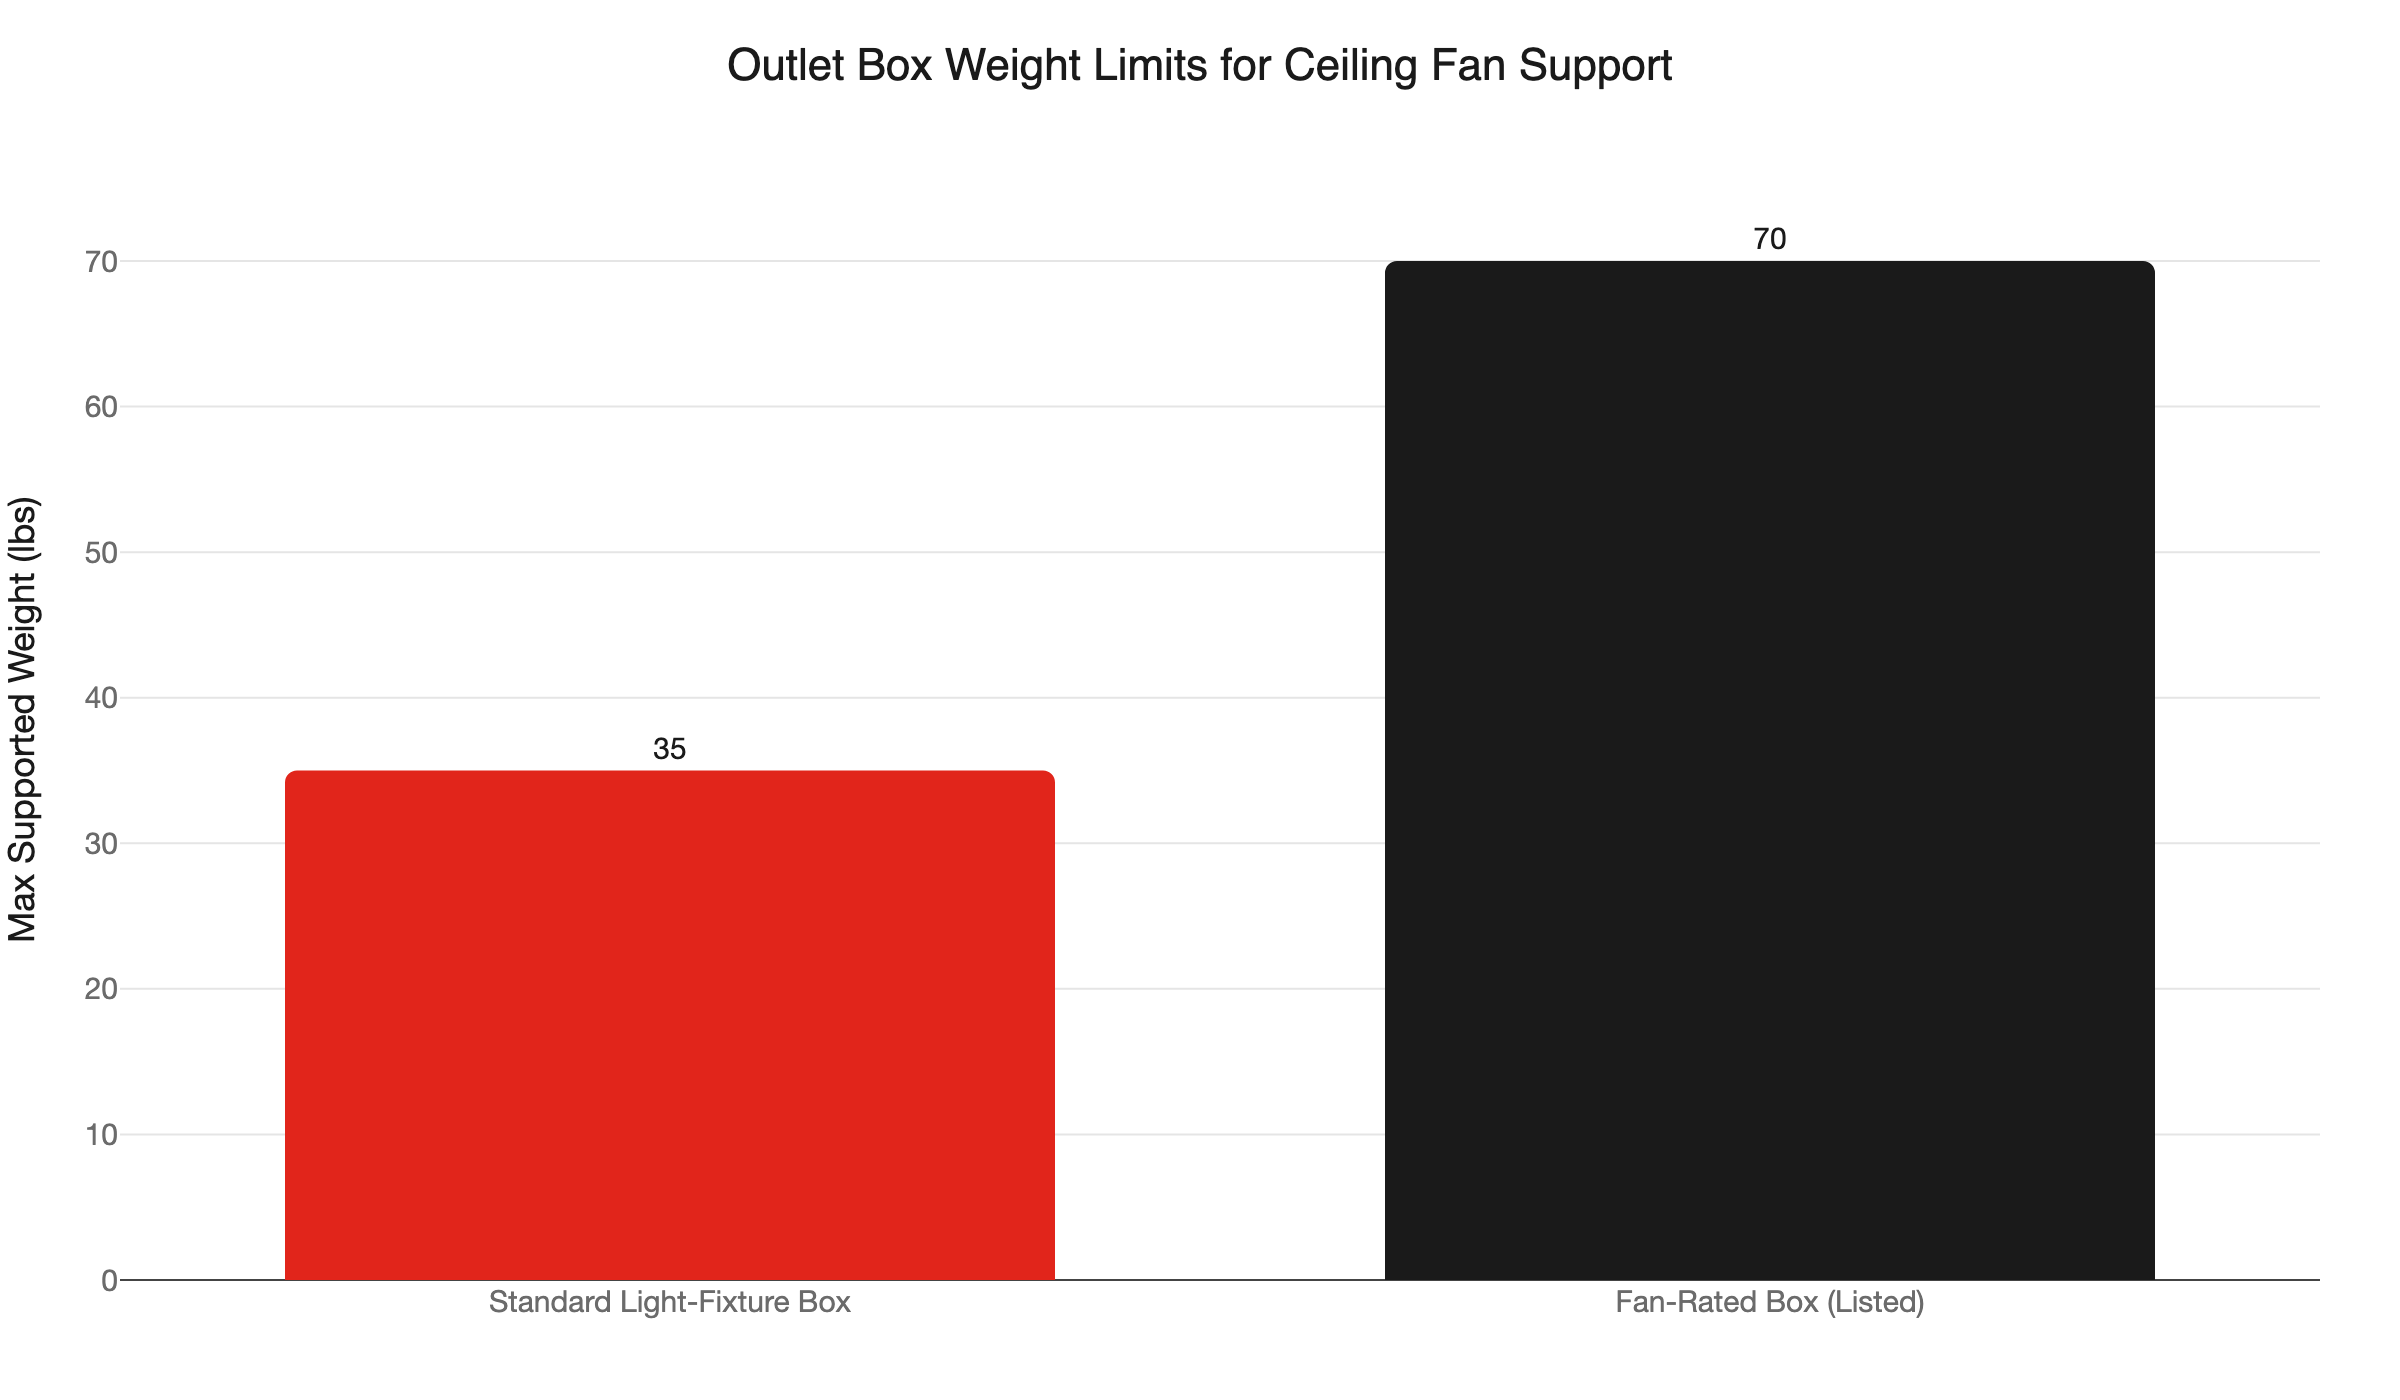
- NEC 314.27(C) requires the box to be listed and marked suitable for fan support. A standard light-fixture box supports up to 35 lbs. A fan-rated box supports up to 70 lbs.
- Minnesota permits filed on or after August 17, 2026 must comply with the 2026 NEC. The fan-box rule moves to 314.27(B) and tightens which ceiling locations require a fan-rated box.
- Downrod length on a vaulted ceiling is a geometry problem, not a tape measure guess. Measure at the mount point, subtract 7 feet, subtract the motor offset, and add 6 inches of buffer for slope asymmetry.
- Slopes above 15 degrees require a dedicated slope adapter. Many Twin Cities vaulted ceilings exceed that threshold.
- Three clearances apply: 7 feet from floor to blade, 8 inches from blade to ceiling, 18 inches from blade to wall.
- Routing or modifying wiring in Minnesota is licensed electrical work. A permit is required for most vaulted ceiling fan installs.
- Call 763-200-5956 or book online to schedule.
Most online guides treat ceiling fan vaulted ceiling installation as a shopping problem. Pick the right fan. Buy a slope adapter. Estimate the downrod length. Order everything and get to work.
That advice skips the step that stops most projects cold: the outlet box. The box in your vaulted ceiling was installed to hold a light fixture. It is almost certainly not rated for a ceiling fan. Swapping it out is the hardest physical step of the job, it is the step that requires a licensed electrician in Minnesota, and it is the step that no popular guide covers.
This post fills that gap. We cover the box requirements, the downrod geometry that retail guides get wrong, the slope adapter decision, the three clearances that matter, and the permit reality for Twin Cities homeowners.
Why Ceiling Fan Vaulted Ceiling Installation Stalls at the Box
Short answer: The box already in your vaulted ceiling was designed for a light fixture, not a ceiling fan. Those are different weight ratings and different structural demands. In Minnesota, replacing that box is licensed electrical work.
A ceiling fan is not a static object. It spins. It vibrates. On a vaulted ceiling it hangs from the end of a long downrod, which amplifies every wobble in the canopy. A light-fixture box rated for a 30-pound chandelier is not built for that kind of dynamic load. The fasteners are different. The structural connection to the framing is different. The expected service life under continuous motion is different.
The problem compounds with vaulted ceiling geometry. The outlet box sits inside the ceiling cavity, usually anchored to a rafter or a structural brace you cannot see from below. There is no surface inspection that tells you whether the anchor is adequate. Getting to it, assessing it, and replacing it with a fan-rated box means working inside the ceiling cavity, often from a tall ladder on an angled floor in a great room designed more for sight lines than for safe maintenance access.
This is why ceiling fan vaulted ceiling installation is a different job than installing a fan on a flat ceiling with an existing fan-rated box. On a flat ceiling with the right box already in place, a competent DIYer can do the fan swap. On a vaulted ceiling, the box is almost never right, and fixing that is the real first step.
Get the box right. Everything else follows from there.
What Is a Fan-Rated Box, and Why Does the Code Require One?
Short answer: A fan-rated box is listed and marked to support both the weight and the motion of a ceiling fan. NEC 314.27(C) makes this mandatory. A standard light-fixture box is not a legal substitute, regardless of what the fan weighs.
The National Electrical Code draws a clear line between boxes that support static fixtures and boxes that support fans. Here is the breakdown by weight rating:
- Standard light-fixture box: rated for up to 35 lbs of static load
- Fan-rated box (listed and marked): rated for up to 70 lbs, designed for the oscillating load of a fan motor under continuous operation
- Fans over 70 lbs: must be supported independently of the outlet box entirely, using a dedicated structural attachment anchored to framing
NEC 314.27(C) also establishes that the outlet box is the sole support for the fan. No supplemental chain, no safety cable, no secondary anchor is permitted as a workaround. The box does the whole job, so the box must be rated for the whole job.
Most residential ceiling fans sized for a vaulted great room fall between 25 and 55 lbs. Many sit right at or above what a standard light-fixture box is rated to hold. A fan that seems secure for the first several months can work its anchor loose over time under vibration and thermal cycling, especially in a ceiling cavity where the original framing was never designed for that load.
There is no workaround here. The fan-rated box is the legal and structural baseline for the install.
What Is Changing in Minnesota on August 17, 2026?
Short answer: Minnesota’s electrical code adopts the 2026 NEC on August 17, 2026. Permits filed on or after that date must comply. The fan-box rule moves from 314.27(C) to 314.27(B) and tightens which ceiling locations must have a fan-rated box or access to framing capable of supporting one.
Minnesota electrical code (MN Rules Chapter 1315) is based on the NEC and updates on a rolling adoption schedule. The 2026 NEC takes effect here on August 17, 2026.
The 2020 NEC had already expanded the fan-box requirement: every outlet box in a habitable-room ceiling of a dwelling must be fan-rated, or provide access to structural framing capable of supporting a fan bracket. The 2026 NEC continues in the same direction, tightening the scope and renumbering the rule.
What this means practically: if your project is in planning now and you expect to pull a permit on or after August 17, your electrician should already be working to 2026 NEC standards. The installation approach does not change much. The compliance exposure if an inspector sees an old-code install on a new-code permit is not something you want to find out about after the job is done.
Our team tracks the NEC transition cycle. You do not have to manage that calendar yourself.
How Do You Calculate the Right Downrod Length for a Vaulted Ceiling?
Short answer: Measure ceiling height at the mount point (not the wall, not the peak). Subtract 7 feet for minimum blade clearance. Subtract the fan’s motor-to-blade offset (typically 10-12 inches). Add 6 inches of buffer for slope asymmetry. That is your minimum downrod length.
This is the calculation retail fan guides skip entirely. They publish flat-ceiling tables: 9-foot ceiling gets an 8-inch downrod, 10-foot ceiling gets a 12-inch downrod. That math assumes the mount point sits at the same height as the surrounding ceiling. On a vaulted ceiling, it does not.
Here is the step-by-step:
-
Find your working ceiling height. Stand on the floor directly below the outlet box. Measure straight up to the ceiling at that exact spot. That number is what drives the calculation. Not the height at the peak. Not the height at the wall. The height at the mount point.
-
Subtract 7 feet. The minimum floor-to-blade clearance is 7 feet, established by manufacturer installation instructions that NEC requires be followed for any UL-listed fan installation.
-
Subtract the motor-to-blade offset. The canopy connects to the downrod. The downrod connects to the motor housing. The blade brackets attach below that. The combined distance from canopy bottom to blade plane is typically 10 to 12 inches, but it varies by fan model. Pull the spec sheet for your specific fan before ordering the downrod.
-
Add 6 inches of buffer. This is the geometry piece that none of the retail guides explain. On a sloped ceiling, the canopy tilts with the slope. The blade arc is not level: it angles slightly toward the low side of the room. The blade tip on the low side ends up measurably closer to the floor than the blade tip on the high side. That asymmetry eats into your clearance where it matters most. A 6-inch buffer keeps you legal on the low-side measurement even after the tilt.
Example: Mount-point ceiling height is 10 feet 6 inches (126 inches). Subtract 84 inches (7 feet): 42 inches remaining. Subtract 12-inch motor offset: 30 inches remaining. Add 6-inch buffer: order a 36-inch downrod as your minimum. The standard 8-inch or 12-inch downrod that ships with most fans is nowhere near enough for a vaulted ceiling at that height.
Most vaulted ceiling fan installs in Twin Cities homes need a 24-inch to 48-inch downrod, depending on ceiling height and fan model. Special-order downrods at specific lengths are available from most fan manufacturers and typically cost $20 to $50.
One hard rule: never couple two shorter downrods together. The joint between them is a stress concentration point. Under the fan’s weight and continuous oscillation, that connection is a failure risk. Buy one downrod at the correct length.
Do You Need a Slope Adapter for a Vaulted Ceiling?
Short answer: If your ceiling slope is 15 degrees or less, the ball-and-socket canopy that ships with most fans handles it. Beyond 15 degrees, you need a dedicated slope adapter. Adapters are available up to 60 degrees of slope.
Most ceiling fans include a ball-and-socket mounting canopy. It allows the canopy to pivot a few degrees so the fan hangs vertically even on a slightly angled ceiling. The typical pivot range covers slopes up to about 15 degrees.
Many Twin Cities vaulted ceilings are steeper than that. Here is a quick reference using standard roof pitch notation:
- 3:12 pitch: about 14 degrees. The included ball-and-socket usually handles this.
- 4:12 pitch: about 18 degrees. A slope adapter is required.
- 6:12 pitch: about 27 degrees. Slope adapter required.
- 8:12 pitch: about 34 degrees. Slope adapter required.
If you do not know your roof pitch, your electrician can measure it during the site visit with a digital level. It takes about 30 seconds with the right tool.
Not every fan is compatible with every slope adapter. Before ordering, confirm the fan model and check the manufacturer’s adapter compatibility list. Some fan lines are designed with proprietary canopy hardware that limits adapter options. Your electrician handles this check as part of the install planning.
What Clearances Apply to a Vaulted Ceiling Fan Installation?
Short answer: Three clearances are required. Seven feet from floor to blade. Eight inches from blade to ceiling plane. Eighteen inches from blade to wall. On a vaulted ceiling, the slope makes the low-side blade tip the critical measurement point for floor clearance.
Floor to blade: 7 feet minimum. This comes from manufacturer installation instructions that NEC requires be followed for a UL-listed fan. It is not a guideline. On a vaulted ceiling with an angled blade arc, the low-side blade tip drops closer to the floor than the high side. That is the measurement that matters, not the average height of the blade plane.
Blade to ceiling plane: 8 inches minimum. Below 8 inches, the fan recirculates its own downdraft and loses significant airflow effectiveness. The ceiling plane on a vaulted ceiling is angled, so this check happens at the blade tips on the high side, where the blades are closest to the ceiling surface.
Blade to wall: 18 inches minimum. CPSC guidance establishes this clearance. In a vaulted great room, the relevant obstacles are not always obvious: chimney chases, structural beams, knee walls at the edges of the vaulted section, and built-in shelving all count. A fan that looks centered in the room from below can still fail this clearance.
All three of these need to be verified before the fan is ordered. Getting a fan home and discovering it clears the floor on the low side with 6 inches to spare means pulling it back down, returning the downrod, and ordering a longer one. Our team checks all three clearances during the site visit, before any hardware is on order.
Does This Project Require a Permit in Minnesota?
Short answer: Yes, if any wiring is modified. Routing or terminating cable through a building structure is licensed electrical work under Minnesota law. Most vaulted ceiling fan installs involve at least a box swap, which in most Twin Cities municipalities triggers a permit.
The permit is filed by the licensed contractor, not by the homeowner. Our team handles that paperwork as part of every job.
Here are the scenarios where scope expands beyond the box:
- Adding a wall switch where none exists. That is a new wiring run through the wall and ceiling.
- Installing a smart switch that requires a neutral wire. The existing circuit may not have a neutral at the switch box.
- Running a dedicated circuit for a large fan with a high-wattage light kit. That work connects at the panel.
- Converting from a pull-chain fan to a remote-controlled model. Some remote systems require a different wiring configuration at the ceiling.
Each of those scenarios requires a permit and a licensed contractor. The inspection at the end of the job protects you: it documents that the work was done to code, which matters if you ever sell the home, make an insurance claim, or have a problem later.
For a plain-language breakdown of when permits are required in Minnesota and what the process looks like, see our guide to electrical permits in Minnesota.
Why Is This Not a DIY Project?
Short answer: On a standard flat ceiling with a confirmed fan-rated box and no wiring changes, a confident DIYer can install a ceiling fan. On a vaulted ceiling in Minnesota, the box swap is licensed work, the height is genuinely hazardous, and the geometry adds complexity that bites people who skip the math.
Four things change when the ceiling is vaulted:
The box replacement is inside the ceiling cavity. This is not a remove-and-swap operation you can do from a ladder. It means accessing the cavity, locating the framing, and securing a fan-rated box to a structural member. Often it involves opening the drywall and patching it afterward.
The ladder situation is a real fall risk. Great rooms with vaulted ceilings are built for visual drama, not for safe maintenance access. Working at 12 to 16 feet from a ladder positioned on an angled great room floor, with a heavy fan motor in one hand, is how people get hurt.
The existing wiring may not be adequate. Homes in the Twin Cities built before 2000 often have ceiling circuits that were sized for a light fixture, not for the combined load of a fan motor and a light kit. A licensed electrician checks the circuit capacity as part of the install, not as an afterthought.
A failed install is a liability event, not a warranty claim. A ceiling fan that pulls away from the ceiling because the box was not rated for fan support is an installation defect. If a homeowner performed the install and a code violation is found underneath, that finding can affect a homeowner’s insurance claim on the resulting damage.
If you are planning a heavier fixture elsewhere in the home alongside this project, the same box-rating logic applies. See our guide on chandelier and heavy fixture installation on fan-rated boxes for more on how the weight ratings work in practice.
Is There an Xcel Energy Rebate for a Ceiling Fan in Minnesota?
Short answer: No confirmed ceiling fan-specific rebate exists in the current program. The Xcel Energy 2024-2026 MN residential rebate program focuses on HVAC equipment, smart thermostats, and insulation upgrades.
That said, a properly sized fan in a vaulted great room delivers real energy savings on warm days. Ceiling fans let most households raise the thermostat setpoint by a few degrees without a noticeable comfort difference. That delta adds up across a Minnesota summer on an Xcel bill, even without a rebate check attached to it.
If your project includes a panel upgrade, an EV charger, or whole-home surge protection, those are the line items where financing and rebate programs make a bigger dent. Our team can walk through what applies to your full project scope when you call.
Schedule Your Vaulted Ceiling Fan Installation in the Twin Cities
Northern Mister Sparky is locally owned and operated, backed by the “America’s On-Time Electrician(R)” standard and the UWIN(R) 100% satisfaction guarantee. When our technician arrives, they show up when scheduled, know the 2026 NEC transition cold, and give you a straight quote before any work starts.
You pick the fan. We handle the outlet box, the downrod, the slope adapter spec, the clearance checks, the wiring, and the permit.
Call 763-200-5956 or book online through our ceiling fan installation page. If you want a sense of what electrical work typically costs in the Twin Cities before you call, our guide to electrician costs in Minneapolis and the Twin Cities breaks down common project ranges.
Frequently Asked Questions
Can I install a ceiling fan on a vaulted ceiling without an electrician in Minnesota? +
How long of a downrod do I need for a vaulted ceiling fan? +
Do I need a slope adapter for a ceiling fan on a vaulted ceiling? +
Need an electrician now?