
Chicken Coop Wiring Backyard: Minnesota Code and Safety Guide
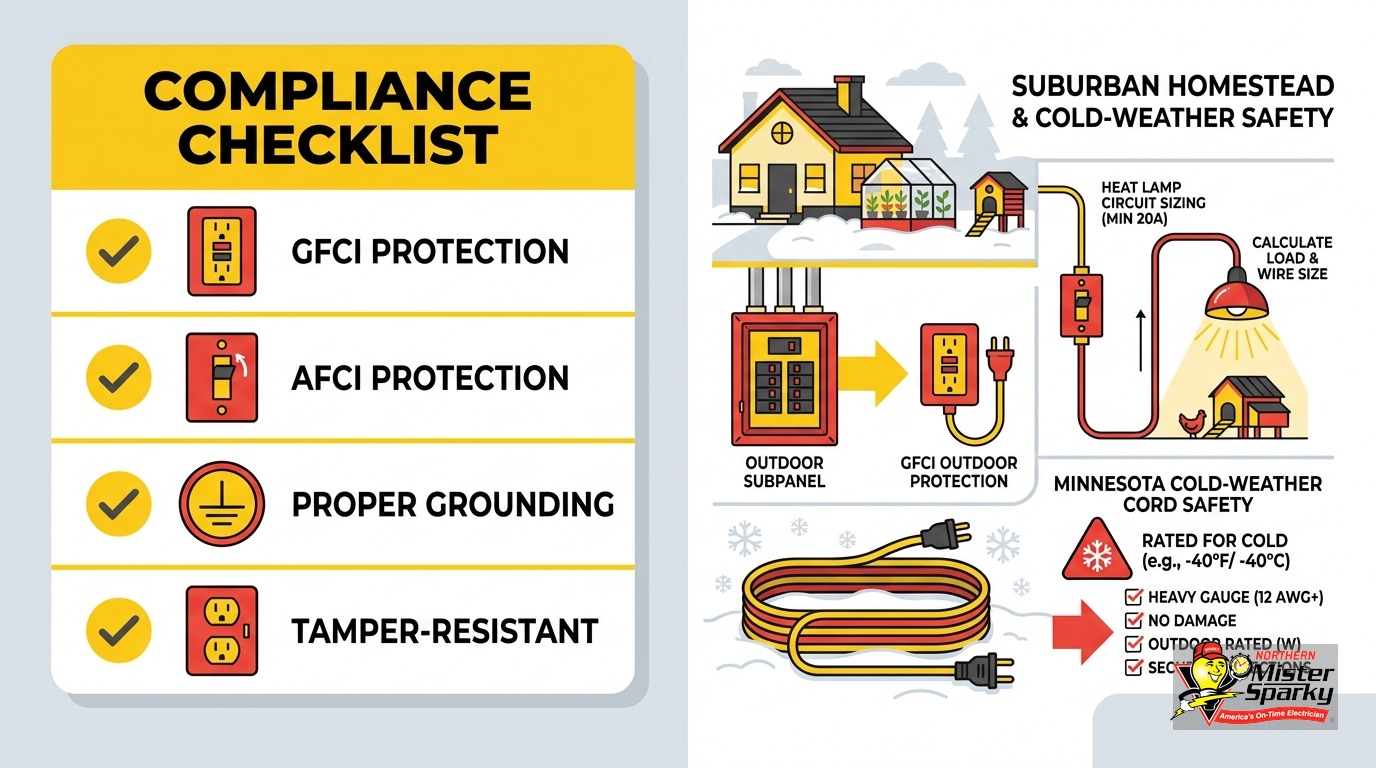
Key Takeaways
- NEC Article 547 applies to backyard chicken coops. It prohibits Romex (NM-B cable) inside any poultry structure with litter dust or excrement vapors.
- Minnesota adopted the 2026 NEC effective August 17, 2026. Any permit pulled today is inspected under the new code, not the 2023 version.
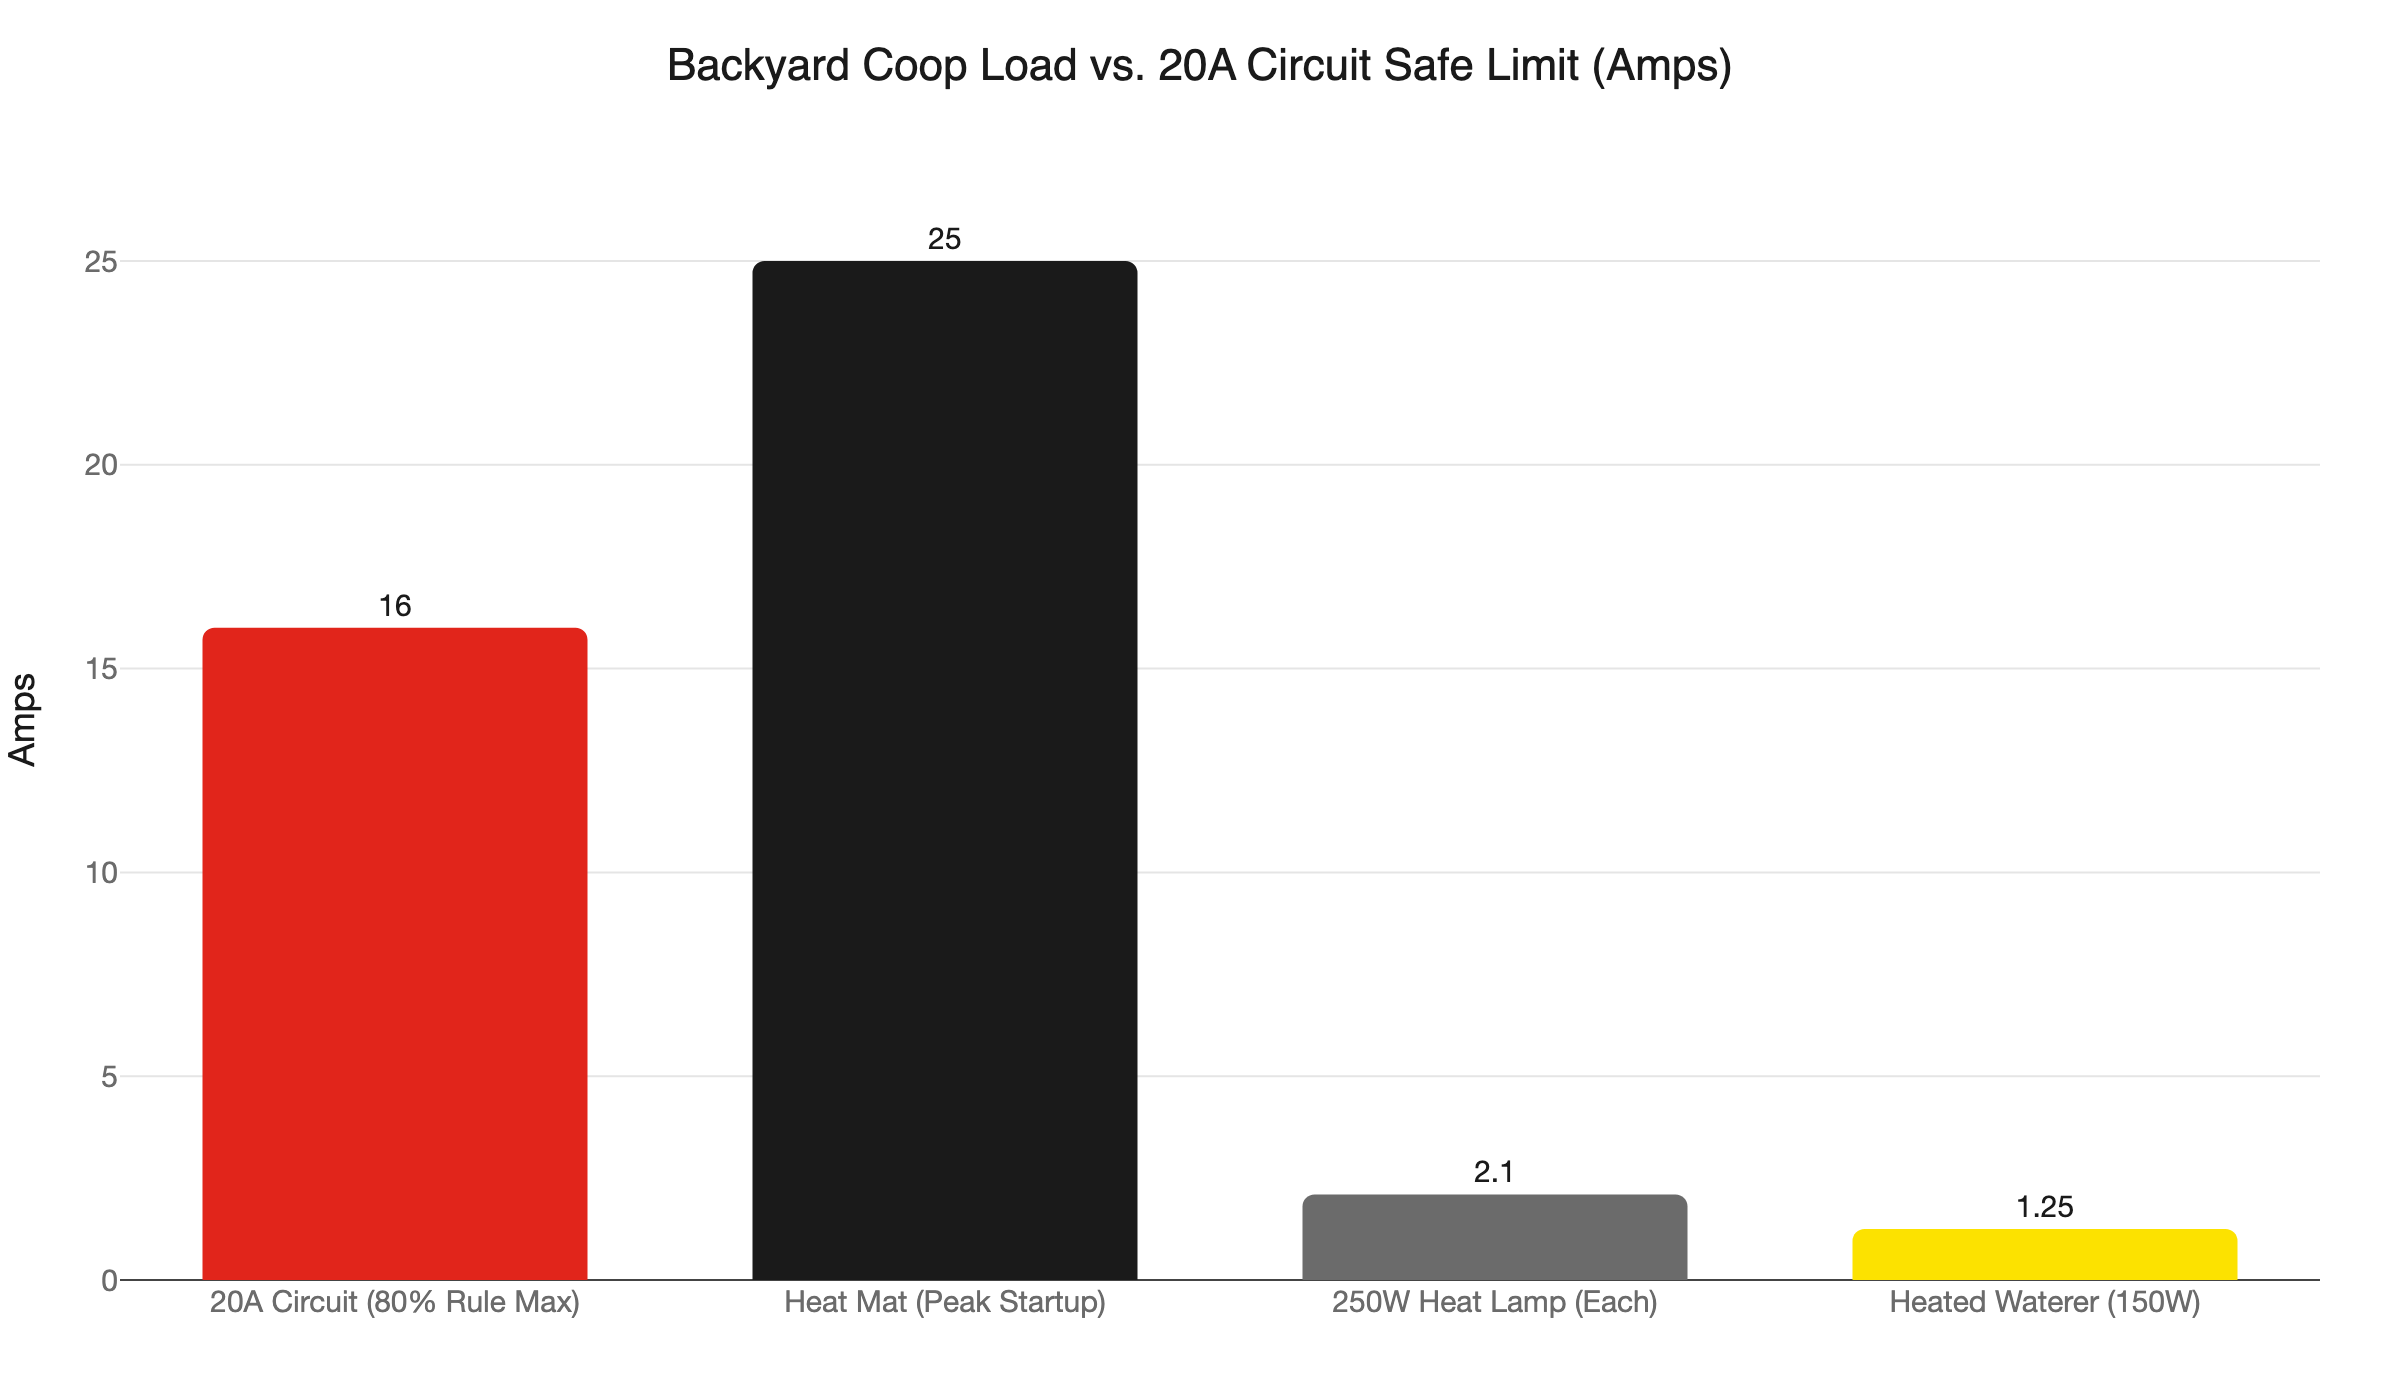
- A 20A circuit is limited to 16 usable amps under the 80% continuous-load rule. A heat mat’s peak startup draw can reach 25 amps alone.
- GFCI protection is required for all receptacles in and around the coop under NEC 547.28 and NEC 210.8(F).
- Detached structures with more than one branch circuit require a grounding electrode at the coop under NEC 250.32.
- Minnesota homeowners can pull their own electrical permit, but a final DLI inspection is required.
- Cold-weather cords must be rated to -40°F. Standard PVC jackets crack at sub-freezing temperatures, leaving exposed conductors in dry bedding.
- A 250W brooder bulb in a 100W-rated clamp lamp exceeds the fixture rating immediately. Poultry bedding ignites at 212°F. Use a porcelain-socketed brooder fixture.
Chicken coop wiring for a backyard flock is one of the more misunderstood electrical projects a homeowner can take on. Most online guides treat it like running power to a garden shed. The code says otherwise. Twin Cities homeowners pulling a permit this week are working under Minnesota’s newly adopted 2026 NEC, and the rules for a structure that houses poultry are meaningfully stricter than a simple outbuilding. This guide covers exactly what the code requires, why the stakes are higher than they look, and how to get the job done right the first time.
Why Backyard Chicken Coop Wiring Is Different from a Shed
Minneapolis, Eagan, Plymouth, Maple Grove - suburban chicken ordinances across the Twin Cities now allow three to six hens per household. Thousands of homeowners have built or bought coops. The next step is usually running power.
A chicken coop is not a shed. The electrical code treats them differently because the environments are different. A shed stores tools. A chicken coop contains live animals, poultry litter dust, feed particles, and ammonia-rich vapors from excrement. Those three factors - combustible dust, organic debris, and corrosive gases - trigger a separate article in the National Electrical Code with its own wiring requirements.
Most DIY guides miss this entirely. They say run UF-B cable to the coop, add a GFCI outlet, and call it done. That advice is incomplete. It also fails a DLI inspection. Understanding how the code classifies your coop is the first step. Everything else follows from it.
Does My Backyard Coop Fall Under NEC Article 547?
Yes, almost certainly. NEC Article 547 covers agricultural buildings with poultry litter dust, feed particles, or corrosive vapors from animal excrement. A backyard chicken coop meets all three criteria. The classification prohibits standard NM-B (Romex) cable inside the structure and requires conduit or wet-rated wiring methods in its place.
Article 547 lays out the specific requirements that apply as soon as a structure is used for poultry confinement. The logic is straightforward: Romex sheathing is not rated for a corrosive environment. Ammonia degrades it over time. Litter dust is combustible. Wire that degrades in those conditions is a fire risk, not a code technicality.
The NEC does not care how many chickens you have or how small the coop is. If there is poultry in the structure and litter on the floor, Article 547 applies. “It is just a small backyard flock” is not a code exemption.
This is the most common violation on residential coop wiring projects. A homeowner runs Romex into the coop walls, pulls a permit, and the inspector flags it on the first visit. The fix means pulling the Romex and installing conduit - an avoidable and expensive re-work. Knowing the classification before you start costs nothing.
What Wiring Method Can You Use Inside a Chicken Coop?
Conduit is the answer inside the coop. PVC conduit with THWN-2 conductors is the standard choice. Liquid-tight flexible conduit handles short runs to fixtures and to individual outlets. UF-B cable is permitted for the underground feed from the house to the coop, but it stops at the exterior wall and transitions into conduit before entering the structure.
Under NEC 547.28, all 125V, 15A and 20A receptacles inside agricultural buildings must have GFCI protection. A GFCI breaker feeding the coop subpanel is the cleanest way to satisfy that requirement. It protects every outlet downstream without requiring individual GFCI devices at each location.
Luminaires inside the coop must be rated for dusty or damp environments. A standard household light fixture does not carry that rating. Look for fixtures labeled “wet location” or “dust-tight.” This applies to the fixture you hang for egg production and to any heat lamp fixture. The listing is printed on the label and easy to check before you buy. Installing an unlisted fixture is the kind of shortcut that fails an inspection and creates a genuine fire risk in a structure full of dry bedding.
How Deep Does the Underground Feed Wire Need to Go?
The required depth depends on your wiring method. UF-B direct-buried cable requires 24 inches minimum. PVC conduit reduces that to 18 inches. Rigid metal conduit (RMC) allows just 6 inches. NEC 300.5 also permits UF-B burial depth to drop to 12 inches when the circuit has GFCI protection at the source.
For most backyard coop runs in the Twin Cities, PVC conduit at 18 inches is the practical choice. It costs more than direct-buried cable but holds up better over time, and it gives you a clean pathway to pull new wire or add a circuit later without opening a trench again. That flexibility is worth the small added cost on a run you want to last 20 years.
Twin Cities frost depth reaches 42 to 60 inches in hard winters. Code burial minimums are not frost-depth targets - they are impact-protection depths. Your conductors are not going to freeze at 18 inches. But frost heave can stress shallow conduit runs over time, particularly in areas with clay-heavy soil. Going to 24 inches is inexpensive insurance on a run you only want to dig once.
Our guide on underground wire depth in Minnesota covers the full burial table for every wiring method and includes conduit type comparisons for any outbuilding feed.
How Do I Size a Circuit for a Minnesota Coop in Winter?
Think about February, not June. The 80% continuous-load rule limits a 20A circuit to 16 usable amps. Add up a realistic winter load: a 250W heat lamp draws 2.08 amps at 120V, a heated waterer at 150W draws 1.25 amps, and a heat mat’s peak startup draw can reach 25 amps. That startup spike alone can trip a 20A breaker before the steady-state load has even settled.
Here is a realistic February circuit calculation:
- Heat mat at steady state: 8 to 10 amps
- Heated waterer at 150W: 1.25 amps
- One 250W heat lamp: 2.08 amps
- LED coop light: under 0.5 amps
That puts you at 12 to 14 amps on a 16-amp continuous limit - tight before any cold-snap additions. Add a second heat lamp and you are at or past the ceiling.
The correct approach is a dedicated 20A circuit for heating loads. Lights and receptacles go on a second circuit. That split keeps both circuits well inside their operating range and gives you room on a -20°F night without tripping breakers in the middle of the night. If you add a second circuit, the grounding requirements in the next two sections become mandatory.
Do I Need a Subpanel at the Coop?
Not always, but usually it is the right call. A single-circuit run from the main house panel is code-compliant for the simplest coop setups. The moment you add a second circuit, NEC 250.32 requires a separate grounding electrode at the detached structure. That means a ground rod driven at the coop, which adds a step to a single-circuit install anyway.
Given that requirement, a small subpanel at the coop is the cleaner long-term choice for any setup with two or more circuits. A 60A or 100A subpanel gives you a clean location for the GFCI breaker, a place to land multiple branch circuits, and the grounding electrode connection in one organized package. The subpanel feed runs from the main house panel on a single appropriately sized breaker.
Our page on detached garage subpanel installation covers the mechanics in detail. The load math differs for a coop, but the installation process is identical.
If there is any chance you want outdoor coop lighting, a heated water line to a run, or an outlet for tools in the next few years, put the subpanel in now. Running conduit twice costs more than doing it right the first time.
NEC 250.32: Do You Need a Ground Rod at the Coop?
Yes, if you run more than one circuit. A single-circuit run can use the equipment grounding conductor in the cable or conduit to share the main panel’s grounding system. Add a second circuit and NEC 250.32 mandates a separate grounding electrode at the detached structure.
An 8-foot copper ground rod driven at the coop satisfies this requirement. The rod connects to the coop’s grounding electrode conductor, which connects back to the subpanel’s grounding bus. This step is not optional and it is not something to skip to save a half-hour.
Proper grounding protects the equipment and anyone who touches a metal part of the structure during a fault. Metal feeders, metal waterers, a metal subpanel enclosure, a metal coop frame - in a backyard coop, metal contact points are everywhere. Grounding protection on all of them is the point, not a bureaucratic formality.
Minnesota Permits and the 2026 NEC Transition
Minnesota homeowners can pull their own electrical permit for electrical work on a property they occupy and reside in. You do not need a licensed electrician to do the wiring. You do need a final DLI inspection before calling the project complete. Skipping the inspection is not a code shortcut - it is a gap in your insurance coverage and a liability exposure if something goes wrong later.
Permit fees start at $25 base plus a $1 surcharge, with additional fees based on circuit count. A coop with a subpanel and two branch circuits typically falls into the $165 tier for 15 to 30 feeders and circuits.
Here is what most homeowners do not know right now: Minnesota adopted the 2026 NEC effective August 17, 2026. Any permit pulled this week is inspected under the new code. No other coop wiring guide mentions this transition. If you are working from a guide written before August 2026, confirm that its code references align with what the DLI inspector will actually check.
The DLI maintains a dedicated agricultural electrical bulletin covering farm and outbuilding wiring under the state-adopted NEC. If your coop is larger than a typical backyard structure, that document is worth reading before you finalize your design.
For a broader overview of the permit process, see our guide on Minnesota electrical permits.
Cold-Weather Cord Safety: What Happens Below Freezing?
Standard extension cords fail in Minnesota winters. PVC cord jackets stiffen when temperatures drop and crack when bent in that stiffened state. A cracked jacket exposes the conductor inside. In a coop with dry straw, wood shavings, or loose feed on the floor, an exposed conductor is a fire source.
Twin Cities winters routinely push -15°F to -25°F, with stretches colder in the north metro. For year-round outdoor use in this climate, cords must be rated to -40°F. The designation to look for is SOOW: Service, Oil-resistant, Oil-resistant jacket, Weather-resistant. That rating confirms the cord is built for outdoor cold-climate use and will remain flexible at temperatures relevant to Minnesota.
The second problem is permanence. Running an extension cord to the coop every October and leaving it until April is a code violation. NFPA NEC 590.3 limits temporary wiring to 90 days for seasonal use. Running the same cord winter after winter qualifies as a permanent installation under those rules - and a permanent installation must meet permanent wiring standards. Most homeowner insurance policies also exclude fire damage traced to permanent extension cord use.
The correct answer is a permanent conduit run with properly rated conductors. That is the fix. Extension cords to a coop are not a workaround for avoiding the conduit run; they are a cold-weather fire risk.
Heat Lamp Fires Start with the Wrong Fixture
Most backyard coop fires trace back to the same mistake: a 250W brooder bulb in a fixture rated for 100W.
Painter’s clamp lamps are inexpensive, easy to find at any hardware store, and not designed for brooder use. They are rated to 100W with plastic sockets. A 250W brooder bulb in a 100W-rated fixture exceeds the socket rating from the moment it is energized. The socket overheats. The bulb surface reaches above 480°F. Dry chicken bedding ignites at 212°F.
GFCI protection does not prevent this. GFCI detects ground faults and trips on them. An overloaded plastic socket overheating above dry straw is not a ground fault - it is a heat source. The GFCI does not respond to it.
Use a porcelain-socketed brooder fixture rated for the wattage you intend to run. Mount it securely so a startled bird cannot knock it into the bedding. Inspect the mount and the cord before each cold season. These steps matter, but they only matter if the fixture is correct in the first place.
The better option is to skip the heat lamp entirely. Flat panel radiant heaters designed for poultry run at lower surface temperatures, draw significantly less current, and remove the hanging high-temperature fire source from the equation. A 150W flat panel draws 1.25 amps, keeps a small flock through most Minnesota nights, and keeps you well inside a single circuit’s safe range. If you use heat lamps, use the right fixture, rate the circuit for them, and inspect the hardware before winter.
Outdoor GFCI Requirements for the Run and Exterior Outlets
Under NEC 210.8(F), all outdoor receptacles at dwellings on single-phase circuits 150V or less to ground, 50A or less, require GFCI protection. That covers any outlet on the exterior coop wall, any outlet inside the chicken run, and any nearby outdoor receptacle used for tools or a secondary water heater.
A GFCI breaker at the coop subpanel is the most efficient path to compliance. It protects every outlet downstream. Weatherproof covers on each outdoor receptacle are still required as a separate requirement - GFCI protection and weatherproof enclosures address different hazards and both apply.
If you choose individual GFCI outlets instead of a GFCI breaker, test them monthly. Outdoor GFCI devices take more abuse from moisture, temperature swings, and frost than interior outlets. A failed GFCI that no longer trips is more dangerous than having no GFCI at all, because it creates false confidence. Our guide on outdoor GFCI outlet installation covers testing procedures and replacement indicators.
Should You DIY or Hire a Licensed Electrician?
It depends on what you are comfortable executing. Pulling an electrical permit as a Minnesota homeowner is legal and straightforward. Digging a trench, laying PVC conduit, and wiring a subpanel is work a mechanically skilled homeowner can do with the right preparation. The DLI inspection will catch anything that is wrong before the project is finalized.
Where homeowners run into trouble is the full checklist. NEC Article 547 classification, conduit inside the coop, burial depth by wiring method, GFCI subpanel, ground rod, wet-rated luminaires, cold-weather-rated conductors - each item is manageable. Missing one means a failed inspection and re-work. No malarky: the cost of calling a licensed electrician is often less than the cost of re-digging a trench.
If you want to do the work yourself, pull the permit first and call us before moving dirt. We can review your plan and flag code issues before anything is committed. If you want our team to handle the full project, we are locally owned and operated, we know Minnesota’s 2026 NEC transition, and we pull permits and pass inspections every week. As America’s On-Time Electrician(R), we back every job with the UWIN(R) 100% satisfaction guarantee.
Call 763-200-5956 or schedule online to get a quote for your backyard coop electrical project.
Frequently Asked Questions
Do I need a permit for backyard chicken coop wiring in Minnesota? +
Can I use Romex cable inside a chicken coop? +
What size circuit do I need for a heated chicken coop in Minnesota? +
Need an electrician now?