
Outdoor Landscape Speaker Wiring Installation Guide
Key Takeaways
- Outdoor speaker cable must carry the CL2X rating, the UL designation for wet locations and direct burial, per the NEC. Standard CL2 in-wall wire cannot go underground or stay exposed outdoors.
- Minnesota adopted the 2026 NEC on August 17, 2026. Permits filed from that date must comply with the 2026 edition.
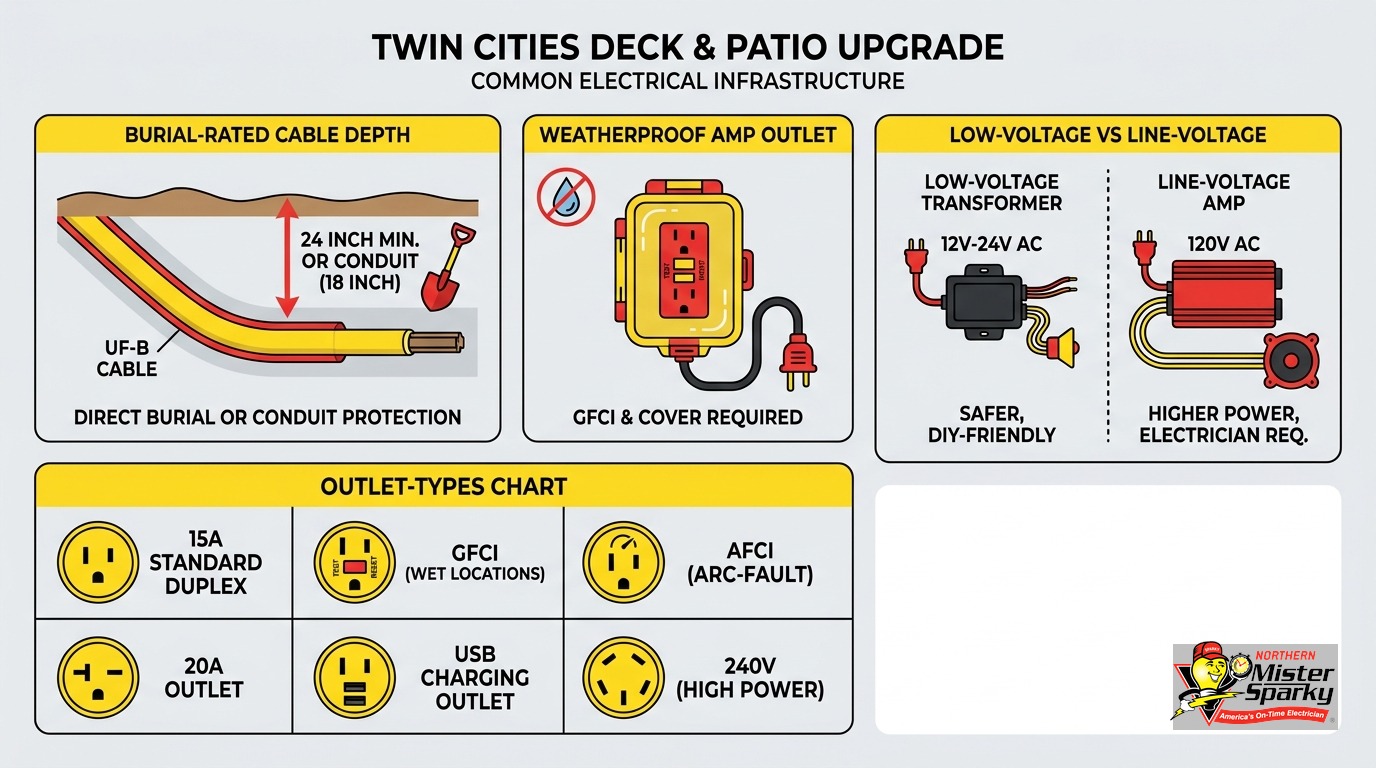
- NEC’s 18-inch minimum for PVC conduit is a damage-protection standard, not a frost standard. In the Twin Cities, bury conduit at 24 inches minimum. The metro frost zone runs 42 to 60 inches deep.
- Any outdoor 120V receptacle for an amplifier must be GFCI-protected and fitted with an extra-duty in-use weatherproof cover. Old snap-lid covers do not comply.
- A new landscape speaker installation requires a permit under MN Statute 326B.36. File before work begins.
- Low-voltage speaker wiring requires a licensed Power Limited Technician or master electrician. The 120V amp outlet requires a licensed electrician.
- Yard runs longer than 100 feet or systems with more than two zones should use a 70V constant-voltage amplifier, not a standard 4-8 ohm setup.
What Does Outdoor Landscape Speaker Wiring Installation Actually Involve?
Outdoor landscape speaker wiring installation covers three distinct electrical layers: the buried Class 2 cable running from the amplifier to each speaker, the conduit system protecting that wire underground, and the 120V branch circuit powering an outdoor amplifier cabinet. Each layer has its own code requirements. In Minnesota, each layer also has its own licensing tier.
Most homeowners picture the project as running wire from a stereo receiver to some yard speakers. That picture leaves out the parts most likely to cause problems later.
The first layer is the speaker circuit itself. Speaker wiring is classified as Class 2, power-limited wiring under NEC Article 725. Class 2 carries lower energy levels than branch circuits, which affects burial depth rules and the license required to install it.
The second layer is what protects that wire underground. Bare cable without conduit is vulnerable to frost heave, root damage, and lawnmower strikes. Running CL2X cable inside PVC conduit is the standard approach in the Twin Cities. You give up a little on upfront cost and gain the ability to pull new wire through the conduit years later without redigging.
The third layer is the 120V circuit for an outdoor amplifier. If your amp lives indoors and feeds buried speaker wire through the wall, you only need layers one and two. But if you want a weatherproof amp cabinet on the deck or mounted in the yard, layer three is mandatory, and that work belongs to a licensed electrician.
Getting all three layers right is the difference between a system that lasts 30 years and one that needs attention every other summer.
What Cable Do You Use for Buried Speaker Wire?
Not just any speaker wire. For buried or outdoor-exposed runs, the cable must be rated CL2X, the UL designation for wet locations and direct-burial use under the NEC. Standard CL2 cable is rated for dry indoor locations only and degrades quickly when buried or left exposed outdoors.
Speaker wire is a Class 2 power-limited circuit. The NEC requires any Class 2 cable run outdoors to be listed for wet locations.
Standard CL2 is the wire sold on most big-box store spools, typically labeled “in-wall speaker wire.” It is designed for dry wall cavities. Bury it and the insulation starts breaking down within a few seasons. The jacket fails, moisture reaches the conductor, resistance increases, and volume drops until the speaker goes silent.
CL2X has a moisture-resistant jacket listed for both wet locations and direct burial. You have two code-compliant options:
- Direct burial: Use CL2X cable and bury it to the correct depth for your installation type.
- Conduit method: Run standard CL2 or CL2X inside Schedule 40 PVC conduit. The conduit provides wet-location protection and is usually the preferred approach in the Twin Cities. You can pull new cable through the conduit years later without digging up the yard.
One detail worth understanding: the speaker wire circuit is still Class 2 regardless of run length or the number of speakers connected. That classification determines which burial depths apply and which license is required to install the wire.
How Deep Should You Bury Speaker Wire in Minnesota?
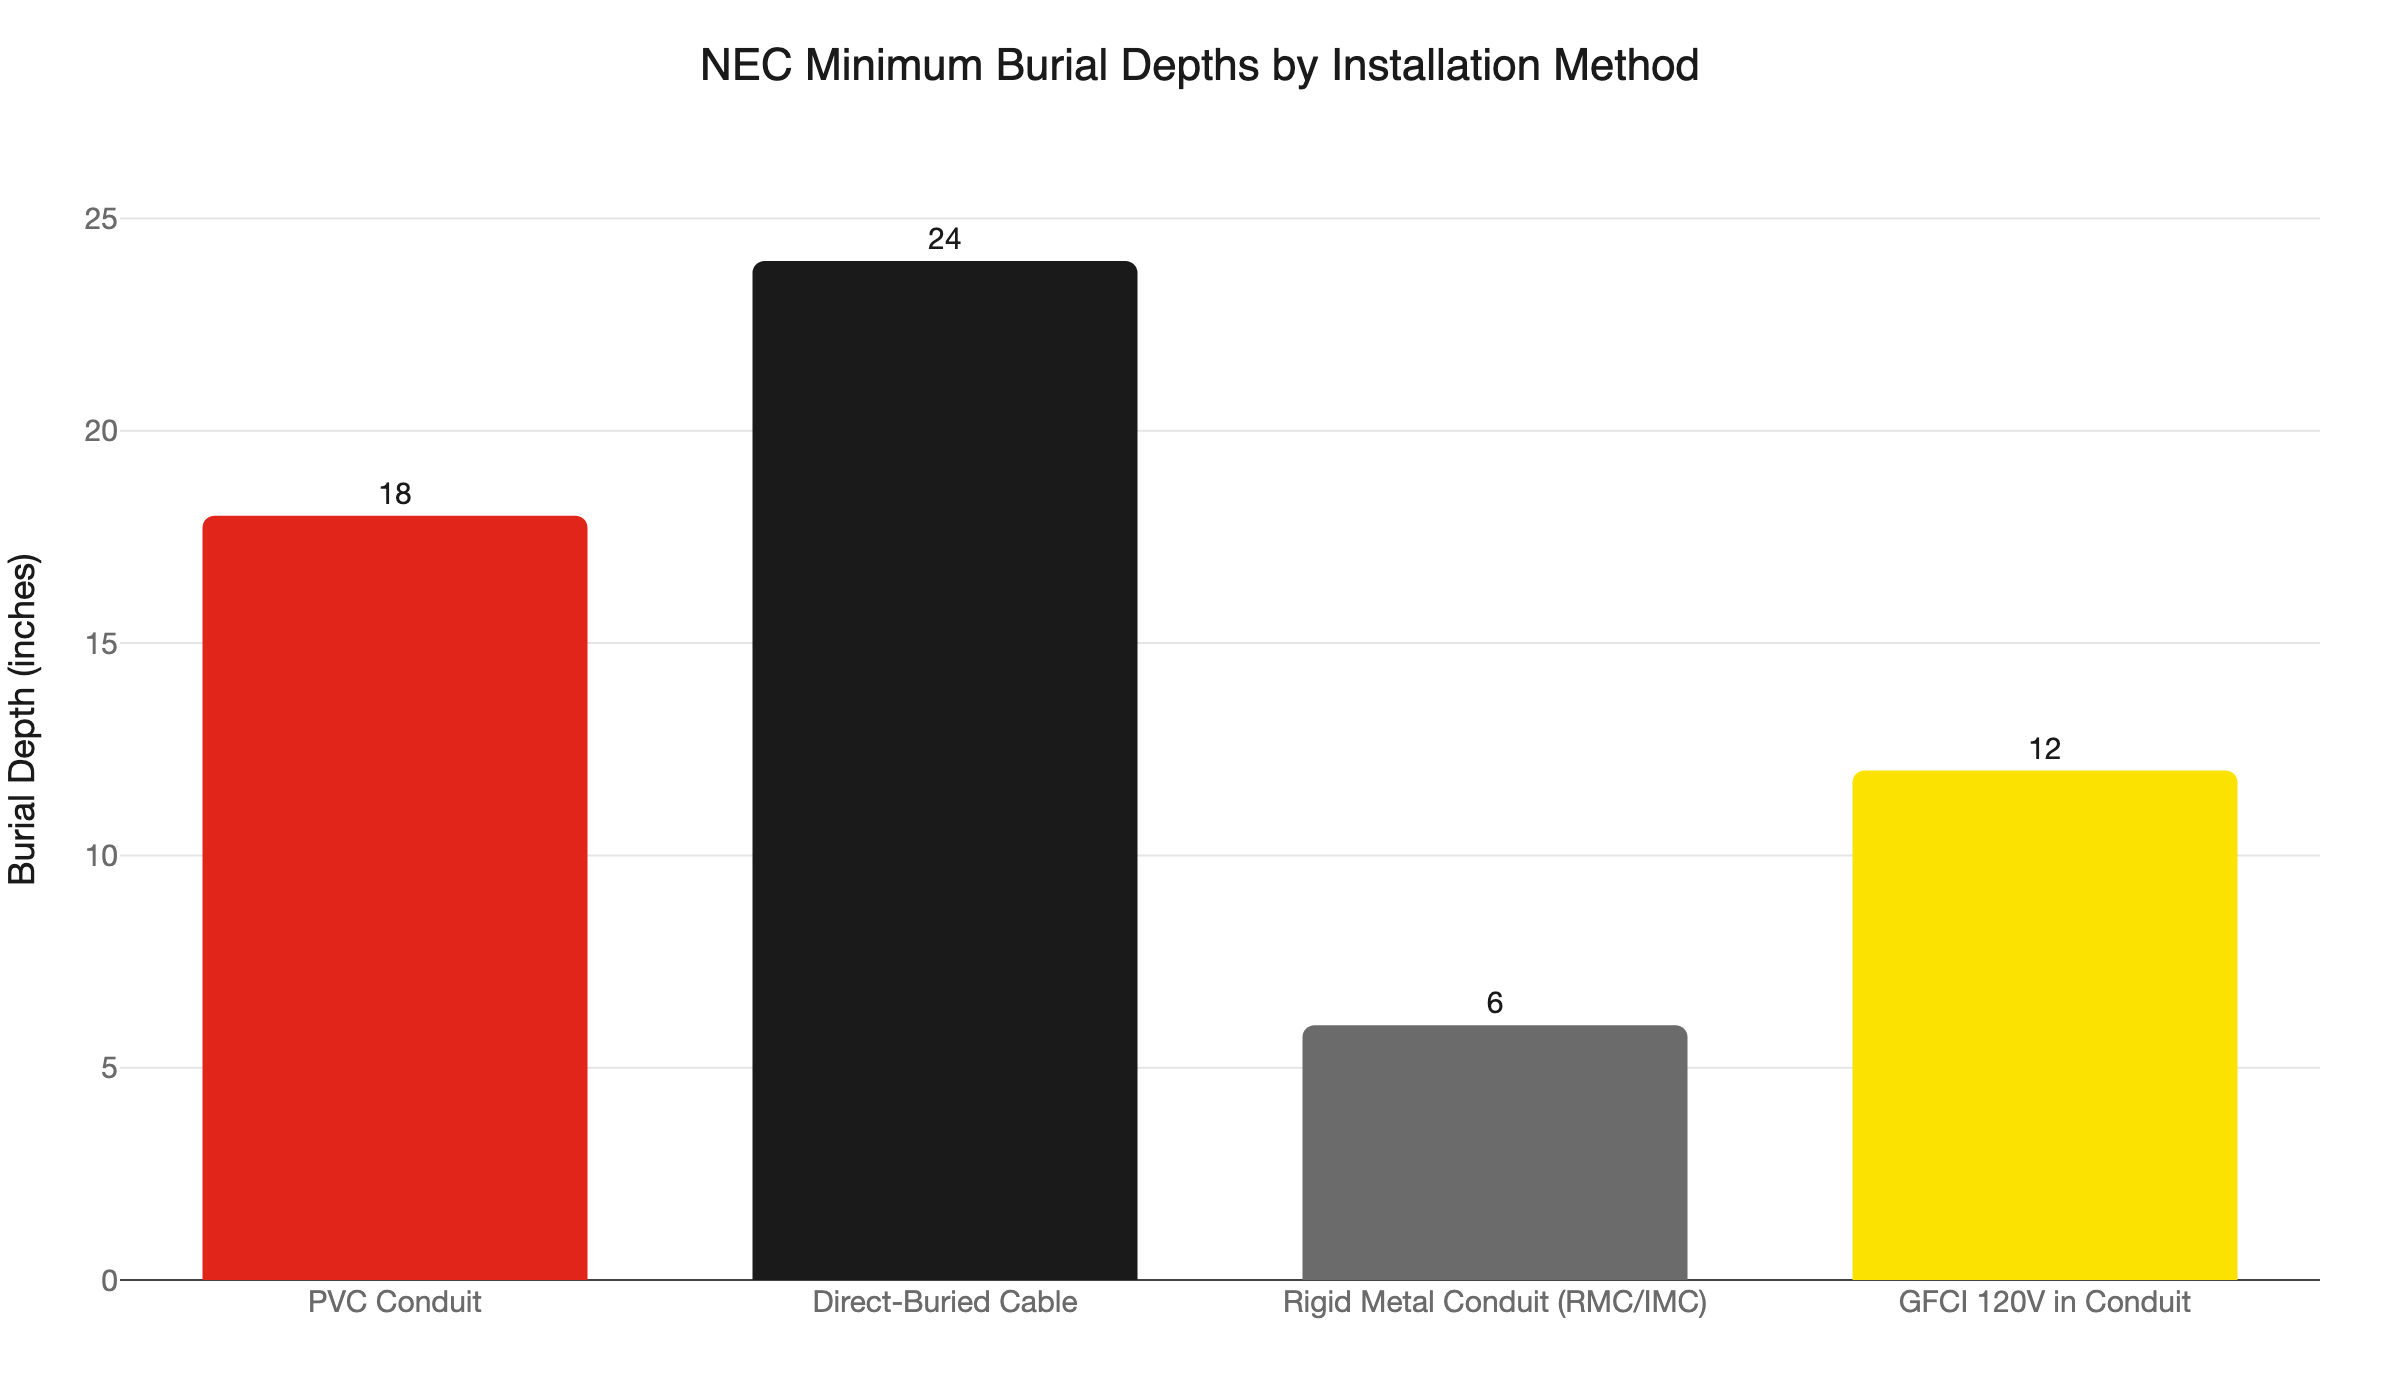
The NEC sets minimum burial depths that vary depending on whether you are running PVC conduit or direct-buried cable. Those are physical damage minimums, not frost minimums. The Minneapolis-St. Paul area has a substantial design frost depth, per Minnesota DOT frost depth data. For Twin Cities yards, the practical target is 24 inches for Class 2 conduit runs and deeper if sharing a trench with irrigation lines.
Here is what the NEC depths mean and what they do not mean.
NEC Table 300.5 is a protection-from-damage standard. The 18-inch minimum for PVC conduit means “deep enough that a garden trowel or lawn tractor is unlikely to hit it.” It was not written for frost zones.
In Minneapolis, conduit buried at 18 inches sits inside the active frost zone. Soil movement is substantial every winter. Connections shift. Conduit at a concrete path transition can buckle at the entry point. Splice boxes set at 18 inches are the first thing to fail.
The practical burial depths for a Twin Cities outdoor speaker project:
CL2X direct-buried cable:
- NEC minimum: 24 inches
- Twin Cities recommendation: 24 inches minimum
PVC conduit with CL2 wire inside:
- NEC minimum: 18 inches
- Twin Cities recommendation: 24 inches minimum; 36 inches if sharing a trench with an irrigation lateral
Rigid metal conduit (RMC or IMC):
- NEC minimum: 6 inches
- Less common for landscape audio due to material cost, but a valid option
GFCI-protected 120V circuit for the outdoor amp outlet, wire in conduit:
- NEC minimum: 12 inches under the reduced cover exception
- Twin Cities recommendation: 18 inches minimum
NEC Article 725 technically governs Class 2 circuits rather than Article 300. But applying Table 300.5 depths to your Class 2 conduit is sound practice that will satisfy any inspector in Minnesota.
Do You Need a Permit for Landscape Speaker Wiring in Minnesota?
Yes. MN Statute 326B.36 requires a permit for any new technology circuits or systems, and speaker wiring falls under that definition. A new landscape audio installation is not “minor work” under the statute. You must file the permit before work begins, and the finished installation must pass a final inspection.
This catches most homeowners off guard. Low-voltage wiring feels minor. Under Minnesota law, running new speaker wire across your yard is a permitted activity, not a gray area.
Minnesota defines “technology circuits or systems” broadly. The definition covers phone wiring, data cabling, security systems, and audio wiring. A new run from amp to buried yard speaker qualifies.
The “minor work” exemption in 326B.36 is narrow. It covers adjusting or repairing existing parts of an installation. A brand-new landscape run from scratch is not minor work.
The permit process in Minnesota follows a call-before-close model. File before breaking ground. An inspector checks the open trench - verifying burial depth, cable rating, and connection quality - before you backfill. Call for your rough-in inspection while the trench is open, not after you have filled it.
If you own and occupy the home, you have an exemption from the licensing requirement. You can install the low-voltage speaker wiring yourself. You still pull the permit and still need a passing inspection. Minnesota does not allow self-certification.
The homeowner exemption does not extend to the 120V outdoor outlet circuit. That work requires a licensed Class A electrical contractor regardless of who owns the property.
Who Does the Work: PLT, Master Electrician, or Homeowner?
MN Statute 326B.31 defines a Power Limited Technician as the license required for planning, laying out, and installing technology circuits, including speaker wiring. A licensed master electrician also qualifies. A homeowner-occupant can do the low-voltage work on their own home with a permit and inspection. The 120V outdoor amplifier circuit requires a licensed electrician, full stop.
Minnesota structures electrical licensing around the type of work, not just the voltage.
Low-voltage speaker wiring (Class 2):
A licensed Power Limited Technician (PLT) is the specific credential for technology circuits, including audio wiring. A Technology System Contractor must employ a licensed PLT as its responsible individual. A licensed master electrician also qualifies. A homeowner-occupant can self-perform on their own residence, but needs a permit and must pass inspection.
The 120V outdoor amplifier circuit:
This is a branch circuit installation. It requires a licensed Class A electrical contractor. That contractor files the permit for this scope, installs the GFCI outlet and weatherproof cover, and connects to the panel. PLT licensing does not cover branch circuit work.
Before hiring anyone, verify their license at the Minnesota Department of Labor and Industry. An unlicensed contractor cannot pull a permit in Minnesota. Work done without a permit can create problems with insurance claims and home sales down the road.
We handle both scopes on a single service call. One visit, one permit package, one inspection sign-off. No handoffs between separate contractors on your yard.
What Does an Outdoor Amplifier Circuit Require?
A weatherproof outdoor amplifier cabinet needs a dedicated 20A GFCI-protected circuit and an extra-duty in-use (WU) weatherproof cover. Under the NEC, the old flip-lid snap covers no longer comply for wet locations. Installing this circuit requires a licensed electrician and a permit.
Most audio installation guides assume the amplifier lives indoors, feeding buried speaker wire through a foundation or rim joist penetration. For a small patio with two speakers close to the house, that works fine.
For a larger Twin Cities yard with four zones and runs across a half-acre lot, an outdoor amp cabinet is the cleaner solution. It eliminates the long indoor-to-yard cable run and puts zone control right at the amp.
The code requirements for an outdoor amplifier circuit:
- Any 15 or 20A, 125V outdoor receptacle must be GFCI-protected, per NEC 210.8(A)(3). No exceptions.
- Receptacles in wet locations require an extra-duty in-use weatherproof cover. This is the type that seals around a cord while it is plugged in. The snap-lid style covers leave the plug exposed and fail NEC 406.9(B)(1).
- A dedicated 20A circuit prevents nuisance trips from sharing the outlet with deck lighting or other loads.
Minnesota’s 2026 NEC adoption means any permit filed now must be measured against the 2026 edition. That is the version your inspector will use.
A dedicated amp circuit is a good reason to plan the rest of your deck or patio electrical work at the same time. Our deck and patio outdoor electrical planning guide walks through outlets, lighting circuits, and amp circuits as a package. One trench, multiple runs, one permit inspection.
Should You Use a 70V System for Your Yard?
If your runs are longer than about 100 feet or you have more than two speaker zones, yes. A 70V constant-voltage amplifier uses a step-down transformer at each speaker. Every speaker plays at consistent volume regardless of run length. One bad speaker cannot kill the zone. The cable is still Class 2, so burial rules and licensing are identical to a standard 4-ohm setup.
Standard 4-8 ohm systems work well for a small patio or deck with two speakers near the house. They become difficult to manage quickly.
Run four or more 4-8 ohm speakers in parallel and total impedance drops below what most amps can safely drive. Stretch a run to 150 feet and wire resistance causes a noticeable volume drop at the far end. Add a second zone and you are stacking impedance problems.
A 70V constant-voltage system sidesteps all of this. Each speaker has a built-in step-down transformer with selectable wattage taps. The AVIXA standard for distributed audio design provides guidance on speaker configurations like this one. Residential systems with larger footprints benefit from the same engineering that makes 70V the standard in commercial installs.
The amplifier draws more current than a standard stereo receiver. That is the primary reason the dedicated outdoor circuit is not optional. We size the circuit for the specific amp you are using, not a generic 20A estimate.
If you are tying outdoor zones into a whole-home system, the whole-home audio wiring installation guide covers how indoor and outdoor zones connect. Done right, you control everything from one interface.
Outdoor Landscape Speaker Wiring Installation: What the Job Looks Like Step by Step
Here is how a typical four-speaker, two-zone installation comes together on a Twin Cities property.
Step 1: Site walk and design
We walk the yard with you, mark speaker locations, identify the amp location (indoor or outdoor cabinet), and plan the conduit route. We note obstacles: concrete walks, irrigation zones, and tree roots. We confirm the system type - standard 4-8 ohm or 70V - before anything is ordered.
Step 2: Permit filing
We file the permit before any work begins. The permit covers the technology circuit installation and, if needed, the 120V outdoor circuit.
Step 3: Trench and conduit
We dig to 24 inches in standard lawn areas. Schedule 40 PVC is our baseline. Conduit sweeps gently around obstacles. Entry points at concrete edges get a sweep connector to handle soil movement.
Step 4: Cable pull
We pull CL2 cable through the conduit from the amp location to each speaker stub-out above grade. All in-ground splice points are avoided. Wire runs continuously from the amp to the speaker connection above ground.
Step 5: Outdoor circuit installation
If the amp lives outdoors, we install the dedicated 20A GFCI circuit and the extra-duty WU cover. We schedule the rough-in inspection before closing any trenches. Our outdoor GFCI outlet installation service covers what this circuit involves in detail.
Step 6: Speaker mounting
We mount the speakers to posts, rocks, or landscape planters. All cable-to-speaker connections are weatherproof and made above grade. No wire nuts exposed to rain.
Step 7: Inspection and backfill
The inspector checks the open trench: burial depth, cable rating, conduit quality, and outlet installation. We pass inspection, then backfill and restore the lawn. Sod can go back down on most jobs the same day.
A typical four-speaker, two-zone system runs one to two days across two visits: rough-in inspection, then final. If you are also planning landscape lighting, running both conduit systems in the same trench cuts the overall cost substantially. See our outdoor and landscape lighting installation service for what pairs naturally with a landscape audio project.
The Mistake Most Homeowners Make
They order the equipment before designing the electrical system.
A 70V amplifier is not compatible with standard 4-8 ohm speakers. An outdoor amp cabinet designed for a specific post mount may not fit where the conduit has to surface. Speaker locations that look clean on a yard diagram may require crossing a concrete walkway, an irrigation main, or a gas line.
Equipment returns cost time. Redigging a trench costs real money. Designing the electrical layout first and then sizing the equipment to match costs neither.
Get the plan on paper, pull the permit, confirm amp and speaker compatibility, and order gear sized to the system you have actually designed. That sequence saves more headaches than any single component choice.
Northern Mister Sparky is America’s On-Time Electrician(R), locally owned and operated right here in the Twin Cities - no malarky. We handle the circuit, the conduit, the permit, and the inspection. You bring the playlist.
Call 763-200-5956 or book online to schedule a landscape audio consultation. If the project also involves a panel upgrade or additional outdoor circuits, ask about financing options when you call.
Frequently Asked Questions
Do I need a permit for landscape speaker wiring in Minnesota? +
Can I bury standard CL2 speaker wire underground? +
How deep should I bury landscape speaker conduit in the Twin Cities? +
Need an electrician now?