
Whole Home Audio Wiring Installation: Twin Cities Guide
Key Takeaways
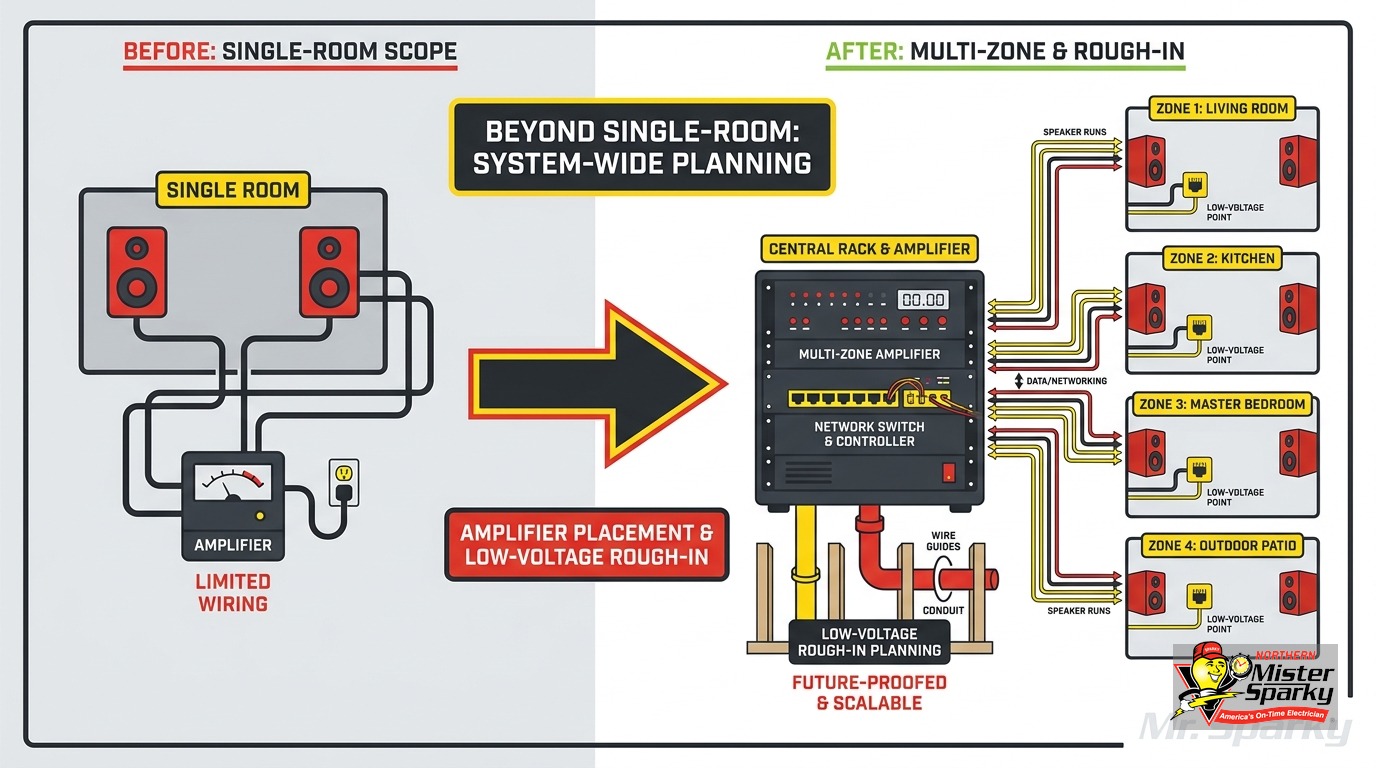
- Whole home audio wiring installation splits into two scopes: the electrician’s rough-in (cable pulls, dedicated circuits, conduit sleeves) and the AV installer’s system connection.
- Minnesota adopted the 2026 NEC on August 17, 2026. Any permit filed on or after that date must comply.
- All in-wall cable must be CL2 at minimum. Floor penetrations require CL2R (riser-rated). Air-handling spaces require CL2P (plenum-rated).
- NEC 725.136 requires a 2-inch minimum separation from line-voltage wiring when run parallel in open framing.
- Home-run (star) topology is the industry standard: one continuous cable per speaker pair, all terminating at the amp location. No daisy-chains.
- Wire gauge: 16 AWG for runs under 50 feet, 14 AWG for 50-100 feet, 12 AWG over 100 feet.
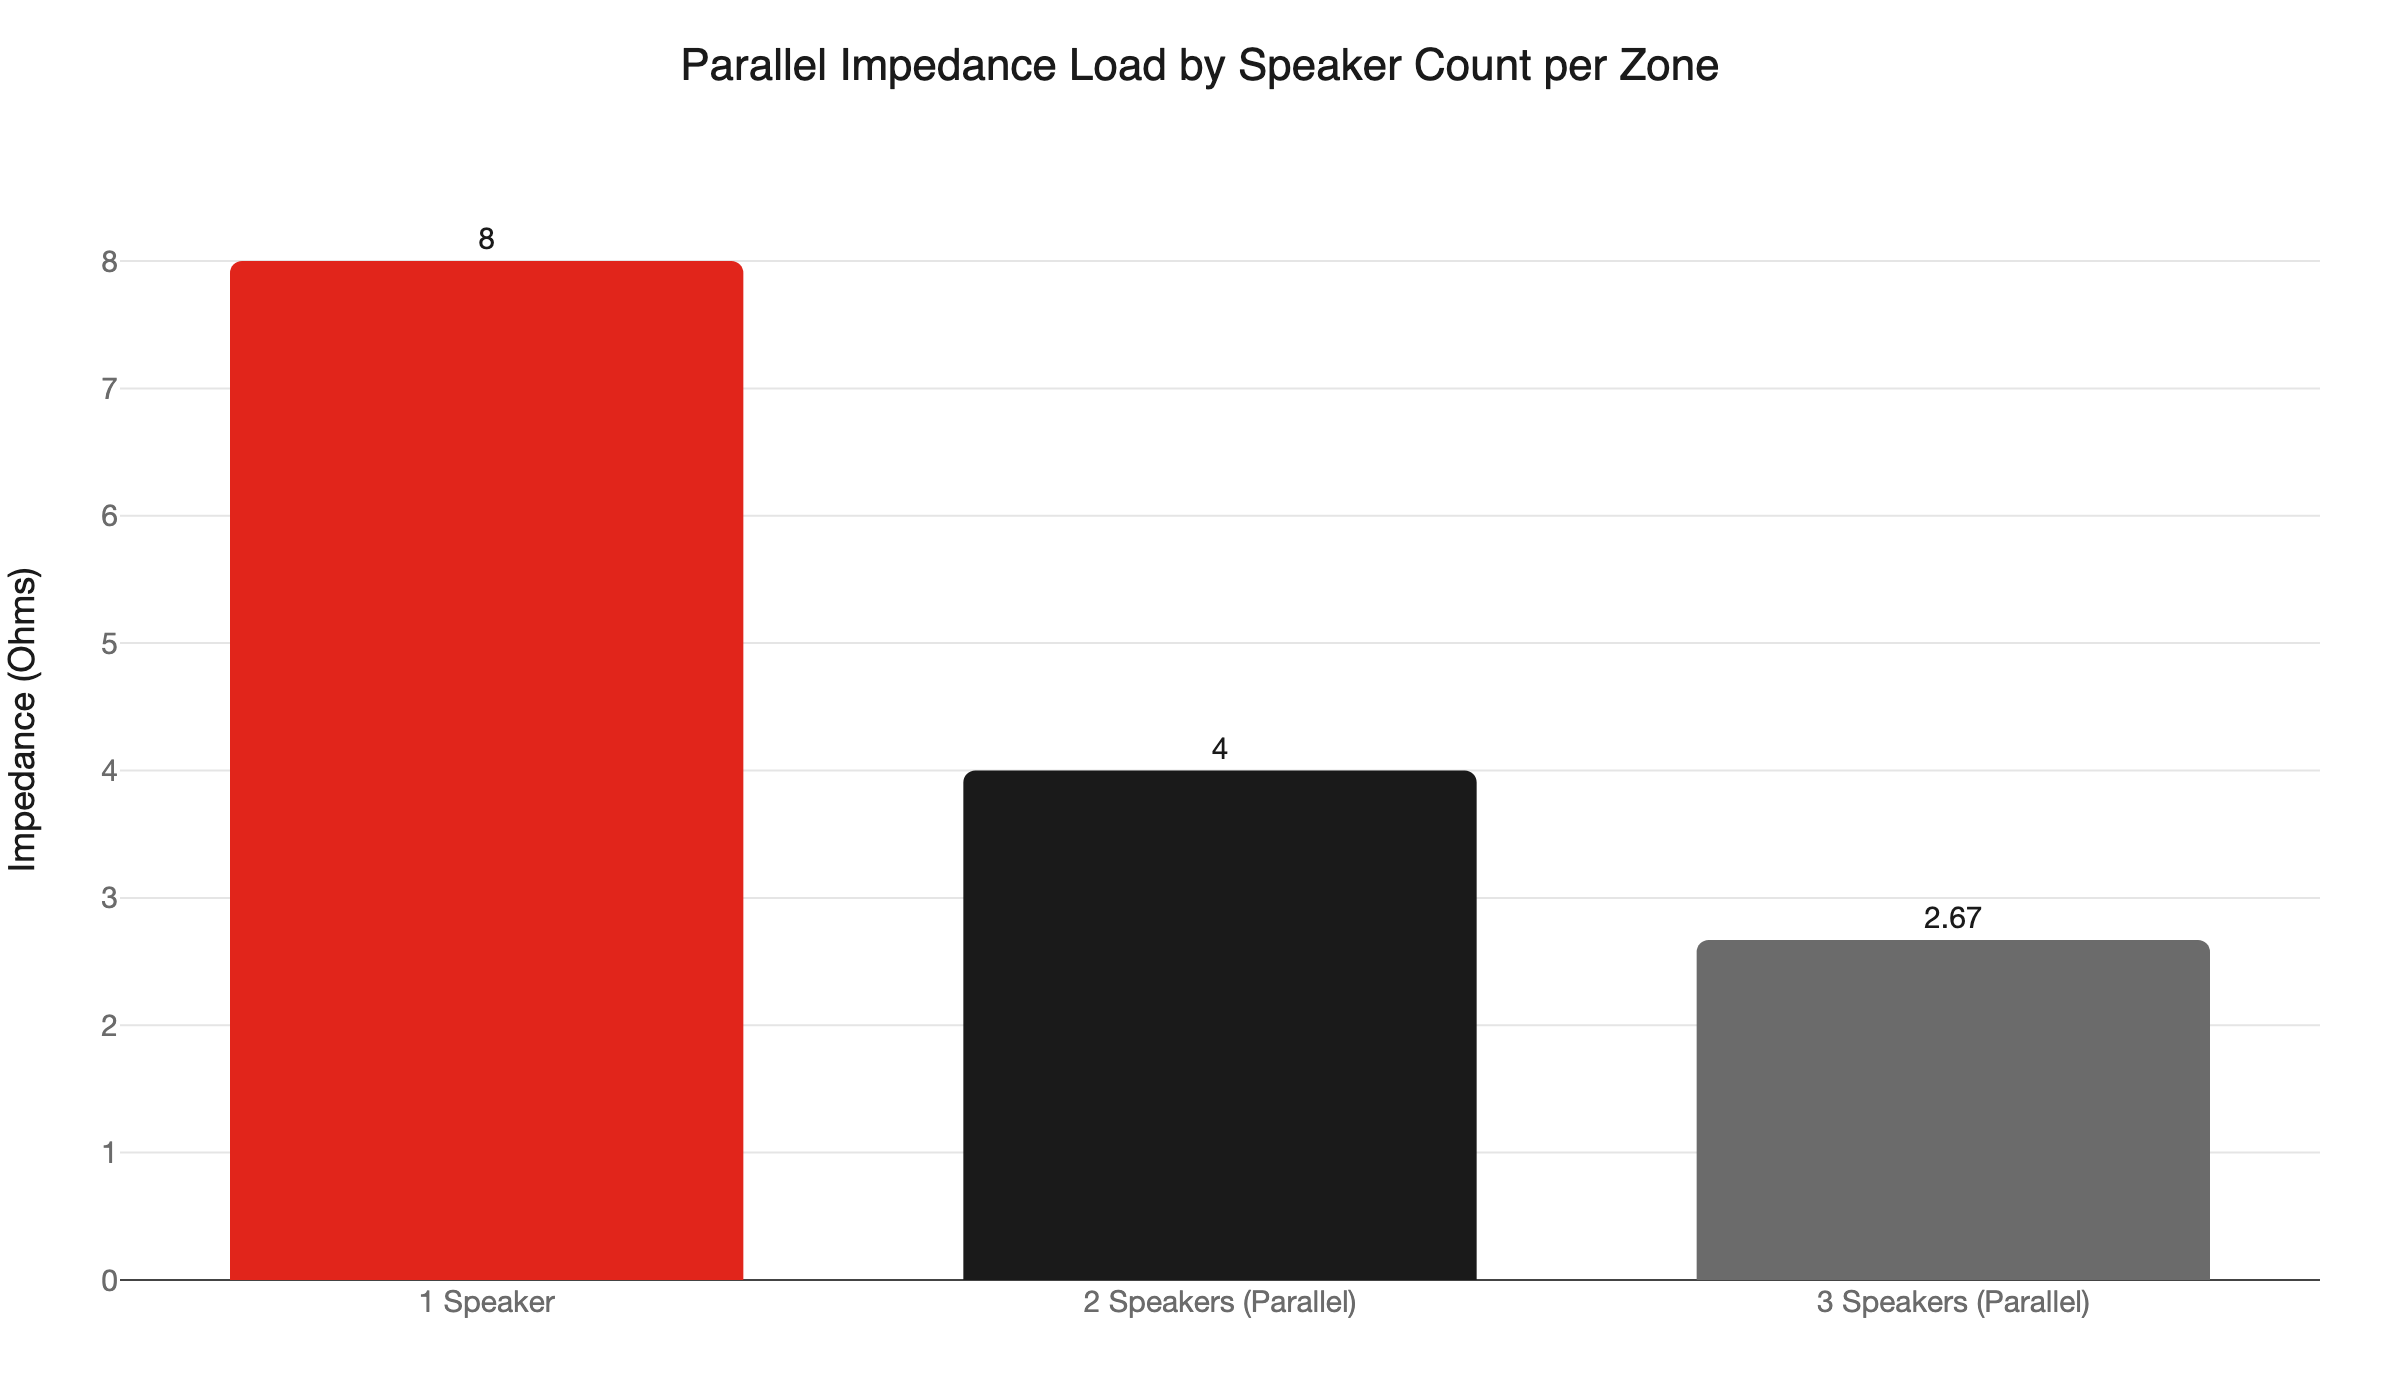
- Wiring two 8-ohm speakers in parallel drops the load to 4 ohms - the lower safe limit for most residential amps. Three speakers in parallel drops it to 2.67 ohms and will cause amplifier failure.
- A dedicated 20-amp circuit is the right spec for a multi-zone amplifier rack.
- In older Twin Cities homes, plan conduit sleeves during any remodel. Retrofitting is far more expensive once the walls are closed.
Planning a whole home audio wiring installation in your Twin Cities home involves two trades working in sequence. The electrician comes first. By the time your AV installer walks in the door, the rough-in is done, the circuits are live, and every speaker location has a labeled cable end waiting. Get this layer wrong and you are fishing wire through finished walls - or worse, pulling drywall. Get it right and the rest of the project is clean.
What Is Whole Home Audio Wiring Installation?
Whole home audio wiring installation means routing speaker cable, control wiring, and power circuits through your home’s structure so that music plays in multiple rooms from a central amplifier and source. The rough-in work happens before drywall goes up - or, in a retrofit, inside finished walls.
This is not a plug-in system. A permanently installed multi-zone audio setup requires listed in-wall cable, code-compliant routing through wall and floor assemblies, and a dedicated circuit for the amplifier rack. Most online guides skip this layer. They start at “choose your streaming platform.” This guide starts at the rough-in, because the rough-in is what separates a system that lasts from one that creates ongoing problems.
Who Does the Rough-In Work in Minnesota?
A licensed electrician handles the rough-in layer. That includes dedicated circuits, conduit sleeves, and code-compliant cable pulls. The AV installer connects the system components afterward. These two scopes do not overlap.
In Minnesota, low-voltage work - including audio, security, and data - falls under a separate Low Voltage Restricted Electrical License. A general electrical license does not automatically qualify a contractor to install and connect audio equipment in every jurisdiction. What matters practically: your electrician owns the cable pulls, circuit installation, and penetration sealing regardless of who programs the zones and connects the speakers.
The two trades need to coordinate before either one starts. The electrician needs to know the equipment room location and the topology the AV installer is designing around. The AV installer needs to know what the electrician will leave for them: labeled terminations at the amp location and at each speaker rough-in box. Getting that coordination right at the start saves hours of rework at the finish.
What Does the 2026 NEC Require for In-Wall Audio Cable?
All cable installed inside walls must be listed - CL2 rated at minimum. NEC Article 640 governs permanently installed audio signal processing equipment and requires that cable inside walls be listed (CL2 or CL3 at minimum). Article 640.9 points to Articles 725 and 800 for the underlying wiring method requirements.
Minnesota adopted the 2026 NEC on August 17, 2026. Permits filed before that date follow the 2023 NEC. Permits filed on or after that date must comply with the 2026 standard. Licensing exams shifted to the 2026 NEC on September 8, 2026.
Why does the code transition matter for an audio project? Inspectors reviewing new rough-ins today apply the 2026 standard. An electrician who is not current on the transition can produce work that fails inspection and requires rework. Verify that whoever pulls your permit is working under the correct code cycle before the project starts.
The Cable Jacket Hierarchy: CL2, CL2R, and CL2P
NEC Article 725 establishes the Class 2 and Class 3 circuit definitions that determine which jacket ratings are code-compliant for residential audio runs. The three ratings you need to know:
- CL2: Minimum for in-wall runs within a single floor level.
- CL2R (riser-rated): Required for any vertical run penetrating a floor assembly. In a two-story Twin Cities home, that means any cable traveling from the basement to the first floor, or from the first floor to the second floor.
- CL2P (plenum-rated): Required for any run through an air-handling space - including drop ceilings that return air to the HVAC system.
In most multi-zone installs in two-story homes, CL2R is the practical baseline, not CL2. Plan for it from the start and you will not need to rework cable after the rough-in inspection.
One Minnesota-specific note: attic spaces in the Twin Cities reach -20°F in January and can exceed 140°F in August. Most CL2 and CL3 cable is rated from -20°C to 60°C. That range works fine for conditioned wall cavities. For any run through an unconditioned attic, verify the cable’s temperature rating before specifying it. The rating may be marginal in a hard Minnesota winter if the attic floor insulation is thin.
What Wire Gauge Do You Need for Multi-Zone Speaker Runs?
Use 16 AWG CL2 for runs up to 50 feet, 14 AWG for 50-100 feet, and 12 AWG for runs over 100 feet or any subwoofer run. Wire resistance increases with length and will audibly degrade bass response on longer runs.
Older Twin Cities homes on rambler and split-level lots compound this quickly. A finished basement adds 30 to 40 feet of vertical and horizontal distance before the cable even reaches the first floor. A speaker in a second-floor bedroom can easily be 80 to 100 feet from an amp closet in the basement. That run needs 14 AWG at minimum.
Measure the actual cable route through walls, across joists, and down chases - not the floor-plan distance. A run that looks like 40 feet on a floor plan can be 70 feet when you account for the path through the structure. Home-run topology means every cable runs continuously from the amp location to the speaker location with no splices. The longest run in the house sets the wire gauge spec for the whole job.
For single-room in-wall speaker work, see our post on in-wall speaker wiring installation.
Why Does Impedance Math Matter in Multi-Zone Systems?
Most residential amplifiers are rated for an 8-ohm load. Wiring two 8-ohm speakers in parallel drops that load to 4 ohms - the lower safe limit for most residential amps. Three speakers in parallel drops it to 2.67 ohms and will cause thermal shutdown or amplifier failure.
This is the most common technical mistake in whole home audio wiring installation. A homeowner wires three ceiling speakers into one zone, each rated at 8 ohms. The parallel combination gives the amplifier a 2.67-ohm load. The amp overheats, the protection circuit trips, and the homeowner assumes the equipment is defective. The equipment is usually fine - the wiring design is the problem.
Two solutions exist, and the choice affects the rough-in:
- Impedance-matching in-wall volume controls: Designed for multi-speaker zones. They present a stable 8-ohm load to the amplifier regardless of how many speakers are downstream. This is the standard residential fix for a 2- or 3-speaker zone.
- 70V constant-voltage distribution: The commercial standard, increasingly used in large residential homes with 6 or more zones. Each speaker tap draws power independently, so the amplifier sees an additive wattage load rather than a parallel impedance load. It scales cleanly to 10 or 12 zones without impedance problems.
Coordinate the system design with your AV integrator before your electrician starts pulling cable. The amp location, circuit sizing, and cable topology can differ between an 8-ohm system with volume controls and a 70V distribution system. Changing course after the rough-in is expensive.
Equipment Room Design: The Electrician’s Deliverable
The amplifier rack needs a location before drywall closes. This is an electrical rough-in decision, not an afterthought.
What your electrician should install at the equipment location:
- A dedicated 20-amp, 120V circuit. A 6- to 8-zone system pulling 8 to 12 amps under load will nuisance-trip a shared circuit. It needs its own breaker from the panel. If you are planning a large rack with a whole-home theater system alongside the audio zones, ask your electrician whether a second dedicated circuit makes sense. For more on sizing dedicated circuits for entertainment systems, see our guide on home theater dedicated circuit planning.
- Labeled home-run terminations. Every speaker cable in the house terminates here with a label identifying the room and speaker position. A termination panel or punch-down block makes the AV installer’s job clean and the system easy to troubleshoot years later.
- Conduit sleeves for future runs. A 1-inch or 2-inch sleeve from the equipment room through the floor to each floor level costs almost nothing during rough-in. Retrofitting that path after drywall is up can run hundreds of dollars and usually requires patching.
- Whole-home surge protection at the panel. Whole-home surge protection protects the entire system, not just the rack. It is most cost-effective when added during a rough-in visit rather than as a standalone job later.
Does Whole Home Audio Wiring Require a Permit in Minnesota?
Yes - if the scope includes licensed electrical work. Dedicated circuits, panel connections, conduit installation, and penetrations of fire-rated assemblies all require a permit. The low-voltage cable pull itself may not require a separate permit in every municipality, but the electrical work always does.
Minnesota’s Department of Labor and Industry oversees both the permitting process and contractor licensing requirements. Any electrical work must be permitted, inspected, and signed off. An open or missing permit is a red flag in any home inspection and can slow or derail a sale.
The practical process: your electrician pulls the permit, completes the rough-in, and schedules the inspection. The AV installer typically does not pull a separate permit for the low-voltage connection work, but that varies by municipality. Ask your contractor before the project starts - not after the drywall is up.
If you are in Minneapolis or St. Paul, check with your local building department about any city amendments to the 2026 NEC. Some cities add requirements on low-voltage separation distances or inspection hold points that are not in the base code.
How Does Whole Home Audio Wiring Work in Older Twin Cities Homes?
Retrofitting cable in a finished home is harder and more expensive than new construction, but it is very doable. The best time to run speaker cable is during any remodel that opens walls. The second best time is now. The worst time is after you have already purchased the gear and expect installation next week.
Twin Cities older housing stock - 1950s to 1980s ramblers and split-levels in suburbs like Edina, Eden Prairie, and Plymouth - typically presents:
- Low ceiling joists with insulation packed between them
- Finished basements with drop ceilings that may or may not be accessible
- Insulated exterior walls with minimal interior chase space
- Plaster and lath construction in the oldest sections, which requires a different drilling approach than drywall
Retrofitting speaker cable means fishing wire through finished walls: cutting small access holes, using flex bits and fish tapes, and patching afterward. It is doable for most interior walls. Exterior walls and fully insulated areas are significantly harder and more expensive.
The cost math is straightforward. If you are already opening walls for a kitchen remodel, bathroom renovation, or basement finish, adding conduit sleeves and home-run speaker cable at that time costs a fraction of what a standalone retrofit costs later. Every remodel is a window - and in most older Twin Cities homes, that window does not stay open long.
Pairing Whole Home Audio with Structured Wiring
A whole home audio wiring installation is most cost-effective when it is part of a broader structured wiring project. If you are also running Cat 6 for wired networking or control wiring for a smart home system, a single rough-in pass covers all of it.
See our guide on home Ethernet Cat 6 structured wiring for how that layer works alongside audio runs. The equipment room location should serve all these systems together. An AV closet that also houses the networking gear, the alarm panel, and the smart home hub is far easier to manage than equipment spread across four locations in the house.
Planning the rough-in once, for all the low-voltage systems you anticipate needing, is almost always cheaper than phasing them in separately over several years.
Ready to Plan Your Whole Home Audio Rough-In?
The first call is to your electrician, not the AV installer. The rough-in decisions set the ceiling for everything else in the project.
Our team at Northern Mister Sparky is locally owned and operated in the Twin Cities. We work with AV integrators regularly on projects exactly like this one. We pull the permits, do the rough-in right the first time, and leave clean labeled terminations for whoever connects your system.
Call us at 763-200-5956 or book online. We show up on time. That is the “America’s On-Time Electrician(R)” promise, and we back it with the UWIN(R) 100% satisfaction guarantee.
Frequently Asked Questions
Does whole home audio wiring installation require a permit in Minnesota? +
What wire gauge should I use for in-wall speaker cable? +
Can I run speaker wire next to regular electrical wiring in the wall? +
Need an electrician now?