
Outdoor Post Light Wiring: The Twin Cities Homeowner's Guide
Key Takeaways
- A curb-appeal post light at the driveway entrance or along a walkway means a new dedicated circuit from the panel, not a tap off an existing outdoor outlet.
- Minnesota adopted the 2026 NEC on August 17, 2026. Any permit filed now must comply with the new code.
- Minnesota Statute Chapter 216D requires calling 811 at least two full business days before any excavation. This applies to homeowners, not just contractors.
- Twin Cities frost depth runs 42-48 inches. Set your post footing below the frost line or freeze-thaw cycles will heave it.
- Underground wiring must be inspected before you backfill the trench. Backfill first and you re-dig.
- Homeowners may pull their own permit only on their owner-occupied single-family home. Rentals and duplexes require a licensed contractor.
What Makes Outdoor Post Light Wiring Different From a Simple Outlet Run?
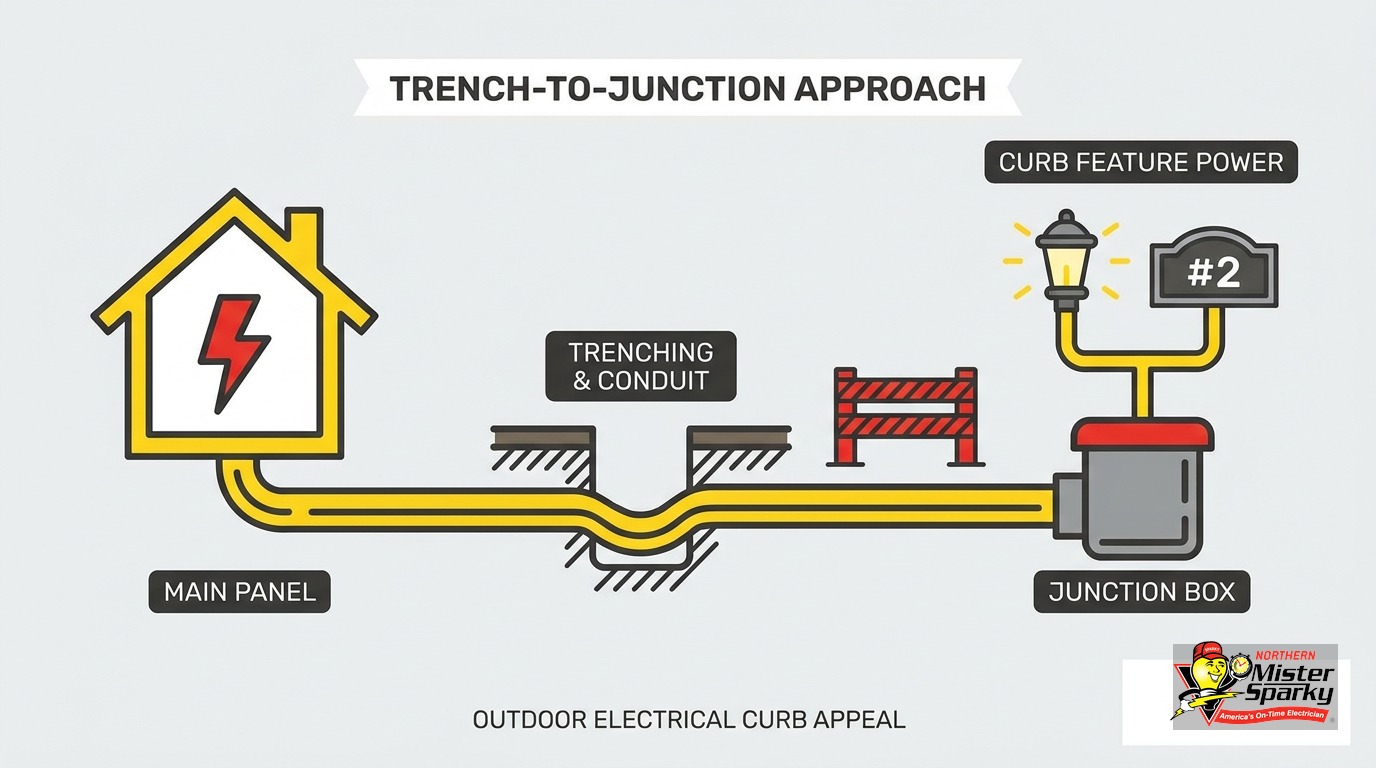
A post light at a driveway entrance or along a front walk is a stand-alone circuit job, not a short tap off an existing outlet. It needs a dedicated underground run from your electrical panel to a buried weatherproof junction box at the post base. That changes the permit, the burial depth requirements, and the inspection process significantly.
Most guides online describe running a short UF-B cable from an existing outdoor receptacle to a nearby garden post. That works for a planter light a few feet off the house. It does not work for a post at the property edge, a driveway entrance, or anywhere a real trench run is involved.
This project is also different from a low-voltage landscape lighting setup. Those run at 12V from a plug-in transformer. A curb-appeal post light runs at 120V on a dedicated branch circuit. The installation method, the code requirements, and the permit process are not the same.
And it is different from a deck receptacle installation, which typically extends an existing circuit to add an outlet. A standalone post light at the property edge is its own circuit from the panel, with its own breaker.
The electrician approach: run a new 15A or 20A circuit from the panel, route it through the house wall, and take it underground to a weatherproof junction box at the post base. The fixture feeds from that box through the post interior to the fixture head. This gives the light its own breaker, a dedicated path, and wiring built to last.
If your post is literally two feet from an existing outdoor outlet, a short-run fixture kit may work fine. For any meaningful distance underground, every section below applies.
Do I Need a Permit to Wire an Outdoor Post Light in Minnesota?
Yes. Any new circuit installation in Minnesota requires an electrical permit. In incorporated cities, the permit comes from the city building department. In unincorporated areas, it comes from the state DLI. No permit means no inspection, and unpermitted electrical work creates liability and problems at resale.
Minnesota DLI is the state authority for electrical permits and code adoption. On August 17, 2026, Minnesota adopted the 2026 NEC. Any permit filed on or after that date must comply with the new edition, not the 2023 code. This is recent. Most online guides have not caught up.
Pull the permit before work starts. Two inspections are required: a rough-in inspection with the trench open and wiring visible, and a final inspection after the fixture is installed and everything is buttoned up. Both are required before the project is legally complete.
Minnesota allows homeowners to pull their own electrical permit and do their own work under specific rules. The property must be your owner-occupied single-family homestead. You must personally do the work, not hire a handyman to do it for you. Rentals, duplexes you do not live in, and condos require a licensed contractor regardless of how straightforward the job appears.
For a full walkthrough of the Minnesota permit process, see our Minnesota electrical permit guide.
Call 811 Before You Dig: This Is Not a Tip
Minnesota Statute Chapter 216D requires every person planning excavation to call Gopher State One Call at 811 at least two full business days before breaking ground. Homeowners are covered by this law, not just contractors. Weekends and state holidays do not count toward the two-day window.
The call is free. A locator marks buried gas lines, water mains, electrical service, telecom cables, and other utilities with color-coded paint and flags. Locators follow the APWA color code: red for electric power lines, yellow for gas and oil, orange for telecom and cable, blue for water, and green for sewers. Each mark tells you what utility runs there and within what zone.
You dig around every mark. Skip the call and you risk fines. Hit a gas line and you face something far worse.
Every trench in Minnesota starts with 811. Make it the second step after you pull the permit.
When you call, have the dig location ready: the address, a brief description of where you plan to trench, and the maximum depth. A locator typically arrives within two business days. After marks are in, MN statute requires hand-digging or soft excavation within 18 inches of any mark. Use a mechanical excavator only outside that tolerance zone.
How Deep Does the Trench Need to Be in the Twin Cities?
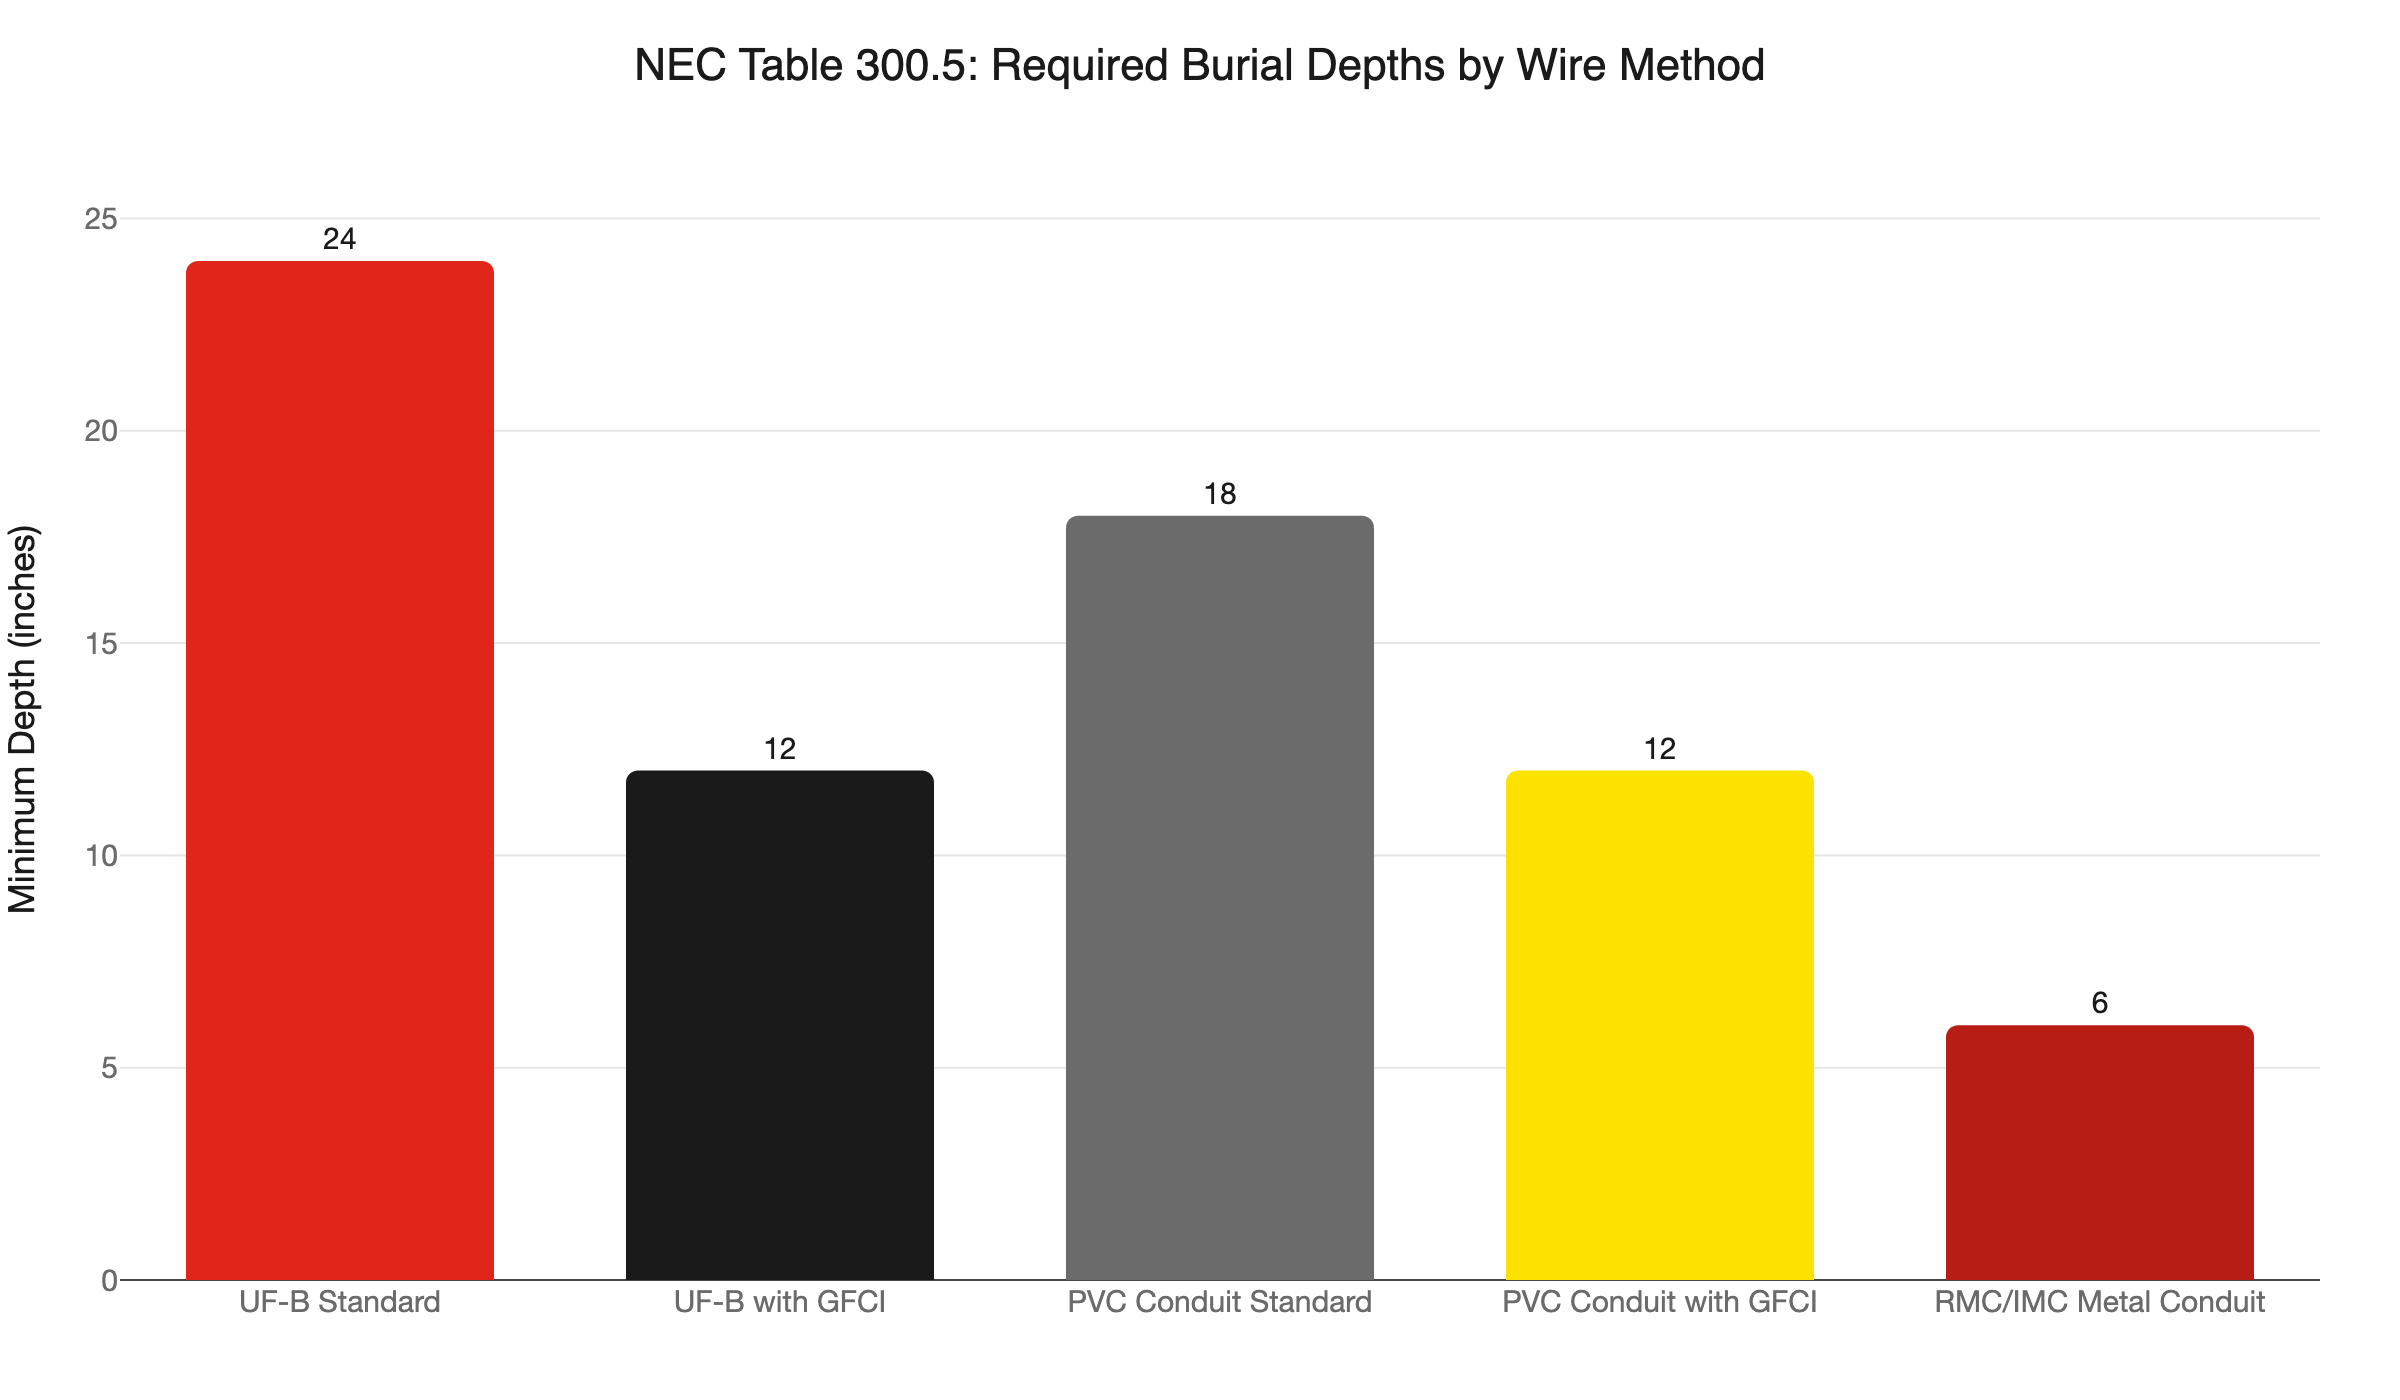
Burial depth depends on wire method. Direct-burial UF-B cable requires 24 inches of cover standard, or 12 inches if the circuit is GFCI-protected on a 120V residential branch circuit. PVC Schedule 40 conduit requires 18 inches standard, or 12 inches with the same GFCI exception. Metal conduit (RMC or IMC) requires only 6 inches. These minimums come from NEC Table 300.5.
Those are national code minimums. In the Twin Cities, frost depth runs 42-48 inches. That number matters for your post footing, not the wire burial depth itself. Confusing the two is a common mistake.
Set a 4x4 wooden post in concrete at 24 inches in Minnesota clay and freeze-thaw cycles will push it upward over multiple winters. A heaved post pulls the conduit fitting or cable connection at its base right along with it. Given enough Minnesota winters, that cracks a fitting or pulls an underground connection apart.
Post footings for any fixture in the Twin Cities should reach below the frost line. A tubular concrete pier at 48 inches or deeper with a surface anchor is one clean solution. A ground anchor sleeve rated for frost-heave conditions is another. Check with your post manufacturer about the right method for your soil type.
Bring a tape measure into the trench during installation. The rough-in inspector will verify depth, and a discrepancy is a failed inspection. Dig to your target depth before laying wire or conduit.
The wire burial depth and the post footing depth are two separate decisions. Get both right before the first shovel goes in.
For a full breakdown of Minnesota burial depth rules, see our underground electrical wire depth guide.
Direct-Burial Cable or Conduit: Which Wire Method Is Right?
For runs under 30 feet to a secondary accent post, direct-burial UF-B cable is code-compliant and cheaper to install. For any run over 30-40 feet, or a primary fixture you do not want to re-trench around in 15 years, PVC Schedule 40 conduit with THWN-2 wire is the better long-term choice.
Direct-burial UF-B cable is the faster option. You trench to the required depth, lay the cable, and backfill. No conduit fittings to cut, glue, or align. On a short run to a secondary garden post, the cost and time savings are real.
The downside is permanence. If the cable fails in 15 years, you re-trench. There is no way to pull replacement wire through a cable that is encased directly in soil. On a 60-foot run to a driveway entrance post, re-trenching means a full excavation through whatever landscape has grown around it.
PVC Schedule 40 conduit with THWN-2 wire costs more upfront. Cutting, gluing, and aligning fittings takes more time than laying cable. But conduit creates a protected wiring pathway that lasts the life of the property. If a wire fails, you pull new wire through the same conduit. No digging required.
Minnesota weather strengthens the conduit case. Frozen soil shifts. Tree roots intrude. Conduit gives the wire a physical channel instead of direct soil contact over two-plus decades.
The rule of thumb: use UF-B for short runs to secondary accent lights. Use conduit for the primary post and any run you would not want to excavate around a finished landscape.
What Goes at the Base of the Post?
The underground circuit terminates in a weatherproof junction box at the post base. A short conduit stub rises from the box through the post interior. Wires connect inside the box, the gasketed cover goes on, and wire feeds up to the fixture head. The box must carry a UL wet-location listing.
Here is the assembly in sequence:
- The underground conduit makes a sweep elbow at the post location, turning from horizontal to vertical.
- The conduit terminates at a weatherproof PVC junction box mounted at or just above grade.
- A conduit nipple runs from the box up through the interior of the post to the fixture head location.
- Wire connections are made inside the box using rated wire nuts. The gasketed cover is secured against the box lip.
- Fixture wires tie in at the top of the post inside the fixture housing.
Every transition from underground to above-grade needs a watertight fitting. Water follows wire. A loose or improperly rated fitting lets moisture track into the box and into the circuit over time.
Boxes that sit below grade must be rated for direct burial. Boxes that sit at grade should rest on a bed of gravel for drainage. Do not let a non-burial-rated box sit in standing water. Check the product label before purchasing: it should explicitly state the listing for the intended use.
Does an Outdoor Post Light Circuit Need GFCI Protection?
If the circuit includes any outdoor receptacle, GFCI protection is required under NEC 210.8(A)(3). That section requires GFCI on all 120V, 15A and 20A outdoor receptacles in residential locations. If the post light is a fixture only with no receptacle, GFCI is not required on the fixture itself, but adding it is a smart choice.
There is also a practical depth benefit. The GFCI exception in NEC Table 300.5 reduces the required burial depth on GFCI-protected 120V circuits: from 24 inches to 12 inches for UF-B cable, and from 18 inches to 12 inches for PVC conduit. On a long trench in Twin Cities clay, shaving six to twelve inches off the dig saves real time and labor.
GFCI protection can come from three sources: a GFCI breaker at the panel, a GFCI receptacle at the first point on the circuit feeding downstream loads, or an in-line GFCI device near the start of the run. For a new dedicated circuit, a GFCI breaker at the panel is the cleanest solution. It protects every point on the circuit from the source, not just the downstream portion.
Our outdoor GFCI outlet installation guide covers the differences between protection options in more detail.
The Pre-Backfill Inspection: The Step You Cannot Skip
This is the single most expensive mistake homeowners make on underground electrical work: backfilling the trench before the rough-in inspection.
Minnesota Administrative Rule 3801.3770 requires underground wiring to be inspected before the trench is covered. The inspector needs to see the wire method, burial depth, conduit fittings, and the transition at the post base. Backfill first and they cannot verify any of it. The inspection fails. You re-dig.
The correct sequence: dig the trench, run the wire or conduit, make underground connections, call for the rough-in inspection, wait for the inspector, pass the inspection, then backfill. That is the order. Do not shortcut the wait.
Call your building department the same day you pull the permit and ask how far out rough-in inspections are running. Some cities can schedule next-day. Others have multi-day backlogs. Build your project timeline around the inspection window, not around the trench schedule.
After the rough-in passes, backfill and move on to above-grade work: setting the post, finishing connections at the junction box, running wire through the post, and installing the fixture head. The final inspection happens after everything is installed and the fixture is operational.
What Fixtures Work for an Outdoor Post Light?
Any post light in an open, unroofed outdoor location is classified as a wet location under the NEC. The fixture must carry a UL wet-location listing. A damp-location listing is not sufficient for a post exposed to direct rain, snow, and water contact. Check the label before you buy.
The listing mark on the fixture box should read “suitable for wet locations” or show a “wet location” listing symbol. A fixture marked only “damp location” is rated for covered porches and overhangs, not open-air posts in a yard.
Family Handyman’s outdoor lighting guide confirms this requirement, though most DIY articles bury it in a footnote or skip it entirely. Make the wet-location listing a non-negotiable spec when you shop. Finish, style, and bulb type are your choices. The listing is not.
For light source, LED is the right choice for a Minnesota outdoor post light. LEDs handle cold starts in sub-zero temperatures better than CFLs, draw less power over time, and last long enough to justify the cost of the underground circuit feeding them. Choose a fixture with a sealed lens or a rated enclosure that handles wide temperature swings. Twin Cities temperature cycles from January to July can span more than 100 degrees. A quality wet-location fixture handles that without trouble. A marginal one will let moisture in after a few seasons.
When Should You Call a Licensed Electrician?
Call a licensed electrician when the job involves a new circuit from the panel, a trench of any meaningful length, any uncertainty about your permit, or anything that puts you inside the electrical panel. Panel work is not the place to figure things out as you go.
Several situations point clearly toward calling our team:
- The post is more than 30-40 feet from the house or the nearest junction point.
- Your home has an older panel, a service running near capacity, or aluminum branch circuit wiring that needs evaluation before adding a new load.
- The trench route crosses hardscape, an irrigation system, or buried utilities that complicate the path.
- You are not comfortable opening the electrical panel to add or relocate a breaker.
- This post light is part of a larger outdoor electrical plan that includes deck outlets, landscape circuits, or an outdoor kitchen circuit. Coordinating multiple underground circuits in one project reduces digging and simplifies the permit process.
Our team at Northern Mister Sparky is locally owned and operated in the Twin Cities. We know Minnesota’s permit process, frost depth considerations, and 2026 NEC compliance because this is where we work every day. We pull the permit, schedule both inspections, and run the trench-to-panel circuit so your post light is safe, code-compliant, and built to last through Minnesota winters.
Ready to Wire Your Outdoor Post Light?
Call us at 763-200-5956 or book your appointment through our outdoor lighting services page. As America’s On-Time Electrician(R), we show up when we say we will. Our UWIN(R) 100% satisfaction guarantee backs every job we complete.
We serve Minneapolis, St. Paul, Bloomington, Brooklyn Park, Woodbury, Blaine, Maple Grove, Plymouth, and communities throughout the Twin Cities metro. Financing is available for larger projects, including panel work if this post light run reveals a service that needs attention.
Frequently Asked Questions
Do I need a permit to wire an outdoor post light in Minnesota? +
How deep does the trench need to be for a post light in the Twin Cities? +
Can a homeowner do their own outdoor post light wiring in Minnesota? +
Why must the trench be inspected before backfilling? +
Need an electrician now?