
How to Wire a Combination Switch Outlet in Minnesota
Key Takeaways
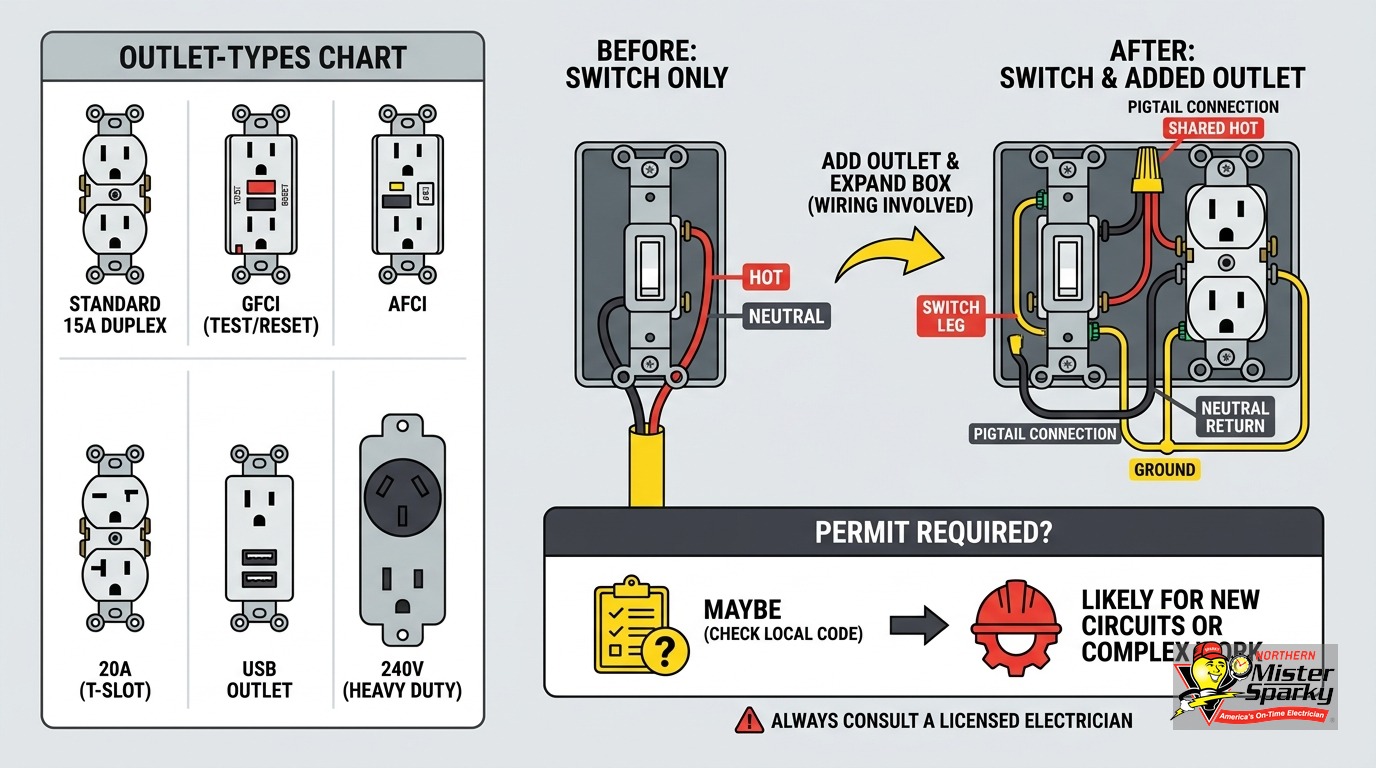
- A combination switch outlet requires a hot wire, a neutral wire, and a ground at the switch box. Not all switch boxes have a neutral.
- Older Twin Cities homes, especially those built from the 1940s through the 1970s, are heavily switch-loop wired. In those boxes, the white wire is a re-identified hot, not a neutral. Connecting an outlet to it is a shock hazard.
- Three distinct scenarios exist when you open a switch box. Each one changes the project scope.
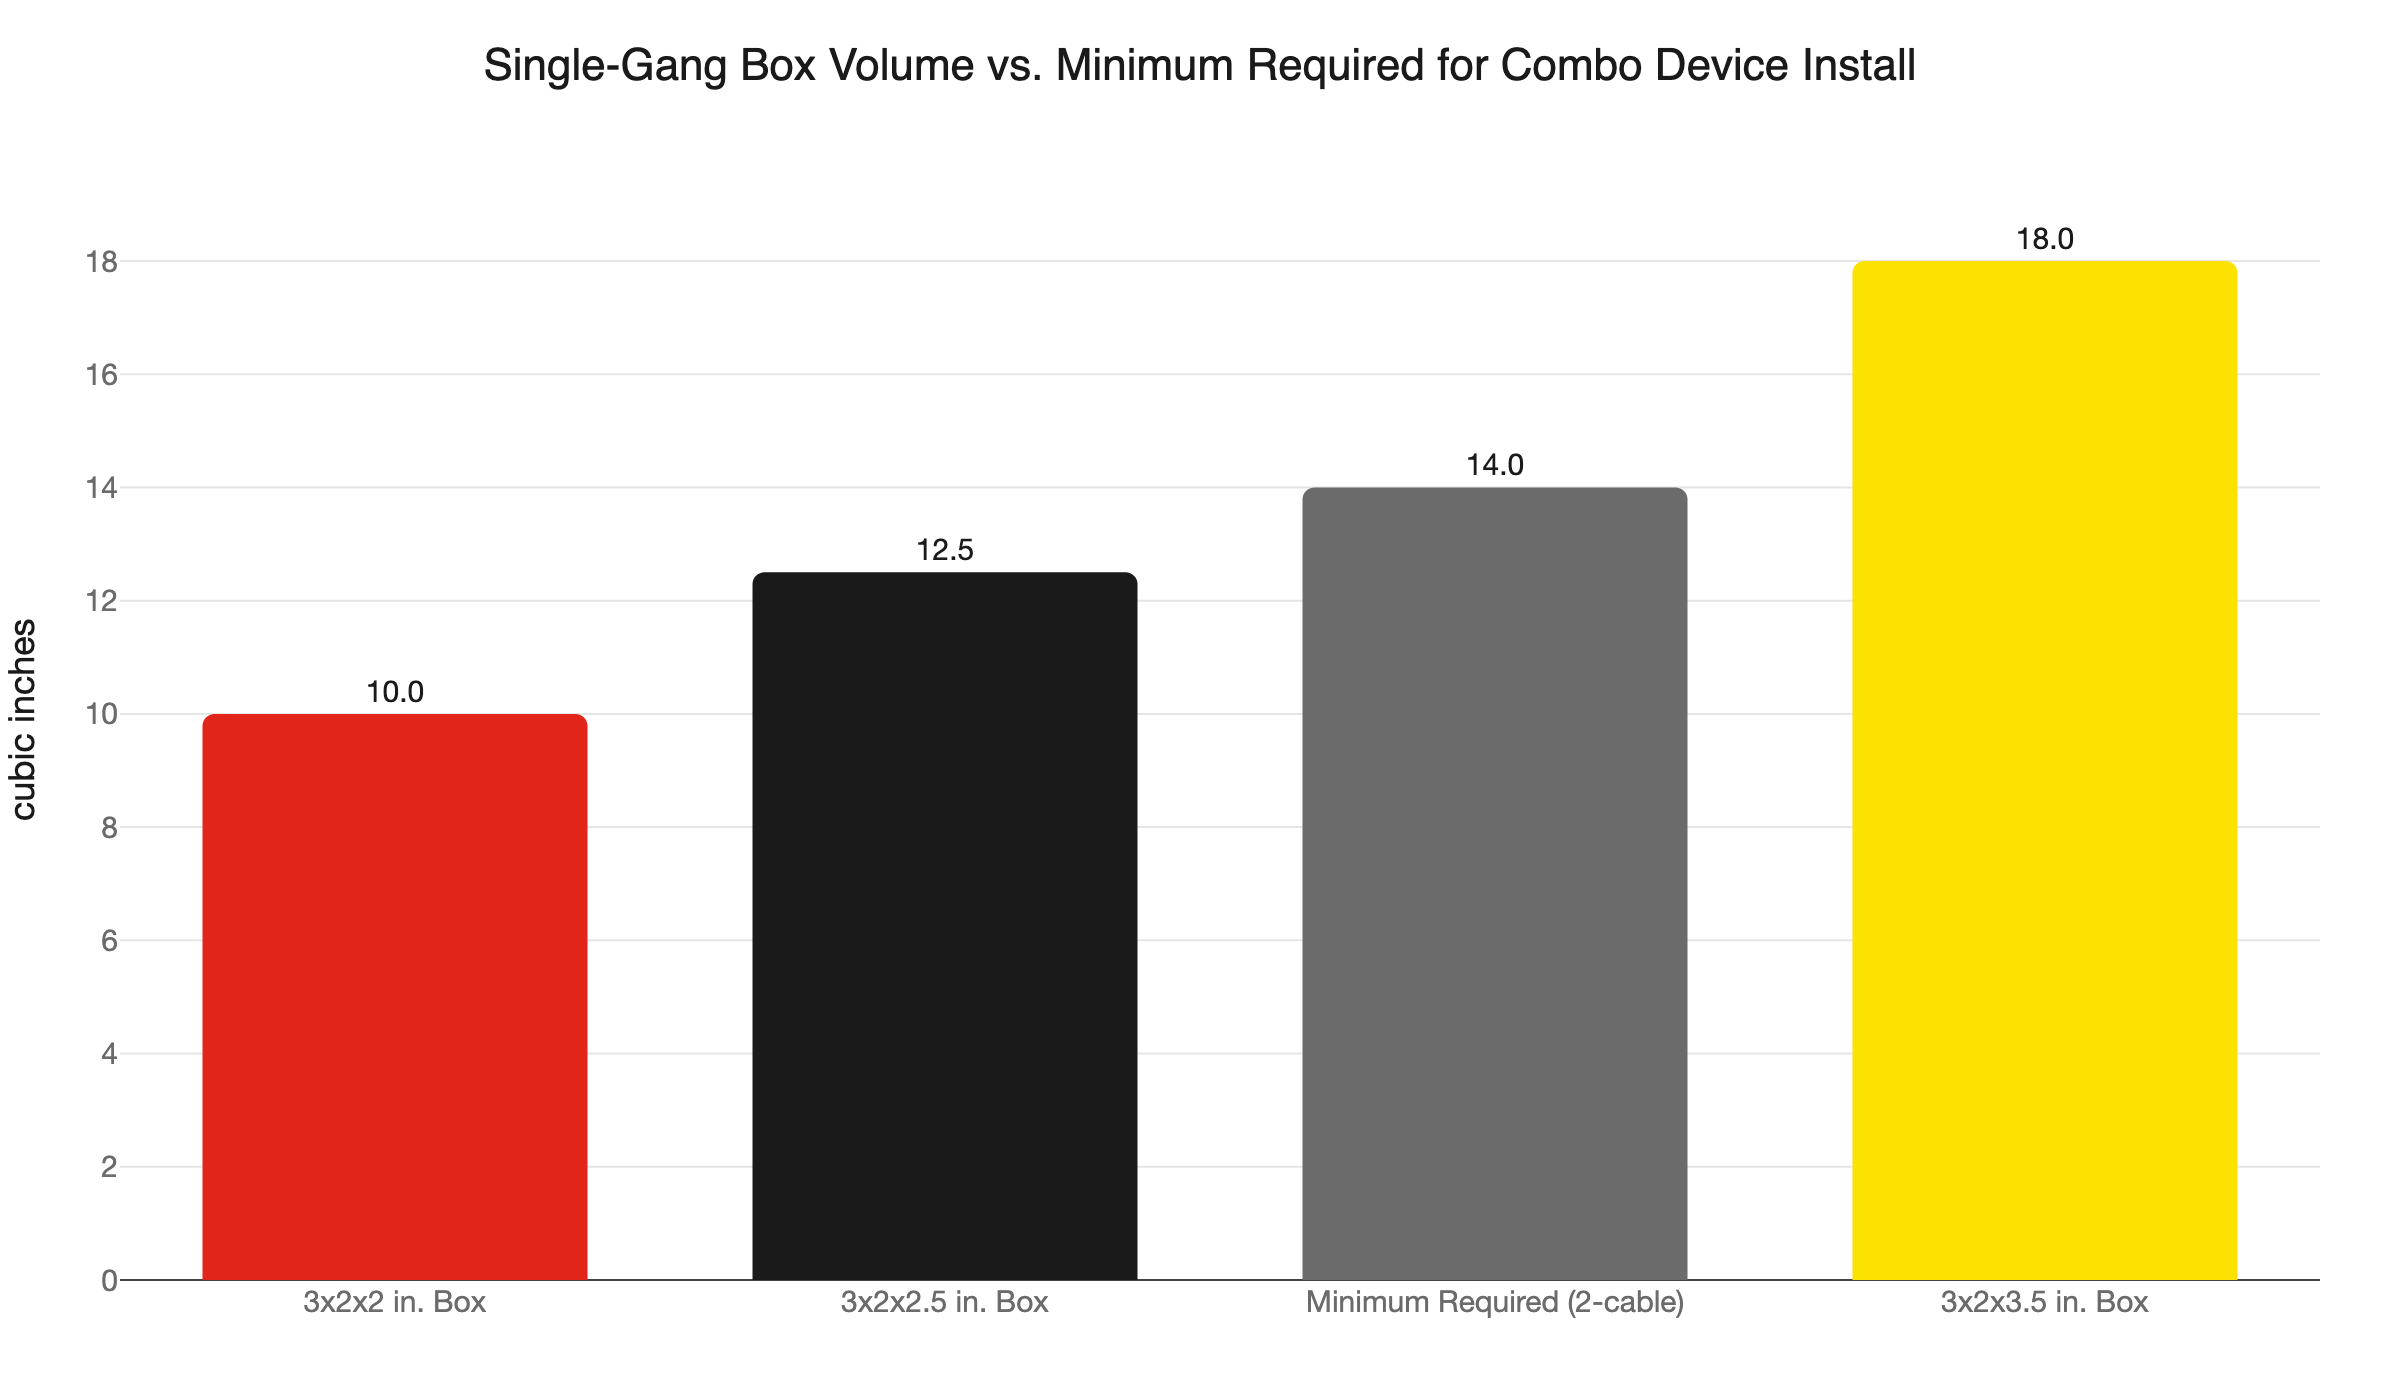
- NEC 314.16 box fill rules apply. A standard 3x2x2-inch single-gang box holds only 10.0 cu. in. A typical two-cable combo device installation needs at least 14.0 cu. in. Verify before you close the wall.
- Adding outlet function to an existing switch box is new electrical work. It requires a permit and inspection in Minnesota.
- Minnesota adopted the 2026 NEC effective August 17, 2026. Any permit filed on or after that date falls under 2026 NEC rules.
How to Wire a Combination Switch Outlet: Open the Box First
Knowing how to wire a combination switch outlet starts before you buy anything. Open the existing switch box, identify which of three wiring scenarios you have, and let that answer drive the rest of the project.
The device looks simple: a toggle switch on top, a standard outlet on the bottom, sold at any home improvement store for under $20. What is not simple is the wiring situation inside your wall. Many Twin Cities homes are missing a neutral wire at the switch location. Connecting an outlet to the wrong wire is a shock hazard and a code violation.
Homes in Minneapolis, St. Paul, and the inner-ring suburbs span a century of construction styles. Some have wiring that makes this a clean 45-minute swap. Others require pulling new cable through finished walls before a combination device can work safely. Most guides online skip the step that tells you which situation you have. This post does not.
What Are the Three Scenarios Inside a Switch Box?
Short answer: The three scenarios are a line-side box with a neutral present, a switch loop box with no neutral, and a switch loop box where a neutral was added per modern code. Which scenario you have determines whether this is a quick swap or a cable-pulling project.
Pull off the switch cover plate. Pull the switch out of the box carefully. What you see next determines everything else.
Scenario 1: Line-Side Box (Power Feeds Into the Switch Box First)
In a line-side configuration, the circuit runs from the panel into the switch box first, then continues to the light fixture. This is the setup most combo-switch wiring diagrams assume.
You will see two cables in the box. The incoming cable has a black hot, a white neutral, and a bare copper ground. The outgoing cable carries the switched leg to the fixture.
A neutral is present. The combination device works cleanly. You connect the always-hot to the outlet’s hot terminal, the neutral to the outlet’s neutral terminal, the ground to the grounding screw, and the switched leg runs to the fixture. The outlet stays live at all times. The switch controls only the light.
This is the straightforward version of this project. If this is what you have, jump ahead to the wiring steps section. If not, keep reading.
Scenario 2: Switch Loop Box with No Neutral
In a switch loop, the circuit runs to the light fixture first. A 2-wire cable then drops from the fixture down to the switch box. That cable carries only two conductors: the white wire brings the always-hot feed down from the fixture, and the black wire carries the switched current back up.
No neutral exists in this box. The white wire is re-identified as a hot. It should carry black tape or a colored marker to signal this, though in older work it frequently does not.
This is the most common scenario in older Twin Cities homes. Houses from the 1940s through the 1970s in Minneapolis, St. Paul, and neighborhoods like Longfellow, Powderhorn, Como Park, and Macalester-Groveland are heavily switch-loop wired.
Connecting the neutral terminal of a receptacle to a re-identified hot wire puts line voltage on a terminal a user expects to be at ground potential. It is a code violation and a genuine shock hazard. Do not wire an outlet from this box as it stands.
The only compliant fix is to run new 3-conductor cable: 14/3 for a 15-amp circuit, 12/3 for a 20-amp circuit. Pull it from the panel or from a nearby junction box that has a true neutral. That is a different and larger project.
Scenario 3: Switch Loop with 3-Wire Cable or a Neutral Added
Some switch loop boxes do have a neutral, particularly in homes wired to later code standards. NEC 404.2(C) began requiring a grounded conductor at most switch locations controlling lighting loads in habitable spaces. In those installations, a 3-wire cable (black, white, red, and bare ground) runs from the fixture to the switch. A true neutral is present, and the combination device works.
Telling Scenario 2 from Scenario 3 is straightforward: count the conductors in the box. A single 2-wire cable entering with no other cables means no neutral. A 3-wire cable, or two separate cables, means a neutral is likely available.
Use a multimeter to confirm before connecting anything. The white wire in a switch loop looks identical to a neutral. Test it. Do not assume.
Note: NEC 404.2(C) Exception 5 provides that a neutral is not required where a switch controls a receptacle load, which is exactly what a combo device does. This exception matters for permitted inspections. It does not change the need to identify all wires correctly before wiring.
Does Your Box Have Enough Room?
Short answer: A standard 3x2x2-inch single-gang box holds only 10.0 cu. in. under NEC 314.16. A typical two-cable combo device installation needs at least 14.0 cu. in. Many shallow boxes in older homes fail this check before you add a single wire. Verify box volume before you buy hardware.
Box fill is the issue almost every guide on how to wire a combination switch outlet leaves out entirely. It is also one of the first things a Minnesota electrical inspector will check.
NEC Table 314.16(A) and 314.16(B) assign a volume allowance to each conductor and device in the box. For 14 AWG wiring, the numbers work like this:
- Each 14 AWG current-carrying conductor: 2.00 cu. in.
- All grounding conductors combined: a single 2.00 cu. in. allowance.
- Each device yoke: double the largest conductor allowance, so 4.00 cu. in. for 14 AWG.
For a standard two-cable installation (one cable in, one cable to the fixture) with 14 AWG wire:
- 4 current-carrying conductors x 2.00 = 8.00 cu. in.
- 1 ground allowance = 2.00 cu. in.
- 1 device yoke = 4.00 cu. in.
- Minimum needed: 14.00 cu. in.
Common single-gang box volumes by depth:
- 3x2x2 in.: 10.0 cu. in. (fails)
- 3x2x2.5 in.: 12.5 cu. in. (fails)
- 3x2x3.5 in.: 18.0 cu. in. (passes)
A combination switch outlet counts as one device yoke, not two. Combining functions into one device does not add a second yoke. But if the existing box is shallow, it may have been marginal or non-compliant with the original switch installed.
Replacing a shallow box is usually straightforward. Old-work retrofit boxes in larger volumes are available at any hardware store. They can often be swapped without opening the wall. Do this before you install the combination device.
How Do You Wire a Combination Switch Outlet in a Line-Side Box?
Short answer: Confirm a neutral is present and box fill is adequate. Turn off the breaker and verify dead with a non-contact tester. Connect the always-hot to the brass terminal, the neutral to the silver terminal, the ground to the green screw, and the switched leg to the fixture terminals. Schedule your inspection before closing the wall.
These steps apply to Scenario 1 only. Do not use this method if you have a switch loop without a neutral.
What you need:
- Non-contact voltage tester
- Multimeter
- Flathead and Phillips screwdrivers
- Wire stripper
- Combination switch outlet rated for the circuit amperage (15A for 15-amp circuits, 20A for 20-amp circuits)
- Cover plate rated for a combination switch outlet (standard single-toggle plates will not fit)
Step 1: Cut the power, then confirm it is dead.
Turn off the breaker controlling this circuit. Use a non-contact voltage tester at every wire in the box before touching anything. Flip the existing switch as a secondary check. Test all conductors again. Do not rely on the switch position alone.
Step 2: Document the existing wiring.
Photograph the inside of the box before disconnecting any wires. Label wires with tape if anything is ambiguous. This photo is your reference if something is unclear when you reassemble.
Step 3: Verify the neutral and box fill.
Use a multimeter to confirm which wire is the true neutral. Calculate box fill using the method above. If the box is undersized, replace it before going further.
Step 4: Connect the combination device.
Most combination switch outlets are wired so the outlet stays hot at all times and the switch controls only the fixture. On a standard device:
- Brass terminal (hot side of outlet): always-hot black wire from the incoming line cable.
- Silver terminal (neutral side of outlet): white neutral wire from the incoming line cable.
- Green screw: bare copper ground wire.
- Switch terminals: the switched-leg wires running to the fixture.
Some devices ship with a break-off tab connecting the outlet and switch hot terminals. Leave this tab intact for the standard configuration. Breaking the tab allows each function to run on a separate circuit feed, which is an advanced setup beyond a basic device swap.
Step 5: Tuck, fasten, and cover.
Fold wires carefully into the box. Avoid sharp bends near the terminals. Fasten the device with the provided screws. Install a cover plate designed for a combination switch outlet: the opening is different from a single-switch or single-outlet plate.
Step 6: Test, then schedule your inspection.
Restore power and test both the switch and the outlet. Then contact your city or DLI to schedule the required inspection. Do not close or paint over the box until the inspector has signed off.
Do You Need a Permit to Add an Outlet in Minnesota?
Short answer: Yes. Adding outlet function to an existing switch box is new electrical work and requires a permit and inspection in Minnesota. Replacing a switch with the identical switch is maintenance; adding an outlet is not. These are different categories under state rules.
Minnesota requires a permit for any new outlet installation. The Division of Labor and Industry handles permits statewide. However, many Minnesota cities - including Minneapolis, St. Paul, Bloomington, Brooklyn Park, Woodbury, Blaine, Maple Grove, and Plymouth - have adopted their own local electrical inspection authority. In those cities, apply for a permit through the city’s inspections department, not through DLI.
If you are unsure who issues permits in your city, check the city’s website under “inspections” or “building permits” before filing. Applying to the wrong authority does not count as a filed permit.
Permit fees vary by city and project scope. Permits with an inspection fee of $250 or less typically expire 12 months from filing if no inspection has been completed. Plan your schedule accordingly, especially in finished spaces where getting access to the box requires coordination.
For the complete guide to how this process works in the Twin Cities, see our post on electrical permits in Minnesota.
Who Can Pull the Permit?
Short answer: Homeowners can pull their own permit and do their own electrical work only on a single-family home they own and occupy. Rentals, duplexes, condominiums, and multi-family buildings require a licensed electrical contractor to do the work and pull the permit.
Minnesota’s homeowner exemption is real and useful. If you own the home, live in it as your primary residence, and it is a single-family dwelling, you are legally allowed to do your own electrical work, pull the permit yourself, and call for your own inspection. You still need to pass that inspection.
The exemption does not apply to:
- Rental properties, regardless of who owns them.
- Duplexes, including the unit you occupy.
- Condominiums. Most condo electrical work beyond like-for-like device swaps requires a licensed contractor.
- Properties you are rehabbing for sale without occupying.
If you are a renter and your landlord wants this work done, the landlord must hire a licensed electrical contractor. The inspector will ask about ownership and occupancy.
For the full rules on who qualifies and what the exemption covers, see our post on homeowner electrical permit exemptions in Minnesota.
What If You Have a Switch Loop? Can You Still Add the Outlet?
Short answer: Not from that box without pulling new cable. A switch loop has no neutral. Connecting the outlet’s neutral terminal to a re-identified hot wire puts line voltage where a safe ground is expected. The fix is to run new 3-conductor cable to bring a true neutral to the switch box location.
This problem is extensively documented in DIY electrical forums: homeowners wire an outlet from a switch loop box, think it worked because the outlet delivers power, and do not realize the neutral terminal is energized. Modern electronics and appliances assume the neutral terminal is near ground potential. An energized neutral can damage sensitive equipment and creates a shock risk for anyone who opens that box later.
Your options when you have a switch loop with no neutral:
Option 1: Pull new 3-conductor cable. Run 14/3 or 12/3 from the panel or from a nearby junction box that has a neutral. This is the correct answer when you need an outlet specifically at that location. In finished walls, it usually means fishing wire or opening drywall. Budget the full scope before you start.
Option 2: Add an outlet elsewhere on the circuit. If the outlet location is flexible, find a nearby box where a neutral is already available. Our post on adding an outlet to a finished wall without drywall work covers techniques for running new outlets with minimal wall damage.
Option 3: Call a licensed electrician. A professional can assess the best cable routing for your specific home layout, pull the permit, complete the work, and see it through inspection. That path is often faster and less disruptive than opening finished walls yourself.
If you are not certain which scenario you have after opening the box, that uncertainty is itself a reason to call. A diagnostic visit costs far less than correcting wiring that failed inspection or caused damage.
Should You Call an Electrician for This Project?
Short answer: Call if you find a switch loop without a neutral, if the box is undersized and wall work is needed, or if anything you see inside the box is unclear. The diagnostic cost is low. The cost of incorrect wiring is not.
The clean version of this project - line-side box, neutral confirmed, box fill verified, permit pulled, inspection passed - is within reach for a careful homeowner. The complicated version - switch loop, new cable needed, finished walls - is a professional job every time.
We are Northern Mister Sparky, locally owned and operated in the Twin Cities. Our electricians handle projects exactly like this one: a quick diagnostic to identify your scenario, a permit pull, code-compliant wiring, and a passed inspection. As America’s On-Time Electrician(R), we show up when we say we will. No runaround, no malarky.
Call us at 763-200-5956 or book online. Every job is backed by the UWIN(R) 100% satisfaction guarantee.
Frequently Asked Questions
Can I wire a combination switch outlet in a switch loop box? +
Do I need a permit to add a combination switch outlet in Minnesota? +
What is NEC box fill and why does it matter for a combo device swap? +
Need an electrician now?