
Photocell Outdoor Light Wiring: Dusk-to-Dawn Sensor Guide
Key Takeaways
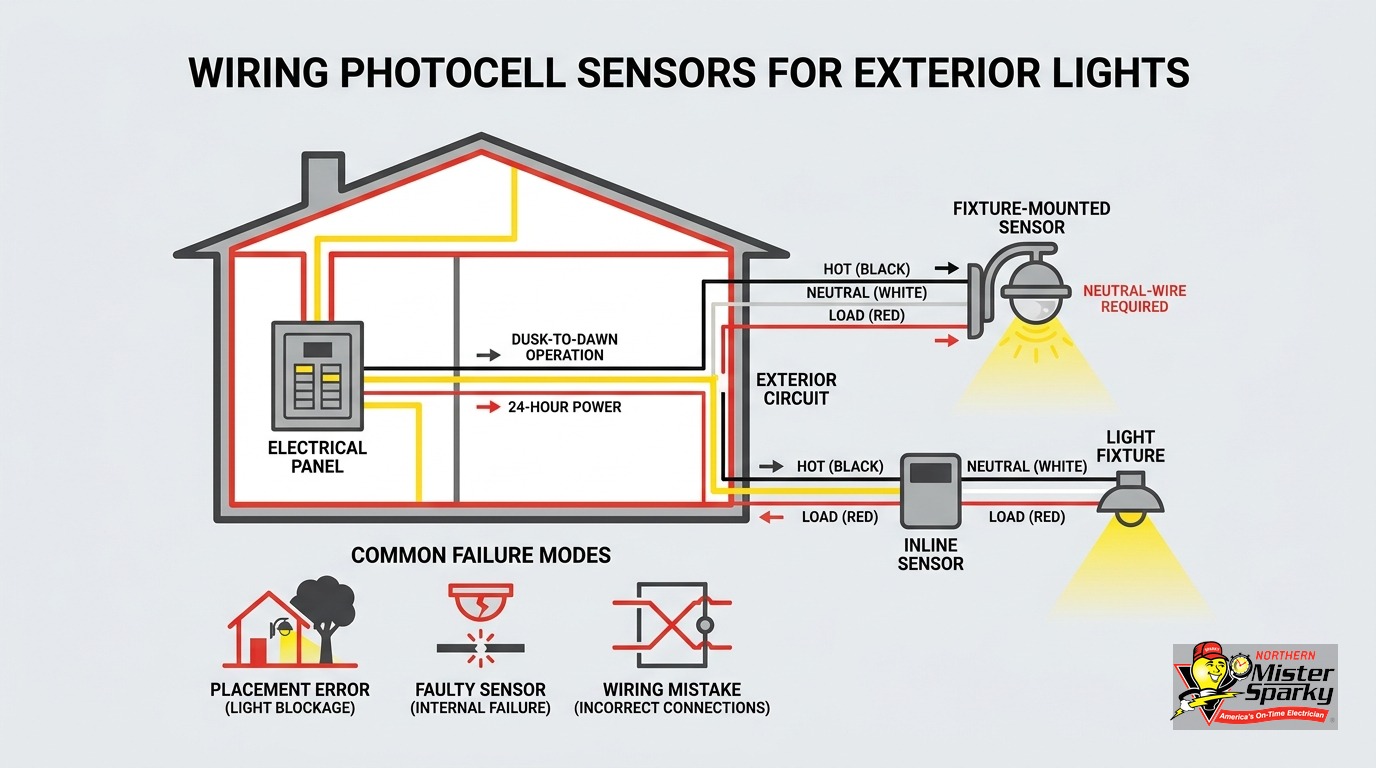
- Wire-in photocells require three conductors: always-hot (black), neutral (white), and switched load (red). The neutral is not optional - it powers the sensor’s internal circuit.
- Many Twin Cities homes built before the mid-1990s ran only a switched hot to exterior fixtures. No neutral in the box means no standard wire-in photocell without additional wiring work.
- Standard relay-type photocells need a minimum wattage load (often 40-100W) to switch cleanly. One LED bulb usually does not meet that floor.
- Never aim the sensor at the fixture it controls. The light output will trigger a feedback loop.
- Minnesota adopted the 2026 NEC effective August 17, 2026. New circuits require a permit. Minneapolis and Saint Paul use their own permit departments, separate from the state DLI system.
- Both the fixture and the sensor must carry a wet-location rating for any exposed exterior installation.
What Does a Dusk-to-Dawn Photocell Sensor Actually Do?
A photocell is a light-sensitive resistor. Ambient light controls its resistance. At dusk, falling light levels shift resistance high enough to close a relay inside the sensor. That relay sends power to the fixture. At dawn, rising light opens the relay and cuts power.
No timer. No manual switch. No smart hub required.
Photocells also satisfy an increasingly common code mandate. Energy codes require automatic controls on many exterior lighting installations. A dusk-to-dawn sensor meets that requirement and can qualify a project for utility rebates in some cases. The combination of energy code compliance and hands-off operation makes photocell controls one of the most practical upgrades for any home’s exterior lighting.
What Are the Two Main Types of Photocell Sensors?
Short answer: Wire-in (inline) sensors hardwire into the circuit inside or near the fixture box. NEMA twist-lock sensors plug into a matching socket on a pole or fixture head. The wiring method differs; the underlying photocell technology is the same.
Wire-In (Inline) Photocells
A wire-in sensor installs inside the junction box or fixture housing. The standard configuration uses three conductors:
- Black - always-hot (line from the panel)
- White - neutral (return path; also powers the sensor’s internal circuit)
- Red - switched load out to the bulb socket
The black and white wires power the sensor itself continuously. The red wire is the switched hot to the fixture. When the sensor opens its relay at dawn, the red wire goes dead and the bulb turns off. The sensor stays powered around the clock through the black-white pair.
The neutral conductor is required. Without it, the sensor has no return path for its own operating current. This is not a technicality - the sensor simply will not function.
NEMA Twist-Lock Photocells
Twist-lock sensors use a standardized three-pin socket built into the fixture or pole arm. Pin A carries line, Pin B carries the switched load, and Pin C carries neutral, per the ANSI C136.10 standard. Five-pin and seven-pin variants add dimming and data channels for smart controls on commercial and municipal installations.
Installation is mechanical: align the sensor’s tabs with the socket’s slots, push in, and rotate a quarter turn to lock. No wire nuts at the sensor itself. The fixture’s internal wiring still needs a neutral available at the socket.
Twist-lock sensors are common on street-style pole fixtures and larger area lights. If you are replacing a pole-mounted area light and the fixture has a built-in NEMA socket, this is the simpler installation path.
Why Do Older Twin Cities Homes Run Into Trouble with Photocell Wiring?
Short answer: Homes built before the mid-1990s often have a switched-loop circuit at exterior fixtures. That means only two wires enter the box: one that is always energized and one that is switched. No neutral. A wire-in photocell cannot operate without one, and this is the most common reason a photocell install stops cold.
You open the fixture box expecting the standard configuration. You find two wires. You assume the white is a neutral and connect the sensor. Nothing works, or the sensor flickers erratically.
In a switched-loop circuit, both conductors in the cable are hots. The always-hot wire should be identified with black tape on the white conductor in correct installations. In older work, it often is not marked at all. Testing with a non-contact voltage tester is the only way to know for certain before you touch a wire.
Options when you have no neutral:
- Replace the fixture with one that has a built-in NEMA socket. The neutral runs inside the fixture’s own internal wiring. You are not trying to import a neutral through the junction box conductors.
- Install a timer switch at the wall instead. A mechanical or digital timer controls the switched hot without requiring a neutral at the fixture end.
- Have an electrician pull a new cable. A new run that includes a neutral conductor is the cleanest long-term fix and opens up all future smart-control options as well.
- Use a no-neutral-rated photocell. A small product category of low-power electronic sensors can bleed a tiny current through the load circuit to power themselves. Read the specification sheet carefully - most standard sensors cannot do this, and wiring a standard sensor on a switched-loop circuit will not produce a working result.
If there is any uncertainty about what is in the box, test first and identify second. A non-contact voltage tester is a $15 tool that eliminates the most dangerous assumption in exterior electrical work.
How Does Photocell Outdoor Light Wiring Connect Step by Step?
Short answer: Kill the breaker, verify dead with a voltage tester, connect black to black (always-hot), white to white (neutral), and red to the fixture’s load wire. Seal the box, restore power, and test by covering the sensor lens with a dark cloth to simulate night.
What you need:
- Non-contact voltage tester
- Wire stripper
- Lineman’s pliers
- Wire nuts or listed push-in connectors
- Photocell sensor rated for wet locations if the box is exposed to weather
Step 1: Kill the circuit at the panel. Turn off the breaker for this circuit. Do not rely on the wall switch alone. Some exterior fixtures run on always-hot circuits with no switch at all.
Step 2: Verify dead at the box. Hold your non-contact tester on every conductor in the box. All should read dead before you proceed. If anything is still live, go back to the panel.
Step 3: Identify the three conductors.
- Always-hot (black or a white wire with black tape marking)
- Neutral (white, confirmed dead when the breaker is off)
- Switched load wire to the fixture socket (often black or red in newer work)
Step 4: Make the connections.
- Photocell black wire to the always-hot black wire in the box
- Photocell white wire to the neutral white wire
- Photocell red wire to the fixture socket’s load wire
Secure each with a properly sized wire nut, twisted clockwise until tight. No bare copper should be visible below the nut threads.
Step 5: Seal the box. NEC 410.10(A) requires luminaires in wet locations to be installed so water cannot enter the wiring compartment. In Minnesota, this is not a formality. Moisture that wicks through an unsealed conduit entry freezes and expands in winter. That expansion cracks wire insulation and corrodes photocell terminals, often within one or two freeze-thaw cycles. Use foam backer or listed conduit seal fittings at every penetration into an exterior junction box.
Step 6: Restore power and test. Cover the sensor lens with a dark cloth or a piece of electrical tape. Power should flow and the fixture should light immediately. Remove the covering. The fixture should go dark within a minute or two as the sensor reads ambient daylight. If it does not respond, move to the failure mode diagnostics below.
What Is the LED Minimum-Load Problem with Dusk-to-Dawn Photocell Sensors?
Short answer: Older relay-type photocells need a minimum load, commonly 40-100 watts, to switch cleanly. A 9W LED bulb falls far below that floor. The result is flickering, ghost-switching, or a sensor stuck permanently on or off.
This catches homeowners off guard because the wiring is correct and the sensor itself is not defective. A photocell that worked perfectly with a 65W incandescent bulb starts misbehaving the moment you swap to an LED.
The relay design inside older sensors relies on current flowing through the load circuit to sustain its switching action. Drop load current below the rated minimum and the relay can no longer maintain a clean open or closed state. It bounces, or it locks up.
The fix: Replace the photocell with one that carries an LED-compatible rating and a listed minimum load of zero or near-zero watts. Most current-production photocells support LED loads out of the box. The label or specification sheet will say. Read it before buying, not after you have already made the connections.
This is especially relevant if you are converting an existing incandescent or fluorescent fixture to LED. The retrofit wiring is straightforward, but the sensor compatibility check is an easy step to skip. If your existing photocell is more than five to seven years old, replace it when you swap the bulbs.
What Causes the Photocell Self-Feedback Cycle?
Short answer: If the sensor can see the fixture it controls, the fixture’s light output reads as “dawn” and the relay opens. The light turns off. The sensor reads “dusk.” The relay closes. The light turns back on. This repeats rapidly, showing up as flickering or a fixture that will not hold on after dark.
The physics is simple. A photocell responds to light intensity at the sensor’s operating wavelength. The fixture it controls produces exactly that kind of light.
Fixing it is a placement problem, not a wiring problem.
Mount the sensor so the fixture’s output cannot reach the lens directly. On a wall-mounted fixture, the sensor face should point away from the lamp, typically on the top or back of the housing. On a pole fixture, the twist-lock socket positions the sensor above the fixture bowl, so aim matters less - but check that the underside of the sensor lens is shielded from the lamp below.
If physical separation between the sensor and the fixture is impossible in a given mounting location, a delay module between the sensor output and the relay adds a debounce window. The sensor must read continuous light for a set period, typically 30-90 seconds, before it triggers the off command. That blocks the feedback cycle because the relay ignores transient light spikes from the fixture starting up or from passing headlights.
How Do You Diagnose a Photocell That Is Not Working?
Short answer: Match the symptom to the failure mode. Light on all day: dirty lens or stuck relay. Light never turns on: sensor faces direct south sun or relay is stuck open. Flickering at dusk: LED load is too light or the feedback loop is running.
Use this decision tree before replacing the sensor outright:
Light on all day:
- Clean the photocell lens with a dry cloth. A layer of pollen, spider web, or grime reads as permanent darkness.
- If the lens is clean, the relay is stuck in the closed position. The sensor is failed and needs replacement.
Light never turns on at night:
- Check placement. A south-facing sensor gets direct afternoon sun and may read “dawn” until well after sunset. Relocate it to a north- or east-facing surface.
- Verify the wiring. A missing neutral means the sensor has no operating power. Go back to Step 3 of the wiring guide above.
- If placement and wiring are both correct, the relay is stuck open. Replace the sensor.
Light flickers at dusk or at night:
- Check the LED minimum-load issue described above. Replace the sensor with an LED-compatible model.
- Check placement. If the sensor lens has any line-of-sight to the fixture output, adjust the angle or add a shield.
- Check whether passing vehicle headlights or a neighbor’s motion light briefly crosses the sensor. A delay module (see self-feedback section) adds resilience against brief ambient light spikes.
Light comes on, then turns off after a few minutes:
- The feedback cycle is most likely active. Adjust the sensor so it cannot see the fixture output.
- On older sensors installed inside the fixture housing: excessive heat from the fixture body can affect the thermistor component and cause erratic readings. Move the sensor to an external mount with better airflow.
What Does Minnesota Code Require for Photocell Outdoor Light Installations?
Short answer: The fixture and sensor must both be rated for wet locations if they are exposed to weather. New circuits require a permit. Replacing a fixture on an existing circuit generally does not. Minneapolis and Saint Paul operate their own permit departments, not the state DLI system.
Minnesota adopted the 2026 NEC effective August 17, 2026. Any permit filed on or after that date must comply with the 2026 NEC. Work permitted before August 17 follows the 2023 NEC. If you are pulling a permit this week, you are under the new code.
NEC 410.10(A) requires fixtures in wet locations to carry a wet-location listing and be installed so water cannot enter the wiring compartment. A sensor rated only for damp locations does not satisfy this requirement on an exposed soffit or eave. Wet-location rated is the correct specification for any fixture or sensor exposed to rain or direct weather. In Minnesota’s climate, freeze-thaw cycling makes this more than a code formality - moisture intrusion is a real and common failure source.
Twin Cities suburban municipalities may also carry outdoor lighting ordinances covering light trespass, shielding angles, and fixture height. A photocell affects when your lights run, not where the light falls. If the fixture itself is already out of compliance with a local ordinance, the photocell does not correct that.
For a full breakdown of when Minnesota electrical projects require a permit and how to pull one, see our guide to pulling an electrical permit in Minnesota.
Minneapolis and Saint Paul note: These cities are self-governing jurisdictions. They do not use the state DLI permit system. If your home is in Minneapolis or Saint Paul, contact your city’s inspections department directly. A Richfield homeowner and a Minneapolis homeowner have different permit processes even though they share a border.
When Should You Call an Electrician Instead of Wiring It Yourself?
Photocell installation is manageable for homeowners who are comfortable working on de-energized circuits, when the box has a neutral, the circuit is labeled at the panel, and access is safe from the ground or a stable step ladder.
Call a licensed electrician when:
- You open the box and find only two conductors (switched-loop with no neutral)
- The circuit is not correctly labeled in your panel and you cannot identify it with certainty
- The home was built between 1965 and 1973 and may have aluminum branch-circuit wiring
- You need to run a new circuit to a fixture location that does not currently have one
- The fixture is above one-story height or requires ladder positioning over an entrance or deck
Aluminum wiring deserves a specific call-out for Twin Cities homeowners. Homes built in that era frequently used aluminum conductors for branch circuits. If you open a box and see silver-colored wires, stop. Aluminum wiring requires different connection methods and specific approved fittings. An improper connection on an aluminum circuit is a fire risk, not just a code violation.
For broader planning on outdoor and landscape lighting installation - fixture selection, circuit layouts, and control options - our full guide covers what a sensor-focused tutorial skips. If your project also involves adding a new weatherproof receptacle near the fixture, we can handle outdoor GFCI outlet installation in the same visit.
Northern Mister Sparky is locally owned and operated, serving Minneapolis, Saint Paul, Bloomington, Maple Grove, Plymouth, Woodbury, Blaine, Brooklyn Park, and surrounding communities. We run on the America’s On-Time Electrician(R) standard - we show up when we say we will, no malarky. If your photocell project uncovered wiring you were not expecting, call us at 763-200-5956 or book online. We will get it sorted.
Frequently Asked Questions
Do I need a permit to install a photocell sensor on my outdoor light in Minnesota? +
Why does my dusk-to-dawn light flicker after I switched to LED bulbs? +
Where should I point the photocell sensor? +
Need an electrician now?