
Recessed Lighting Installation: Can, Canless, and MN Code
Key Takeaways
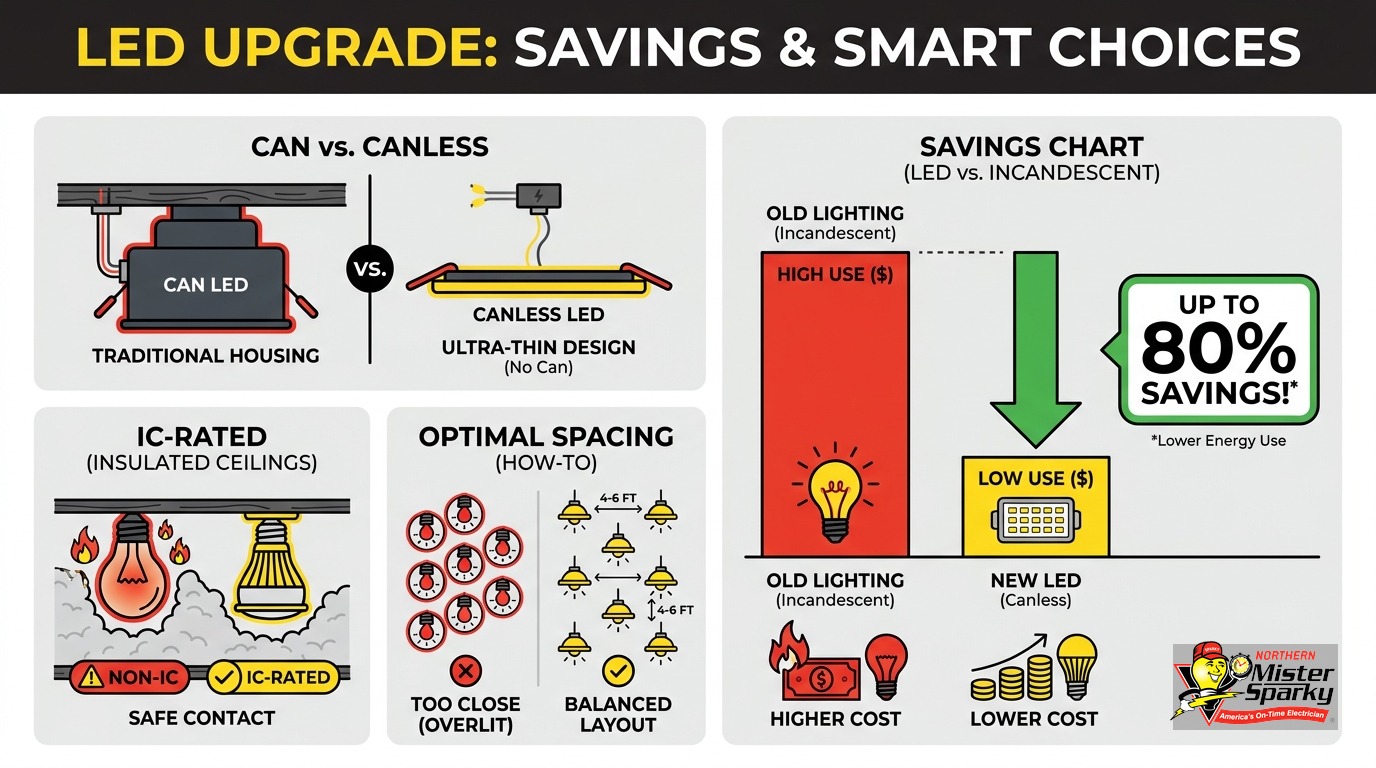
- Minnesota’s 2020 Residential Code, Section N1102.4.5, requires ICAT fixtures in insulated ceilings. IC-rated alone is not enough.
- Canless LED panels are naturally airtight and the easiest ICAT-compliant choice for most Twin Cities remodel jobs.
- Space recessed lights at half your ceiling height: an 8-foot ceiling = 4-foot fixture spacing. Start 2 to 3 feet from the wall.
- Any recessed lighting installation that involves new wiring requires an electrical permit in Minnesota, with two mandatory inspections.
- Xcel Energy rebates cover up to 60% of ENERGY STAR LED downlight costs. The 2026 window runs through October 31.
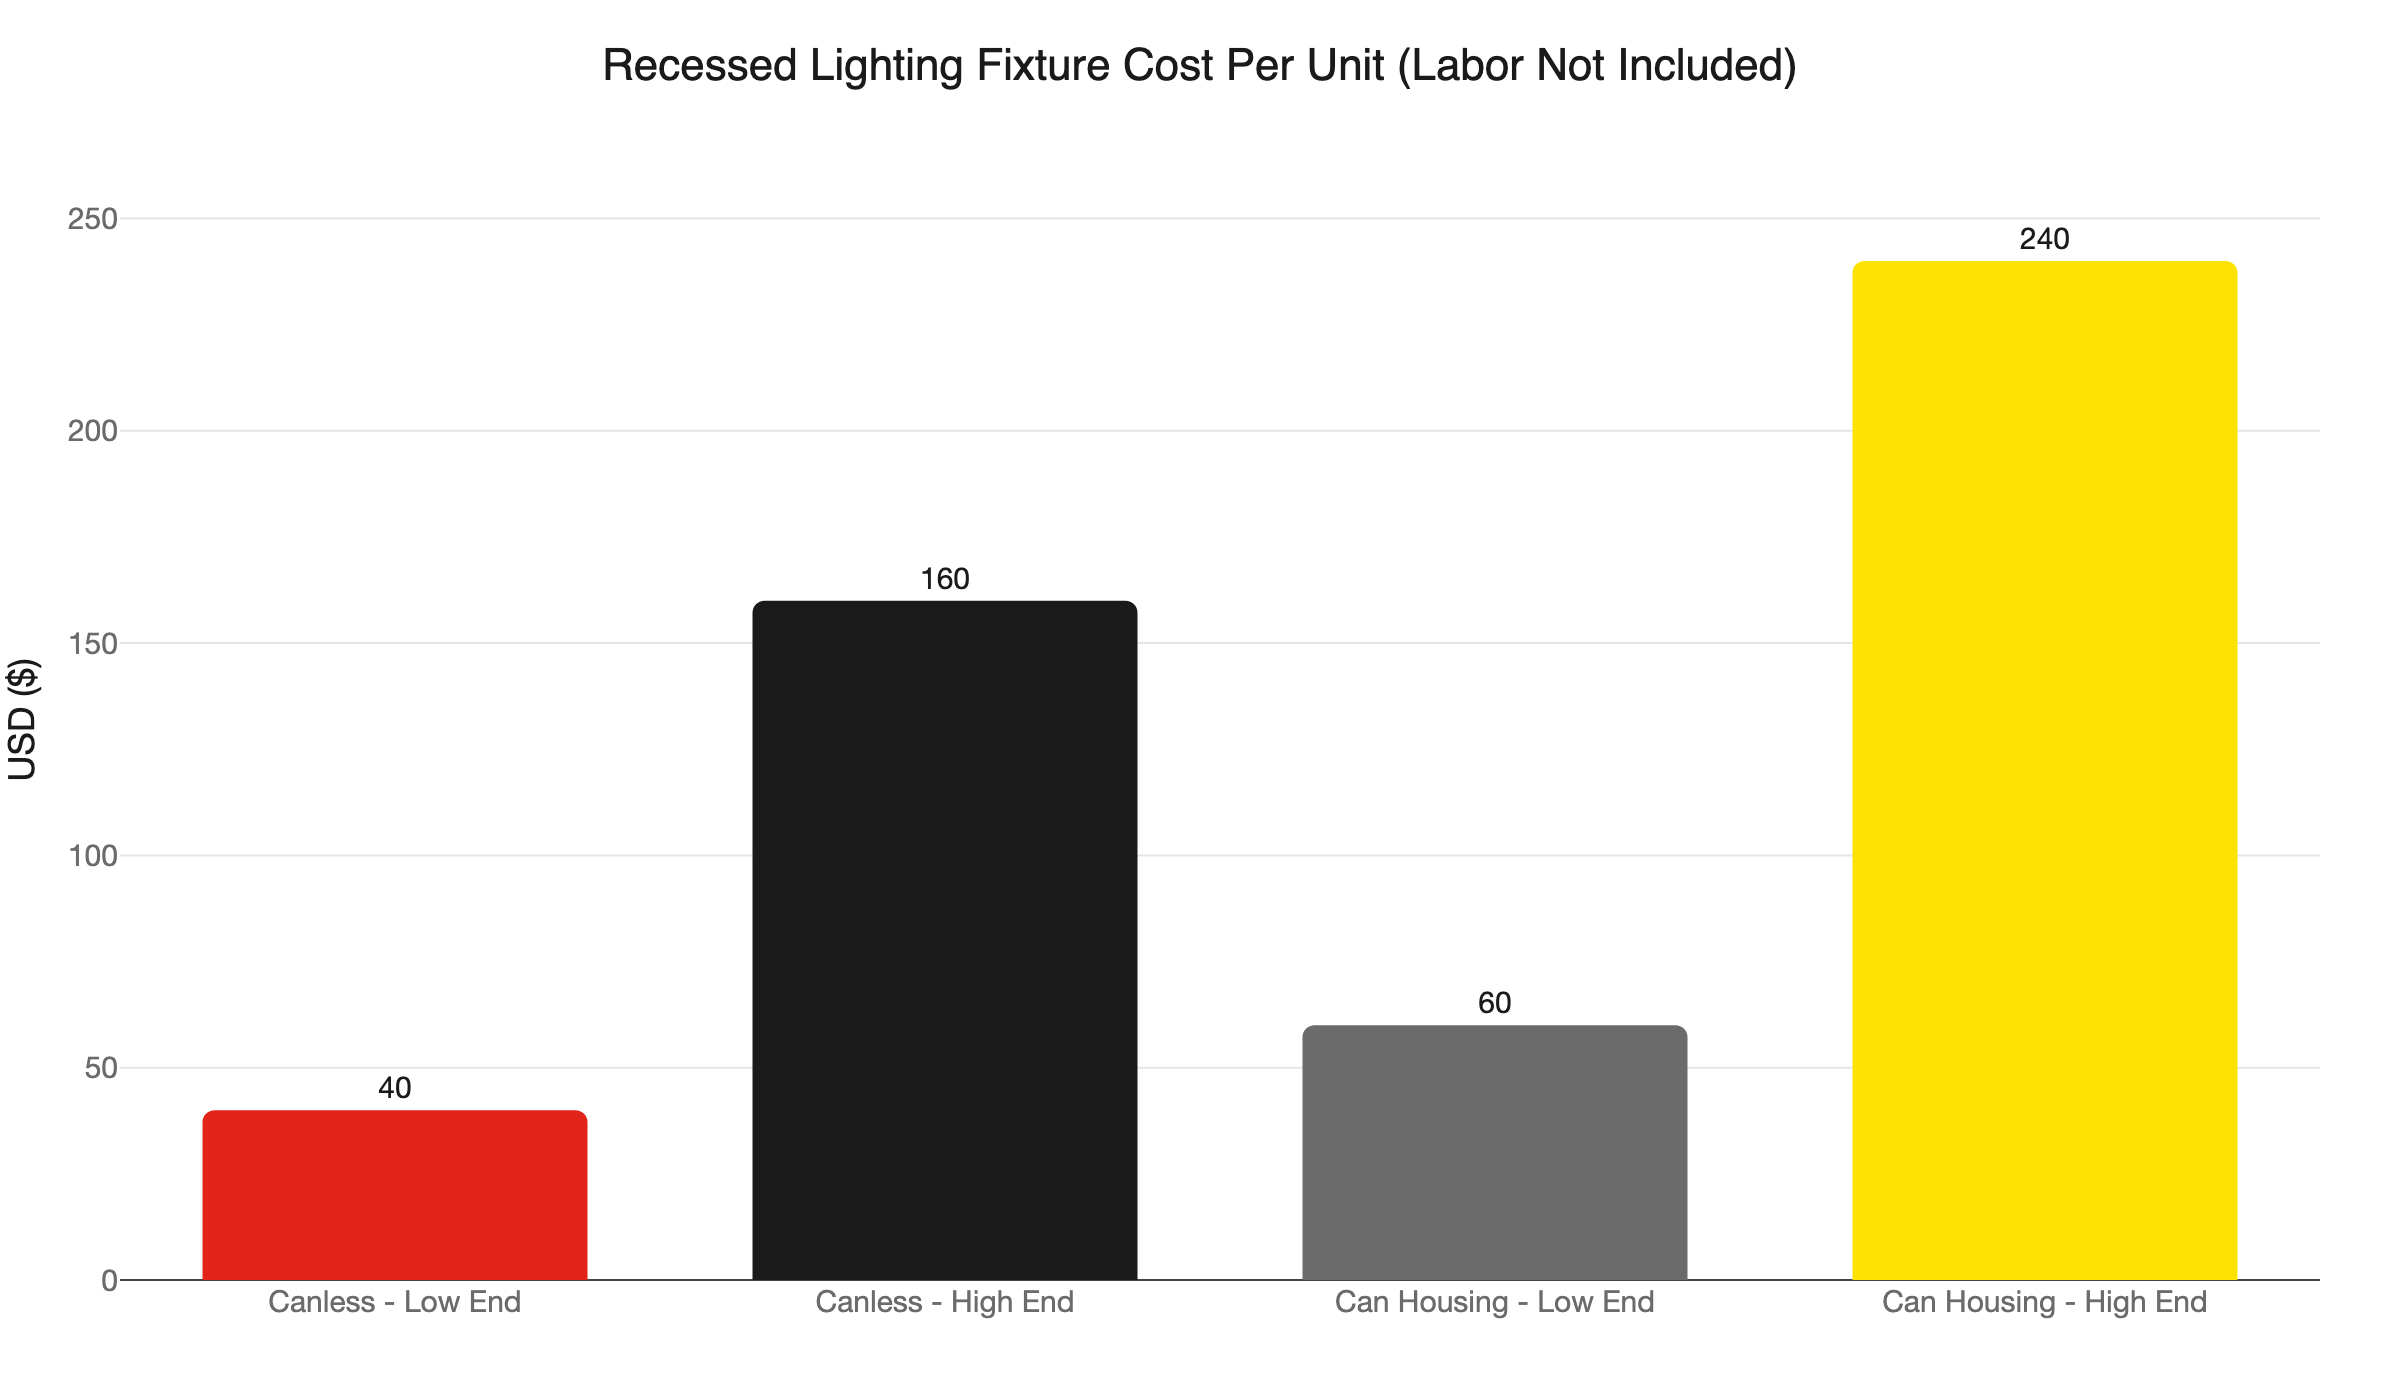
- Fixture costs run $40 to $160 for canless LED panels and $60 to $240 for traditional can housing setups. Labor runs $85 to $105 per hour.
What Is Recessed Lighting Installation?
Recessed lighting installation means mounting light fixtures flush inside the ceiling cavity. Only the trim ring shows below the drywall. The housing sits above the ceiling plane and gets wired to a circuit before the ceiling closes. The result is a clean, modern look with even light across the room.
Each recessed fixture has three parts: a housing inside the ceiling, a trim ring at the opening, and either a separate bulb or an integrated LED panel. There are two main housing types: traditional cans and canless LED panels. The choice between them shapes every other decision on the project, including code compliance.
Most national guides treat recessed lighting as a straightforward upgrade. In Minnesota, there are two specific requirements that most how-to content skips. Getting them right protects your home and avoids problems at resale inspection.
Can vs. Canless: Which Type Should You Choose?
For most Minnesota homes with insulated ceilings, canless LED panels are the better default. They are naturally airtight, ICAT-compliant by design, and need as little as 2 inches of ceiling depth. Traditional cans offer more flexibility on trim and bulb swaps but require more ceiling depth and raise code compliance questions.
Traditional can fixtures
A traditional can has a cylindrical metal housing, a trim kit, and a separate bulb. You can swap the trim style or bulb type without touching the housing. That flexibility matters for accent lighting where you might want to change beam angles later.
The trade-off is depth. Traditional cans need at least 6 inches of ceiling space above the dryline. They also require access from above. In a finished room without attic access, installation means cutting in from below with a retrofit kit or working from above during a remodel with an open ceiling.
LEDVANCE notes that retrofit can kits are the easier path in remodels where existing wired boxes are already in place. For new installations in insulated ceilings, ICAT compliance complicates the choice.
Canless LED panels
A canless fixture is a slim LED panel with a built-in driver and a gasketed edge. It clips into a ceiling cutout. The gasket forms an airtight seal against the drywall. That seal is exactly what Minnesota’s energy code requires, making canless the natural ICAT choice for most Twin Cities homes.
The trade-off: when the LED fails, you replace the whole fixture. The bulb and driver are integrated. At a rated lifespan of 25,000 to 50,000 hours, that is 15 to 25 years of typical home use. Most homeowners will never replace one during ownership.
Canless fixtures need as little as 2 inches of ceiling depth. That makes them the right call for finished ceilings with limited space and no attic access, which covers most Twin Cities remodel projects.
Which is right for your situation
- New construction or open ceiling: Either type works. Traditional cans give you more long-term trim flexibility.
- Finished ceiling, no attic access: Canless. Less depth required, easier to install from below.
- Insulated ceiling in an existing home: Canless by default. Naturally airtight and ICAT-compliant from the factory.
- Matching existing can trim: A retrofit can kit works, but confirm ICAT compliance before ordering.
What Does IC-Rated Mean, and Why Is IC Alone Not Enough in Minnesota?
IC stands for insulation contact. An IC-rated fixture can physically touch insulation without becoming a fire hazard. But IC alone says nothing about air leakage. Minnesota code requires ICAT: IC-rated AND airtight, with air leakage no more than 2.0 cfm at 75 pascals per ASTM E283. An IC label on the box is not the same as ICAT.
This is the detail most national buying guides and local competitors skip. Homeowners who buy IC fixtures expecting code compliance are in for a failed inspection.
Why air sealing matters in a Minnesota attic
Older recessed lights were designed for incandescent bulbs, which run hot. The housings have intentional vent holes to dump heat into the attic. In a Minnesota attic with R-49 to R-60 insulation, those holes act like small chimneys. Warm, conditioned air rises through the fixture and out.
Minnesota sits in Climate Zone 6 and 7, requiring the highest residential insulation levels. Every non-ICAT fixture punches a gap in that insulation barrier. The Pacific Northwest National Laboratory Building America Solution Center confirms that the junction between the housing and the ceiling covering must be sealed with a gasket or caulk. That is an air-sealing requirement, not just an insulation contact rule.
What Minnesota code actually says
Minnesota’s 2020 Residential Code, Section N1102.4.5, requires every recessed luminaire in the building thermal envelope to be ICAT: IC-rated and airtight, with air leakage no more than 2.0 cfm at 75 pascals, tested per ASTM E283.
IC alone does not satisfy this requirement. The fixture must carry both certifications.
What to do with existing non-ICAT cans
If your home has older recessed lights in an insulated ceiling, you have two options. Build a fire-rated drywall enclosure around each housing with at least 3 inches of clearance, then insulate over the box. Or replace the fixtures with ICAT-compliant units.
Building America’s resource guide covers both approaches. Fixture replacement is almost always faster and less expensive than building enclosures.
The NEC 410.116 clearance standard for non-IC fixtures requires at least a half inch from combustibles and 3 inches from insulation on all sides. That leaves roughly one square foot of uninsulated ceiling around every non-IC fixture. In a properly insulated MN attic, each of those gaps is a direct heat-loss point.
If lights in that area have been flickering or behaving strangely after insulation work, heat-related stress on non-ICAT fixtures is a likely cause. Our post on why your lights might be flickering walks through the most common culprits.
How Do You Space Recessed Lights Correctly?
Divide your ceiling height by two. That number is the spacing in feet between fixtures. An 8-foot ceiling gets lights 4 feet apart. A 9-foot ceiling gets 4.5 feet. Place the first row 2 to 3 feet from the wall. Never let any two fixtures run more than 6 feet apart, or dark patches will appear between them.
The formula comes from Eaton’s spacing guide for recessed LED lighting and works for general-purpose ambient lighting in most residential rooms.
Fixture size and coverage area
Diameter determines coverage zone. A 4-inch fixture covers roughly 25 square feet. A 6-inch fixture covers roughly 36 square feet. Use those numbers to estimate how many fixtures a room needs before cutting any holes.
Example: 12 by 16 foot living room with 9-foot ceilings.
- Spacing: 9 divided by 2 = 4.5 feet between fixtures.
- First row: 2 to 3 feet from each wall.
- 6-inch fixtures at 36 sq ft each: 5 to 6 fixtures for even coverage across the room.
Avoiding scallop shadows
A fixture placed too close to a wall angles its beam steeply and creates a scallop shadow on the surface. Keeping the first fixture 2 to 3 feet out lets the beam wash the wall evenly instead.
For accent lighting or an art wall, a dedicated wall-wash fixture is a better tool than a standard downlight positioned close in. Our team plans the layout before cutting anything. See our indoor lighting services for layout planning on both general and accent applications.
Common layout mistakes
- Placing the first fixture flush to the wall: causes visible scallop shadows.
- Spacing fixtures more than 6 feet apart: creates dark areas in the center of the room.
- Running all fixtures on a single switch with no dimmer: limits control and wastes the investment.
- Cutting holes before checking circuit capacity: sometimes reveals the panel needs a new circuit first.
Do You Need a Permit for Recessed Lighting Installation in Minnesota?
Yes, if the job involves new wiring. Minnesota requires an electrical permit for any work that adds or extends a circuit. Two mandatory inspections follow: rough-in before insulation and drywall close, and a final inspection after the job is complete.
The permit is not just process. It protects you at resale. Unpermitted electrical work flags home inspections and can delay or block a closing.
Who can pull the permit
Minnesota DLI allows homeowners to pull their own permit for a primary residence they personally occupy. Two inspections are still required. For rental properties and investment homes, only a licensed electrician may pull the permit.
What inspectors check at each stage
At rough-in, the inspector checks wire routing, box placement, and circuit capacity before the ceiling is closed. At final, the inspector verifies every fixture is installed per manufacturer instructions and carries a Nationally Recognized Testing Laboratory label.
The City of Rosemount’s electrical guidelines require NRTL labeling (UL, ETL, or CSA) on every installed fixture. Most Twin Cities municipalities follow the same standard. A fixture missing that label will fail final inspection regardless of how cleanly it is wired.
Our team pulls the permit, schedules both inspections, and handles every step. Call 763-200-5956 or book your installation online.
Can You Get a Rebate for LED Recessed Lighting in Minnesota?
Yes. Xcel Energy offers rebates for ENERGY STAR certified LED downlights through October 31, 2026. Invoices must be submitted by November 13. Rebates are capped at 60% of project cost and are first-come, first-served. Products must appear on the DLC Qualified Products list or the ENERGY STAR list.
Full details are at Xcel’s residential home lighting rebates page. Reach Xcel at 800-895-4999 with product qualification questions.
How to capture the full rebate
- Choose ENERGY STAR or DLC-listed canless LED fixtures before ordering.
- Have a licensed electrician install them with permit and inspections included.
- Keep your invoice with fixture model numbers clearly listed.
- Submit the invoice to Xcel by November 13, 2026.
The rebate applies to hardwired downlights only, not plug-in lamps. Xcel cross-references submitted invoices against the approved product list, so model numbers must be exact.
At 60% of project cost, the rebate meaningfully offsets a typical install. A six-fixture project with $1,000 in materials qualifies for up to $600 back. Stack that against labor and permit costs and the net price drops substantially.
What Does Recessed Lighting Installation Cost in the Twin Cities?
Fixture costs run $40 to $160 for canless LED panels and $60 to $240 for a traditional can housing setup. Labor runs $85 to $105 per hour. A typical six-fixture living room install with a new circuit runs $800 to $1,800 before any Xcel rebate.
Cost breakdown based on Aidot’s fixture cost data:
- Canless LED panel (per fixture): $40-$160.
- Traditional can housing plus trim (per fixture): $60-$240.
- Labor: $85-$105 per hour.
- Electrical permit: $50-$150 in most Twin Cities municipalities.
A six-fixture install on a finished ceiling with a new dedicated circuit takes 4 to 6 hours of labor. That puts labor at $340 to $630. Add fixtures and permit and the total before rebate lands at $580 to $1,590.
What drives the cost up or down
- Number of fixtures: More holes, more wire runs, more time.
- Circuit availability: A panel with no open slots requires adding a circuit. That can mean a panel upgrade. Read signs you need an electrical panel upgrade before finalizing a large install.
- Ceiling material: Plaster takes longer to cut cleanly than drywall.
- Attic access: Open attic access makes wire routing significantly faster than fishing through a finished ceiling.
- Dimmer addition: Adding a dimmer or a split switch leg increases labor slightly and is almost always worth the cost in living spaces.
Should You Hire an Electrician for Recessed Lighting Installation?
Replacing a single fixture in an existing wired housing is a reasonable homeowner task. Running new wire, cutting new holes in an insulated ceiling, and pulling a permit is a different scope.
Here is where the line sits:
- DIY-reasonable: Swapping one fixture in an existing, already-wired housing. Changing a trim ring in an existing can.
- Call an electrician: Any new wiring, any new circuit, any ICAT compliance question, any job that requires an electrical permit.
The permit requirement is the clearest signal. Work that requires a permit requires two inspections. Unpermitted work creates problems at resale and can void coverage under some homeowner’s insurance policies.
A licensed electrician handles ICAT compliance, fixture layout, circuit capacity, and the permit process in a single visit. Getting those four things right the first time costs less than fixing a failed inspection or pulling out fixtures for a re-install.
Before opening any panel or cutting any ceiling, read our post on DIY electrical dangers. Wiring mistakes are not always visible and can cause fires years after the job is done.
We are locally owned and operated in the Twin Cities. Our team pulls permits, handles both inspections, and stands behind every job with the UWIN(R) 100% satisfaction guarantee. As America’s On-Time Electrician(R), we show up when we say we will.
Call 763-200-5956 or book your recessed lighting installation online. We serve Minneapolis, St. Paul, Bloomington, Brooklyn Park, Woodbury, Blaine, Maple Grove, Plymouth, and the surrounding Twin Cities area.
Frequently Asked Questions
Do I need a permit for recessed lighting installation in Minnesota? +
What is the difference between IC-rated and ICAT recessed lights? +
How far apart should recessed lights be spaced? +
Are canless LED fixtures ICAT compliant? +
Need an electrician now?