
How to Run Electricity to a Shed: Twin Cities Guide
Key Takeaways
- Minnesota electrical permits are issued by the state Department of Labor and Industry (DLI), not your city or county. Apply online before you dig.
- The NEC minimum burial depth for PVC conduit is 18 inches. In the Twin Cities, that is above the frost line. Bury conduit at least 48 inches.
- Underground wiring is the right call for almost every Twin Cities yard. Overhead spans are vulnerable to ice loading in winter and tree canopy year-round.
- A detached shed requires its own grounding electrode system: two 8-foot ground rods, at least 6 feet apart, at the building.
- The trench must be open for a DLI inspection before you backfill. Do not cover it first.
- All 15A and 20A, 125V receptacles in unfinished spaces require GFCI protection.
How to Run Electricity to a Shed in Minnesota
Figuring out how to run electricity to a shed is one of the most common warm-weather projects Twin Cities homeowners tackle. On the surface it looks simple: dig a trench, run some wire, and plug in your shop tools. But if you work from the national code minimums alone, you are setting yourself up for a failed inspection or a frost-heave repair bill within five years.
Minnesota has its own frost line, its own state permit pathway, and its own licensed inspectors. This guide covers what national DIY resources skip: the correct burial depth for our climate, where to actually get the permit, and the grounding requirements that cause the most inspection failures across the metro.
Is Running Electricity to a Shed Underground or Overhead Better?
Short answer: Underground is the right choice for almost every Twin Cities yard. Overhead wiring is allowed under NEC 225, but ice loading during a January storm creates a real failure risk. Underground wiring is more durable, looks cleaner, and can be upgraded without re-trenching.
Overhead wiring does cost less upfront. You skip the trenching and backfill labor. For a very short run with a completely clear, tree-free path, it can be a legitimate option. NEC 225 sets minimum clearance heights for overhead spans: 10 feet over pedestrian areas, 12 feet over residential driveways, and 18 feet over public roads.
The problem is that most Twin Cities lots do not have a clear overhead path. Tree canopy is dense across Minneapolis, St. Paul, Bloomington, Maple Grove, and the suburbs. Branches grow into span wires over several years. When a January ice storm rolls through, ice buildup on the wire or a falling limb can bring the entire span down. That is a power outage, a potential shock hazard, and a repair cost you did not plan for.
Underground eliminates all of that. It also gives you flexibility later. Install 1-inch Schedule 40 PVC conduit now and you can pull larger wire through the same trench if your loads increase. You are not re-trenching if the shop grows. That future-proofing alone is worth the extra digging.
Before you pick up a shovel, map the run and call 811 to have buried utility lines marked. In Minnesota, this is required before any excavation and costs nothing. Utility locators typically come out within three business days.
Why Minnesota’s Frost Line Changes Everything About Burial Depth
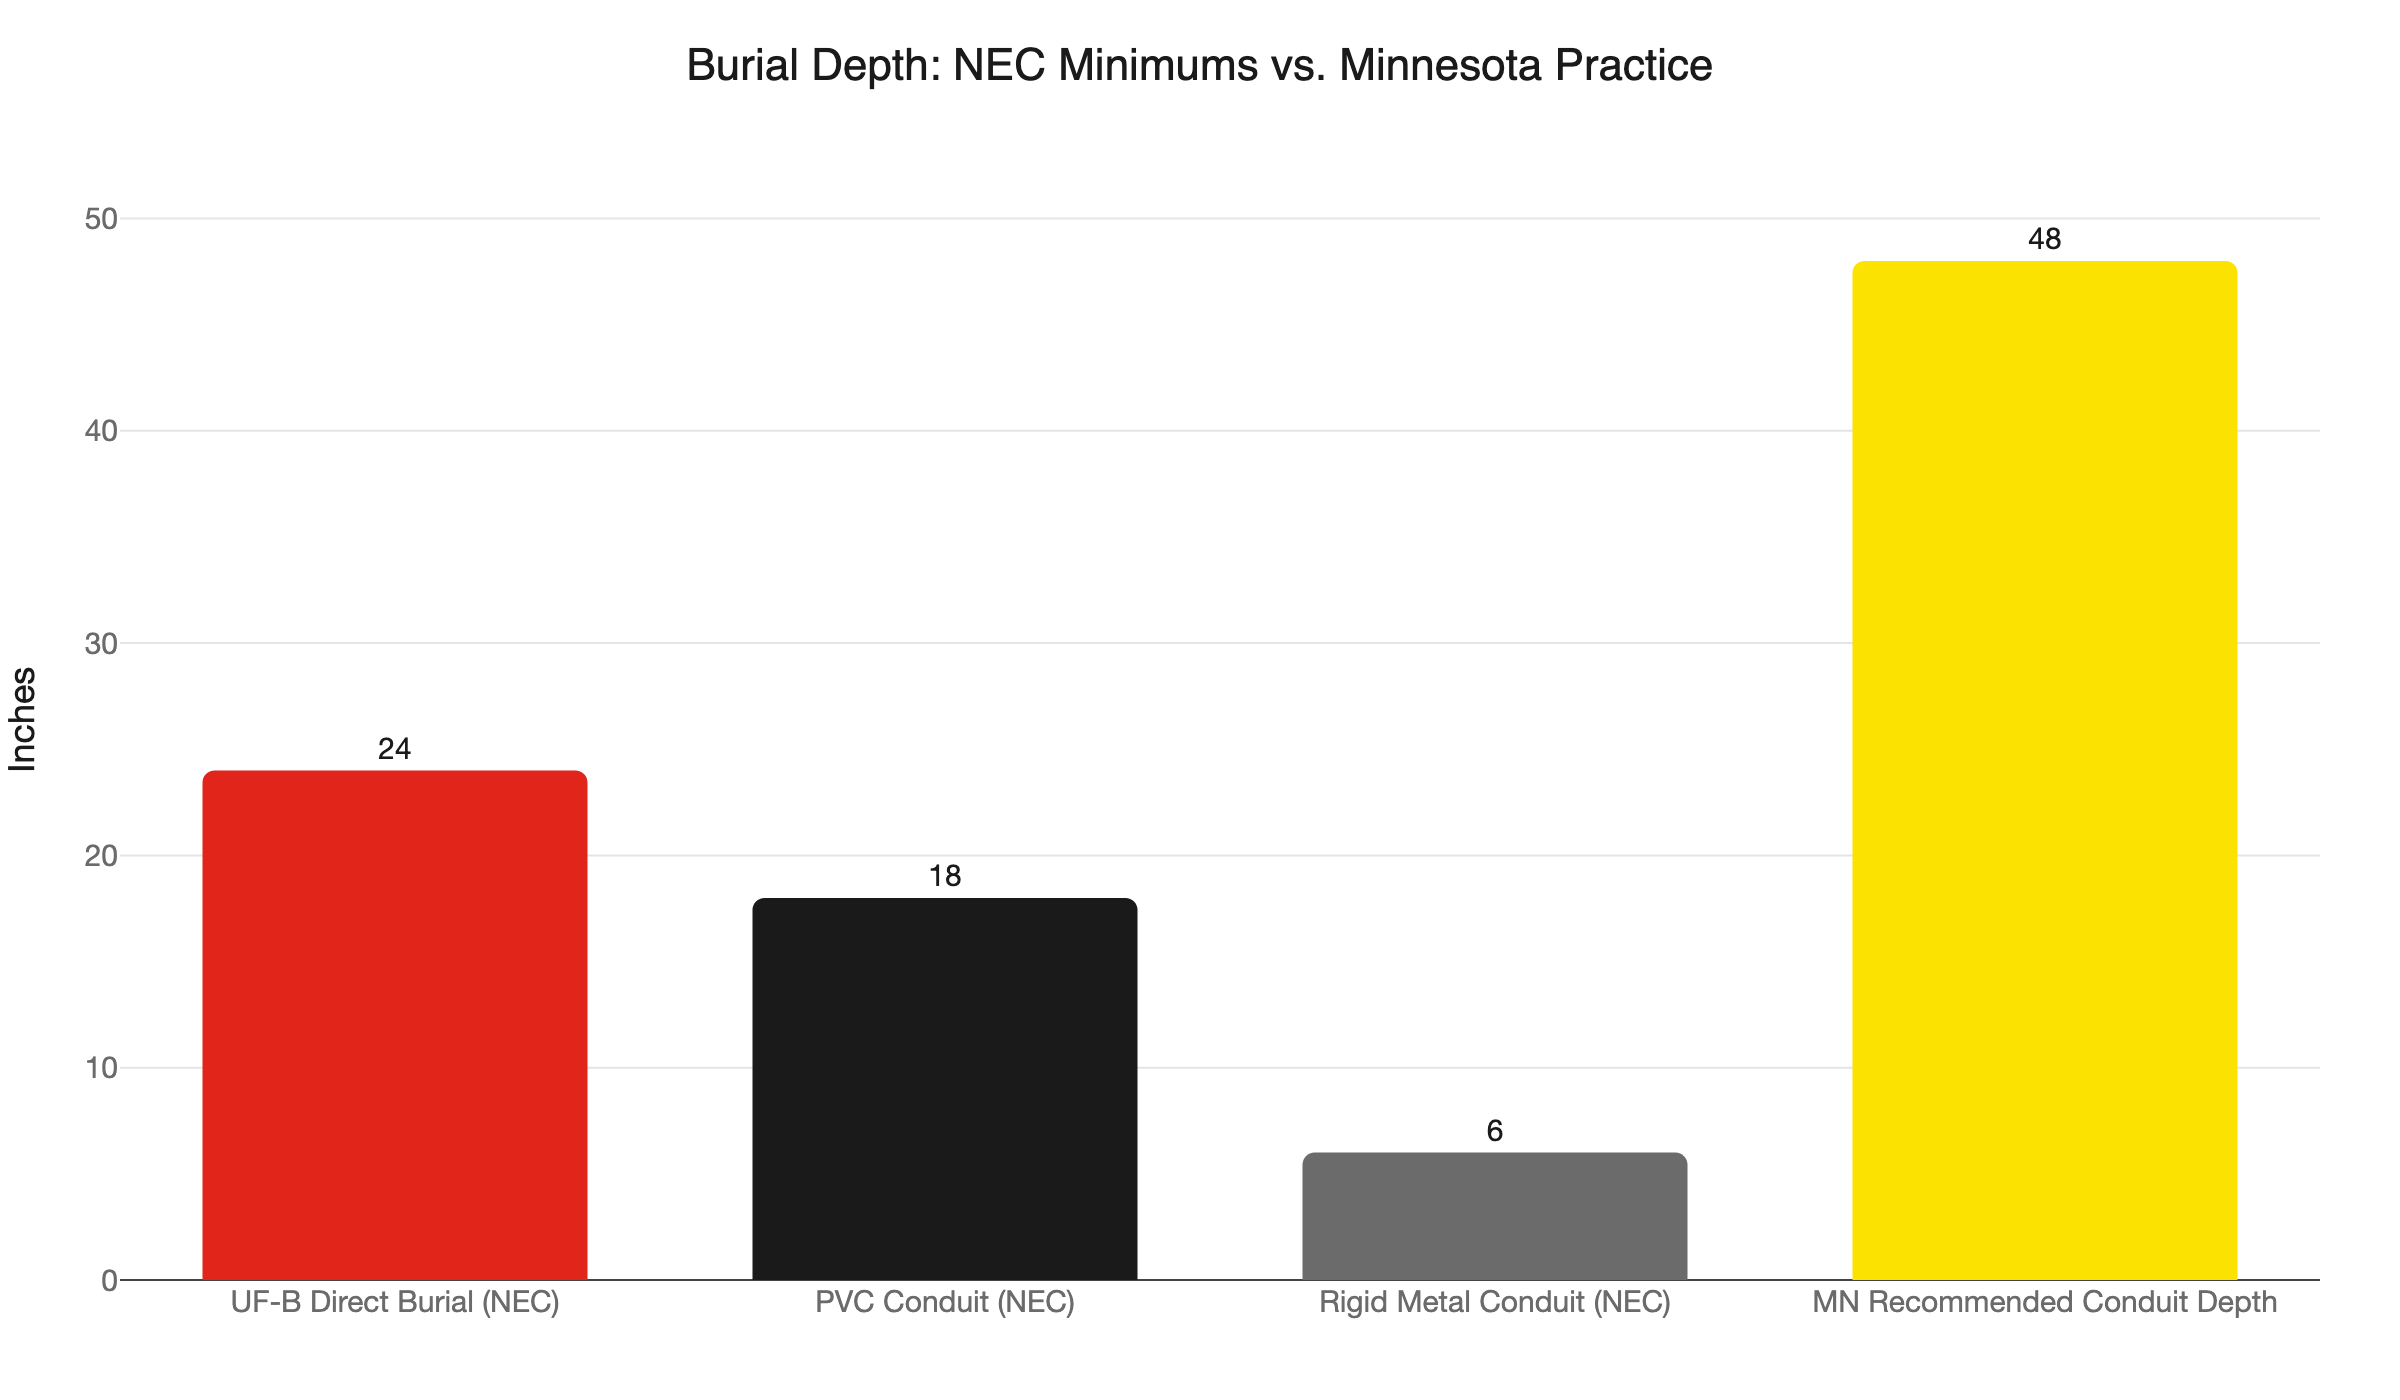
This is the detail that national DIY guides consistently get wrong, and in Minnesota it matters a great deal. The NEC Table 300.5 minimum burial depth for PVC conduit is 18 inches. Eighteen inches sounds adequate if you live somewhere with mild winters. In Minnesota, that depth leaves your conduit squarely in the freeze-thaw zone.
Minnesota’s frost depth is 42 inches minimum across most of the state, and it reaches 54 to 72 inches in northern counties. A conduit buried at 18 inches is well above the frost line in the Twin Cities metro. When the ground freezes and heaves each winter, the conduit shifts. PVC risers crack at bends and transitions. Water infiltrates the run, freezes inside the conduit, and damages the wire. You end up re-trenching, which is the most expensive way to learn this lesson.
The correct local standard in Minnesota is 48 inches minimum for any permanent underground conduit run. That far exceeds the NEC minimum, but it is what experienced Minnesota electricians install to stay below the frost depth and avoid callbacks.
Schedule 40 PVC conduit is the right material for the underground segment. Some homeowners consider direct-burial UF-B cable because the NEC allows it at 24 inches, or as shallow as 12 inches with a GFCI breaker protecting the circuit. Even at 24 inches, UF-B sits well above Minnesota’s frost line. More importantly, direct-burial cable is not upgradeable. If you ever want to add a circuit or pull heavier wire, you dig the whole thing up again. Conduit costs a bit more upfront and is worth every dollar of that difference.
Do You Need a Permit to Run Electricity to a Shed in Minnesota?
Short answer: Yes, always. Minnesota requires an electrical permit for any shed wiring, even when no building permit is required for the shed structure itself. The permit comes from the state, not your city.
This is the single most common source of confusion. Many homeowners call city hall to ask about permits. City hall handles building permits. Electrical permits in Minnesota are issued by the state under Minn. Stat. 326B.36 through the Department of Labor and Industry. These are completely separate processes run by different agencies. Even if your shed does not need a building permit at all, the wiring inside it still requires a state electrical permit.
Apply for the DLI electrical permit online at ims.dli.mn.gov/ims. Create an account, describe the scope of work, and pay the fee. You do not need to visit any office in person. The process is straightforward once you know where to go.
One timing note worth knowing right now: Minnesota adopted the 2026 NEC, effective August 3, 2026. Permits filed before that date fall under the 2023 NEC. Permits filed on or after August 3, 2026 are governed by the 2026 code. For a basic shed circuit, the practical difference is small. But if you are planning this project, note the cutover date.
Our full breakdown of Minnesota’s electrical permit process covers fees, timelines, and what DLI inspectors look for during the review.
Can a Minnesota Homeowner Pull the Permit and Do the Work?
Yes. Minnesota homeowners may perform their own electrical work on their primary residence and its accessory structures. A shed on your property qualifies. You pull the permit in your own name, complete the work, and call for a DLI inspection.
The one rule you cannot bypass: underground wiring must be inspected before backfill. Schedule the inspection before you cover the trench. Leave it open. Backfill only after you have written sign-off from the inspector. Covering the trench before inspection means opening it back up, which no one wants to do.
Before going the DIY route, read through our guide on common DIY electrical dangers so you have a clear picture of where the risk concentrates and when it makes sense to stop and call a licensed electrician.
What Conduit and Wire Do You Need to Run Electricity to a Shed?
Short answer: Schedule 40 PVC conduit underground with THWN-2 wire pulled through it. Size the wire to your anticipated load. Land the feed on a main-breaker sub-panel at the shed, not a main-lug panel alone.
For a shed with basic lighting and a handful of 20A outlets, a 60-amp feed on #6 AWG copper handles typical workshop loads with room to spare. If you plan to run a welder, large air compressor, or any high-draw equipment simultaneously, size up. A 100-amp feed on #2 AWG copper gives you substantial headroom and adds little to the trench cost.
The conduit sizing matters as much as the wire. Use at least 3/4-inch PVC for the underground run. One-inch is better. Pulling additional wire through a 1-inch conduit five years from now is easy. Pulling it through a run that is already at fill capacity is not. This is the one part of the project where bigger upfront pays off most clearly.
Inside the shed, standard NM-B cable works fine if the walls are finished and the wiring is protected. In an unfinished or open-stud shed, the code requires wiring to be protected from physical damage. Use THWN-2 in conduit or metal-clad cable for any exposed runs.
If your main house panel is already near capacity, address that first. Adding a meaningful feeder to an overloaded panel is not a solution - it shifts the problem rather than solving it. Our guide on signs you need an electrical panel upgrade is a good diagnostic starting point before you plan the shed circuit.
How Deep Does Conduit Need to Be When Running Electricity to a Shed?
Short answer: Forty-eight inches minimum in the Twin Cities metro. The NEC minimum for PVC conduit is 18 inches, but that is above Minnesota’s frost line. Forty-eight inches is the local standard that prevents frost heave from cracking or shifting the run.
The chart below shows how far local practice diverges from the NEC table minimums across the common installation methods.
[CHART: shed-burial-depth]
If the conduit run crosses a driveway or any area where vehicles travel, add 6 additional inches of depth, per NEC Table 300.5. Vehicle loading on shallow conduit is a separate failure mode from frost, and the code requires the extra buffer.
Trench in as straight a line as possible. Where the run must change direction, use sweep elbows rather than sharp 90-degree fittings. Sweeps give you room to pull wire without binding and accumulate less moisture at the bend. Plan the route before you dig and avoid areas with tree roots when you can - roots find conduit over time and can crush PVC.
What Are the Grounding Requirements for a Detached Shed?
Short answer: NEC 250.32 requires a separate grounding electrode system at the shed: two 8-foot ground rods driven at least 6 feet apart. The neutral and ground buses must be isolated in the sub-panel. This is the most common inspection failure on outbuilding wiring, and it is easy to understand why once you see the logic.
In your main house panel, the neutral bus and the ground bus are bonded together at one point. That is code-compliant because there is only one neutral-to-ground connection in the system. In a detached building sub-panel, you must not bond them. If you do, you create a second neutral-to-ground connection. Current will flow on the grounding conductor during normal operation - not just during a fault. That is a shock hazard and a code violation.
NEC 250.32 requires two 8-foot copper-clad ground rods driven at least 6 feet apart at the shed. Drive them fully into the earth using a ground rod driver or a hammer drill with a long-barrel attachment. Connect them with a #6 AWG bare copper wire running to the ground bus in the sub-panel. The ground bus in the sub-panel connects to the panel enclosure. The neutral bus sits on isolated standoffs and connects only to the neutral conductors from the feed.
The MN DLI inspection checklist for the 2023 NEC calls out grounding electrode system compliance for detached structures specifically. Inspectors check it on every outbuilding job. Getting it right before the inspector arrives saves a re-inspection fee and a delay.
For a deeper look at sub-panel sizing, feeder design, and the full wiring sequence for a detached building, our guide on detached garage subpanel installation covers each step in detail.
What Does the Shed Wiring Inspection Cover?
Short answer: The inspector checks burial depth with the trench open, conduit connections, panel installation, the grounding electrode system, neutral-ground separation in the sub-panel, GFCI protection on receptacles, and the disconnect requirement at the building.
Two code requirements catch people off guard most often:
GFCI protection. NEC 210.8 requires GFCI protection on all 15A and 20A, 125V receptacles in unfinished spaces. Most sheds qualify as unfinished. You satisfy this requirement with GFCI breakers in the sub-panel or with GFCI outlets at each receptacle location. GFCI breakers in the panel protect the entire circuit from the source, including any wire between the panel and the first outlet box. That is usually the cleaner approach for a new shed installation. Our explainer on GFCI outlet requirements covers both methods and when each is the better fit.
Disconnect at the building. NEC 225.31 requires a disconnect means at or near the feeder entrance to the detached building. A main-lug-only panel does not satisfy this by itself. You need either a main-breaker panel, which includes the disconnect built in, or a separate disconnect switch installed before the panel. Most electricians install a main-breaker sub-panel because it covers both the panel and disconnect requirements in one unit and avoids adding a separate enclosure to the wall.
Call DLI to schedule the inspection before you backfill. Once the inspector signs off on the underground portion, you can cover the trench and finish the remaining above-ground work.
When Should You Hire a Licensed Electrician Instead of DIYing?
Consider hiring a licensed electrician if any of these situations apply:
- Your main house panel is full, outdated, or has a brand flagged as a safety concern. Running a feeder from a compromised panel makes the shed project harder, not simpler.
- The run is longer than 100 feet and you are not confident calculating wire gauge to account for voltage drop over distance.
- The shed will carry high-draw loads: a welder, large air compressor, kiln, or Level 2 EV charger.
- You have not previously worked inside a live panel or installed a grounding electrode system.
- You want the permit coordinated, the inspection scheduled, and the job done on a fixed timeline without back-and-forth.
Northern Mister Sparky is locally owned and operated in the Twin Cities. We handle the permit pull, the trench coordination, the sub-panel installation, and the inspection scheduling. As America’s On-Time Electrician(R), we show up when we say we will. Every job is backed by the UWIN(R) 100% satisfaction guarantee. No malarky.
If you are also thinking about running a 240V circuit for an EV charger in the shed, ask about our EV charger installation service at the same time. Adding that circuit while the trench is already open costs a fraction of what a second mobilization and separate trench dig would run.
Ready to Power Your Shed?
Running electricity to a shed in the Twin Cities is a manageable project when you know what is actually required here. Get the DLI permit first. Trench at 48 inches. Install two ground rods at the building. Keep the trench open for inspection. Use a main-breaker panel with GFCI protection on every receptacle.
If you want it done right without the permit paperwork and inspection scheduling, we are a call or click away. Reach Northern Mister Sparky at 763-200-5956 or book online to put your shed wiring project on the schedule.
Frequently Asked Questions
Do I need a permit to wire a shed in Minnesota? +
How deep does electrical conduit need to be buried in the Twin Cities? +
Can a Minnesota homeowner wire their own shed? +
What grounding is required for a shed subpanel? +
Need an electrician now?